Paws for Comfort
Paw Prints is the ultimate tribute to our favorite four-legged friends, a whimsical glimpse into the universe of cats and dogs in cheerful shades of red and blue with accents of chartreuse and nature-inspired neutrals. With this tutorial, you can make a quilt, treat bag, leash, bed, jacket and collar for your favorite furry friend. Whether you want to learn how to make a dog collar, a comfy DIY dog bed, or cute accessories for a stuffed animal, these adorable projects are perfect for animal lovers.
 Quilt
Quilt
Wooftastic Collar
Best Friend Leash
Treats, Please! Dog Bag
Barksalot Dog Jacket
Pooch Pillow Dog Bed
Quilt
Materials
- FreeSpirit Paw Prints by Kathy Davis fabric:
(A) ½ yard (45.7cm) PWKD075.BLUE
(B) ½ yard (45.7cm) PWKD072.WHITE
(C) ¼ yard (22.86cm) PWKD071.TAN
(D) ¼ yard (22.86cm) PWKD079.BLUE
(E) 3/8 yards (34.3cm) PWKD074.BLUEX
(F) 3/8 yards (34.3cm) PWKD077.BLUEX
(G) ½ yard (45.7cm) PWKD076.BLUE
(H) ½ yard (45.7cm) PWKD073.WHITE
(I) ½ yard (45.7cm) PWKD073.BLUE
(J) 5/8 yard (57.2cm) PWKD076.RED
(K) 3 yards (2.7m) PWKD077.RED
- Coordinating Coats & Clark Dual Duty XP® all-purpose thread
Cutting:
A PWKD075.BLUE Fussy cut:
5 – 4 ½” (11.4cm) squares
3 – 6 ½” (16.5cm) squares
B PWKD072.WHITE Fussy cut:
5 – 4 ½” (11.4cm) squares
3 – 6 ½” (16.5cm) squares
C PWKD071.TAN
(5) 6 ½” (16.5cm) squares
D PWKD079.BLUE
(5) 6 ½” (16.5cm) squares
E PWKD074.BLUEX
(7) 6 ½ ” (16.5cm) squares
F PWKD077.BLUEX
(7) 6 ½” (16.5cm) squares
G PWKD076.BLUE
(6) 7” (17.8cm) squares
H PWKD073.WHITE
(6) 7”(17.8cm) squares
I PWKD073.BLUE
(14) 7” (17.8cm) squares
J PWKD076.RED
(14) 7” (17.8cm) squares
(20) 1 ½” x 4 ½” (3.8 x 11.4cm) strips
(20) 1 ½” x 6 ½” (3.8 x 16.5cm) strips
2 ¼” (5.7cm) strips for binding
K PWKD077.RED
(2) 1½ yard (1.4m) pieces for backing
Instructions
Make half square triangles:
- With right sides of I and J together, mark a line diagonally from one corner to another. Sew ¼” (.64cm) down each side of the line. Cut on the line. Set the seam and iron open. Trim to a 6 ½” (16.5cm) square with the seam as the center diagonal line of the square. The 14 squares of I and J will make (28) 6 ½”x 6 ½” (16.5 x 16.5cm) half square triangles.


- Do the same with G and H. The 12 squares of G and H will make (24) 6 ½”x 6 ½” half square triangles.
- Sew a 1 ½ x 4 ½” (3.8 x 11.4cm) strip of J on opposite sides of the 4 ½” (11.4cm) squares of A and B. Press open. Sew a 1½” x 6½” (3.8 x 16.5cm) strip of J along the top and bottom of the A and B squares. Press open.
- Following diagram, sew squares together, row by row. Sew rows together.

- Square quilt. Sandwich and quilt as desired. Bind with J.
Wooftastic Collar
Materials
- 1/8 yard (11.4cm) PWKD076 RED
- 1/8 yard (11.4cm) PWKD076 LIME
- 1” (2.54cm) parachute buckle
- 1” (2.54cm) strap adjuster
- 1-1/4” (3.2cm) metal d-ring
- 2/3 yard (60.4cm) 1” (2.54cm) strapping
Cutting
From each fabric cut one 2-1/4”x 21” strip.
Instructions
Note: ¼” (.64cm) seam allowance unless otherwise noted.
- Match the two strips on the long edge along one long edge. Sew seam on this edge. Press open seam allowance.
- Press one long, raw edge toward the previously sewn seam, wrong sides together. Repeat on other long edge. Fold the strip in half lengthwise so all the long raw edges are in the center. This will give you a 1” (2.54cm) wide strip resembling double-fold bias tape. Press well.
- Open strip and fold in half, right sides together, so the raw edges pressed into the middle are visible. Stitch across one short end. Trim seam allowance. Repeat on other side. Turn strap right side out and press. All raw edges are now inside the strap.
- Fold one short end 3” (7.6cm) toward the LIME side and press well. Fold the opposite short end 2” (5.08cm) toward the LIME side and press well.
- Feed the 3” (7.6cm) pressed side of the collar through one D ring (domed side up) and then through the female end of the parachute buckle. Move the D ring toward the center of the collar so you can stitch through the collar close to the buckle.
- Slide the D ring close to the line of stitches you just made. Sew a parallel row of straight stitches on the other side of the D ring.
- Sew a box stitch to secure the short edge of the collar.
- Feed the other end of the collar through the strap adjuster, using the outermost bars (leave the center bar free for now). Keep a loop of collar fabric about 2” (5.08cm) above the adjuster.
- Feed the end through the male portion of the parachute buckle, making sure it is right side up and clicks into the other end.
- Insert the end of the collar strap up through the bottom of the strap adjuster, then feed the end back down until the fold you pressed is against the center bar. Sew a 1” (2.54cm) box stitch to secure the end of the collar. Adjust to desired collar size.

Best Friend Leash
Materials
- 1/8 yard (11.4cm) PWKD076 RED
- 1/8 yard (11.4cm) PWKD076 LIME
- 1-1/4” (3.2cm) swivel latch
- 1-2/3 (151.8cm) yard 1” (2.54cm) strapping
Cutting
From the two fabrics cut two (2) 2-1/4”x WOF (5.7cm x WOF) strips. Trim selvedges.
Instructions
Note: ¼” (.64cm) seam allowance unless otherwise noted.
- Match up one RED strip with one LIME strip and sew together the short ends, right sides together. Repeat with other RED and LIME strips.
- Match the two joined strips on the long edges so the colors are reversed (RED to LIME, LIME to RED). Sew along one long edge. Press open seam allowance.
- Press one long, raw edge toward the previously sewn seam, wrong sides together. Repeat on other long edge. Fold the strip in half lengthwise so all the long raw edges are in the center. This will give you a 1” (2.54cm) wide strip resembling double-fold bias tape. Press well.
- Open strip and fold in half, right sides together, so the raw edges pressed into the middle are visible. Stitch across one short end. Trim seam allowance. Repeat on other side. Turn strap right side out and press. All raw edges are now inside the strap.
- Press the LIME short edge 2” (5.08cm) toward the RED. Slip the swivel latch through and stitch straight across the lease, close to the hardware. Sew a box stitch to secure the short end to the leash.
- To make the leash handle, press the RED short edge 10” (25.4cm) toward the LIME. Secure with a box stitch.
Treats, Please! Dog Bag
Materials
- 1 Fat Quarter PWKD077 BLUE
- 1/8 yd (11.4cm) PWKD076 RED
- 1 yard (91.4cm) narrow cording
- 1 cord jump
- 1/6 yard (15.2cm) Décor Bond
Cutting
- Cut two of pattern piece from fabric for exterior
- Cut two of pattern piece from fabric for lining
- Cut two of pattern piece from interfacing
- 2” x 10” (5.08 x 25.4cm) strip of PWKD076 RED
Instructions
Note: ¼” (.64cm) seam allowance unless otherwise noted.
- Fuse interfacing to two exterior pieces of fabric.
- Make buttonhole on one exterior piece as indicated on pattern piece.
- Match interfaced pieces, right sides together. Pin and sew sides and bottom but not top edge or notched corners. Press seam allowances to one side.
- Open treat bag exterior and form into a bag shape by flattening bottom and pushing side seams down to match the centered bottom seam. Pin and sew across the open edges.
- Turn bag exterior right side out and place it inside the bag lining, matching the top (raw) edges. Pin and sew.
- Turn bag right side out through gap left in lining. Press well.
- Sew two rows of stitches through all layers as shown on pattern.
- Press RED strip in half, right sides together, to make a 1” x 10” (2.54 x 25.4cm) strip. Open and press long edges toward middle. Edge stitch both long edges.
- Press one raw edge ½” (1.27cm) toward middle of strip. Fold down other short edge to meet it. Press well.
- Place folded strip loop in the center back of the treat bag with the bottom edge 2-1/4” (5.7cm) down from the top edge of the bag. Sew through all layers with a box stitch, catching all raw edges in your stitches.
- Use a safety pin or bodkin to feed cording through the buttonhole and casing. Insert ends through cord stop. Sew closed gap in lining. Attach carabiner to hanging loop on the back.
Barksalot Dog Jacket
Materials
- 5/8 yard (57.2cm) PWKD078 LIME (exterior)
- ½ yard (45.7cm) PWKD077 LIME (lining)
- 1/3 yard (30.2cm) PWKD076 BLUE (contrast stripe and binding)
- ½ yard (45.7cm) batting or fusible fleece
- Package of 1” (2.54cm) hook-and-loop tape
Cutting
- Cut one each of the pattern piece from the PWKD078 LIME, PWKD077 LIME and batting/fusible fleece.
- Cut one 3” x 14 ½” (7.6 x 36.8cm) strip from PWKD076 BLUE
- Use the remaining BLUE fabric to make 2 ½ yards (2.3m) of bias binding.
Instructions
- Fold under the long edges of the strip ½” (1.27cm) and press.
- Make a “quilt sandwich,” layering the Lime PWKD078, batting/fleece and LIME PWKD077. Baste around the edge.
- Center the pressed strip on the center back of the “quilt sandwich.” Pin and edgestitch the long edges. Trim if necessary.
- Bind around edge of dog jacket.
- Attach hook-and-loop tape to overlapping “arms” of dog jacket.
Pooch Pillow Dog Bed
Materials
- 1/8 yard (11.4cm) each of:
PWKD076 BLUE
PWKD076 LIME
PWKD076 RED
PWKD077 BLUE
PWKD077 LIME
PWKD077 RED - 5/8 yard (57.2cm) PWKD079 TAN
- 5/8 yard (57.2cm) PWKD075 LIME
- 5/8 yard (57.2cm) batting or fusible fleece
- 5/8 yard (57.2cm) muslin
- 5/8 yard (57.2cm) Décor Bond
- 22” (55.9cm) polyester zipper
- Twin size egg crate mattress pad
Cutting
- From the 1/8 yard (11.4cm) fabrics cut one 2-3/4” x WOF (7cm x WOF) strips from each. Trim selvedges and cut in
- half (21”).
- From PWKD079 TAN, cut three strips measuring 21”x 5” (53.3 x 12.7cm).
- Cut one- 20 ½” x 40” (52 x 101.6cm) from PWKD075 LIME
- Cut one- 20 ½” x 40” (52 x 101.6cm) piece of Décor Bond
Instructions
Note: ¼” (.64cm) seam allowance unless otherwise noted
- Group the 2-3/4” (7cm) strips into four sets of RED, LIME and BLUE. Arrange with one large tan strip in between the groups. See Figure 1.

- Sew the strips together along the long edges, pressing seam allowances to one side.
- Sandwich pieced top, batting and muslin and quilt as desired. Trim to 20 ½ ” x 40” (52 x 01.6cm).
- Fuse Décor Bond to wrong side of PWKD075 LIME.
- Open zipper and press flat. Center the short edge of the dog bed to over the zipper, matching the raw edge to the edge of the zipper tape with the zipper completely hidden by the top. Sew close to the zipper teeth. Press dog bed top away from the zipper.
- Repeat on other side of zipper with interfaced PWKD075 LIME.
- Match three raw edges of dog bed top with dog bed bottom, right sides together. Sew long edges first. Open zipper, then sew closed remaining edge. Clip corners, then turn right side out through zippered opening.
- Cut egg crate mattress pad to fit dog bed. Insert through zipper, then close and put in Fido’s favorite spot.
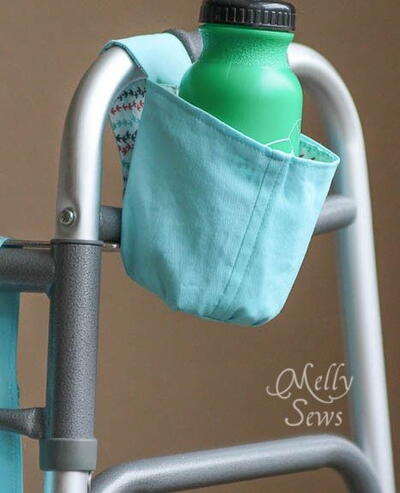
Read NextPortable Hanging Cup Holder