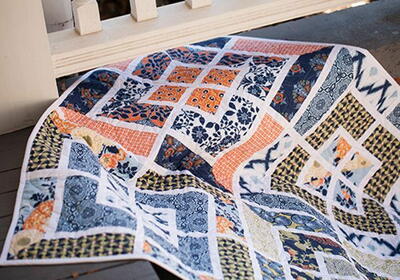
Botanique Quilt (Free Pattern)
Welcome couture décor. This chateau-inspired collection of elegant lifestyle fabrics brings a fantastic flavor of French florals, crisp geometrics and an ethnic Ikat into harmony. The Botanique Quilt combines these vibrant fabrics as fresh interpretation for your couture decor.

Materials
- 2/3 (.61m) of the following FreeSpirit Botanique by Joel Dewberry fabrics:
A (#JD079-ASPAR)
B (#JD079-DEEPW)
C (#JD080-DEEPW)
D (#JD081-ASPAR)
E (#JD082-ASPAR)
(8) 3-1/2” x 11“ (8.89cm x 27.94cm)
F (#JD083-DEEPW) (8) 3-1/2” x 7-1/2“ (8.89cm x 19.05cm)
G (#JD084-DEEPW) (8) 3-1/2” x 3-1/2“ (8.89cm x 8.89cm)
H (#JD085-APRIC)
I (#JD086-APRIC)
J (#JD087-ASPAR)
K (#JD087-DEEPW)
L (#JD088-TEALX)
- (8) 2-1/2” x WOF (6.35cm x WOF)
- 3-1/8 (2.9m) M (white solid) (12) 1-1/4“ x WOF (3.18cm x WOF)
- (136) 1-1/4” x 11“ (3.18cm x 27.94cm)
- (96) 1-1/4” x 7-1/2“ (3.18cm x 19.05cm)
- 5-1/2 (5m) Backing Fabric (2) 98” x WOF (250cm x WOF) )
- Misc. Materials 75” x 98” quilt batting (191cm x 250cm)
- Coordinating Coats & Clark Dual Duty XP® all-purpose thread
Cutting
From Fabrics A-L, cut:
- (8) 3-1/2” x 11“ (8.89cm x 27.94cm)
- (8) 3-1/2” x 7-1/2“ (8.89cm x 19.05cm)
- (8) 3-1/2” x 3-1/2“ (8.89cm x 8.89cm)
From Fabric M (white solid), cut:
- (8) 2-1/2” x WOF (6.35cm x WOF)
- (12) 1-1/4“ x WOF (3.18cm x WOF)
- (136) 1-1/4” x 11“ (3.18cm x 27.94cm)
- (96) 1-1/4” x 7-1/2“ (3.18cm x 19.05cm)
Instructions
Note: Seam allowances are 1/4” (.635cm) unless stated otherwise. WOF means Width of Fabric.
- Stitch a 1-1/4” x 11“ (3.18cm x 27.94cm) Fabric M white strip lengthwise to each of the Fabrics A-L print 3-1/2” x 11“ (8.89cm x 27.94cm) strips.

- Stitch a 1-1/4” x 7-1/2“ (3.18cm x 19.05cm) Fabric M white strip lengthwise to each of the Fabrics A-L print 3-1/2” x 7-1/2“ (8.89cm x 19.05cm) strips.

- With left edges aligned, sew a Fabric F 11” (27.94cm) unit, Fabric B 7-1/2” (19.05cm) unit and Fabric K 3-1/2” (8.89cm) square together as shown. Make a total of four sections.

- With right edges aligned, sew a Fabric C 11” (27.94cm) unit, Fabric B 7-1/2” (19.05cm) unit and Fabric K 3-1/2” (8.89cm) square together as shown. Make a total of four sections.

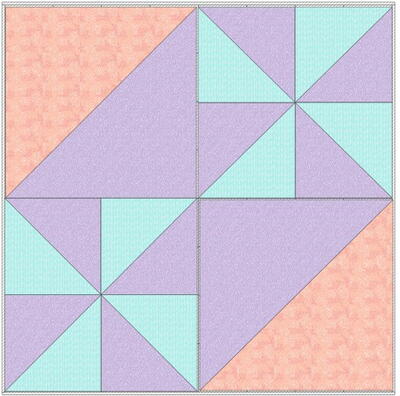
- Lay one of each section right sides together aligning edges. Draw a diagonal line from corner to corner on wrong side of top section as shown. Stitch along marked line. Trim seam allowance to 1/4”. Press block open. Make a total of four Block 1.

- Make four of each of the following blocks in the same manner as Block 1:

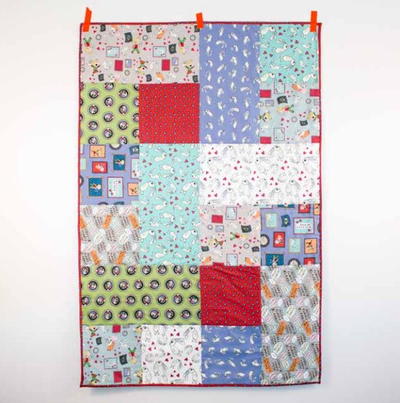
Assembly
- Referring to the color quilt image, arrange blocks in eight rows of six blocks, so they form the larger secondary block design. Place a Fabric M white 1-1/4” x 11“ (3.18cm x 27.94cm) strip between blocks of each row. Sew the strips and blocks into rows.
- Stitch the twelve white Fabric M 1-1/4“ x WOF (3.18cm x WOF) strips together end-to-end. From this, cut seven 67-1/4” (170.82cm) lengths.
- Sew a white Fabric M 67-1/4” (170.82cm) strip to the bottom of the top seven rows of blocks. Sew the rows together.
Finishing
- Sew the two lengths of backing together along selvage edges creating a two-panel wide backing. Layer the backing, batting and quilt top. Quilt or tie as desired.
- Prepare binding from eight 2-1/2” x WOF (6.35cm x WOF) Fabric M white strips. Sew strips together into one long binding strip. Press strip in half lengthwise.
- Carefully trim backing and batting even with quilt top.
- Leaving an 8” (20.32cm) tail of binding, sew binding to top of quilt through all layers matching all raw edges. Miter corners. Stop approximately 12” (30.48cm) from where you started. Lay both loose ends of binding at along quilt edge. Where these two loose ends meet, fold them back on themselves and press to form a crease. Using this crease as your stitching line, sew the two open ends of the binding together right sides together. Trim seam to 1/4” (.64cm) and press open. Finish sewing binding to quilt.
- Turn binding to back of quilt and blind stitch in place.
Read NextCoffee Table Quilt