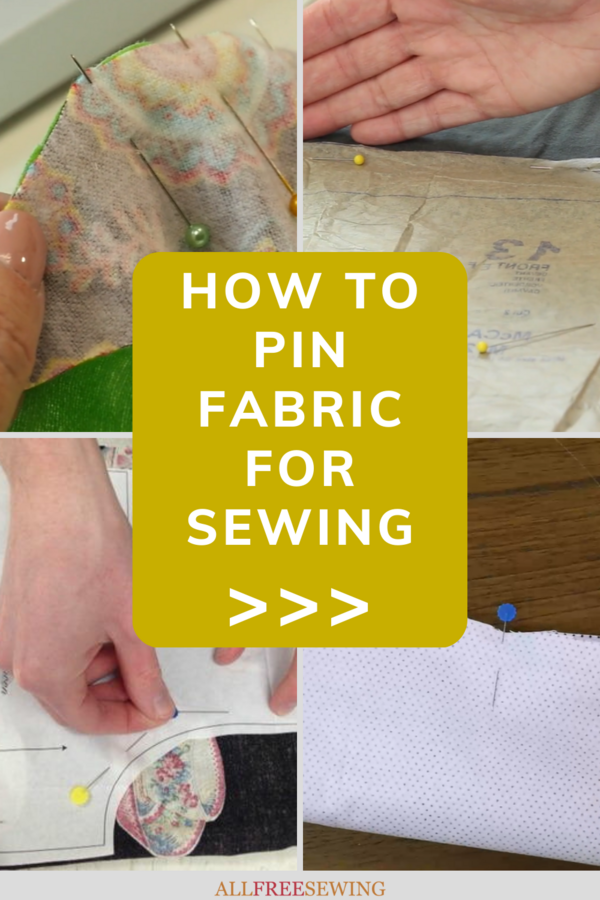
How to Pin Fabric for Sewing
One of the most important sewing pattern tips you can get is how to best pin fabric and patterns for sewing. Read our guide and get pinning!

Beginner sewists are often very excited to make their first sewing project from a store-bought pattern.
It is so exciting to purchase a pattern and know what it is going to look like.
With this guide, learn How to Pin for Sewing. We'll go over all sorts of FAQs when it comes to pinning. Types of sewing pins, when to pin, how to pin fabric, how to pin patterns, and more!
The professional-quality pieces on the cover are the best motivation you can find.
This moment can pass quickly, however, when you learn that you do not know how to pin a pattern. Sewing patterns and working with fabric can be very confusing.
Plus, we'll go over some pitfalls involving pins, like what happens when you sew over pins or don't pin at all.
One of the first steps to learning how to use a sewing pattern is figuring out how to pin a pattern to fabric correctly. This info-packed page has all the info you need.
Because mistakes in pinning fabric and sewing templates can cause irreversible problems, this guide helps you to prepare ahead of time. Even sewists who have been sewing for years can easily make a blunder when prepping and pinning fabric, patterns, and more.
How to Pin Fabric for Sewing
Types of Sewing Pins
Not all pins are equal! Nearly as important to how you pin is what type of pins you are using to prep your project. Some pins are longer, some are thinner, and some that have plastic elements are prone to melting if exposed to heat.
Make sure you have a decent selection if you want to get it right every time. Below, we're listing the seven most common types of pins and a little about them. Learn more about clips below!
- Glass Head Pins - Straight metal pins with glass ball heads that won't melt if exposed to heat. Can be used for most sewing projects.
- Ball Point Pins - Straight metal pins with slight rounded points and plastic ball heads. The heads can melt when exposed to heat. Can be used for most sewing projects, but not when pressing.
- Quilting Pins - Long and strong metal straight pins with colorful ball heads, usually made of plastic. The heads can melt when exposed to heat. Most commonly used for quilting though can work for additional projects, but not when pressing.
- Plastic Head Pins - Straight metal pins with large plastic heads, usually in fun shapes (like flowers, hearts, or stars) and colorful. The heads can melt when exposed to heat. Can be used for most sewing projects, particularly felt, but not when pressing.
- Silk Pins - Fine, thin straight metal pins with tiny heads of the same metal as the pin. Best to use with delicate fabrics like silk. Can be used while pressing as there is no head to melt.
- T-Pins - Longer, thicker straight pins with a t-shape head created of the same metal as the pin. Not used in most sewing projects but can be useful for thick, heavy-duty upholstery fabrics/projects. Can be used while pressing as there is no head to melt.
- Fork Pins - Doubl-sided metal pins that are slightly bent and can hold material, lining, or patterns in place. Can be used while pressing as there is no head to melt.

When to Pin for Sewing
When exactly should you pin when working on a sewing project? Pins are usually used at the following points in the process:
- Attaching a pattern template to the fabric before cutting.
- Attaching a pattern template to the fabric while cutting.
- Keeping fabric pieces together and in place after cutting for sewing.
- Keeping fabric pieces together and in place after cutting for pressing.

When Not to Pin and Alternatives to Pinning
Pinning is not always the best method for sewing! As helpful as it can be to attach patterns and fabric, it does poke holes into your pieces. This is why using the correct type of pin for the project you are working on is so important. However, sometimes not pinning is the better option.
So, when should you avoid pins?
- High-quality, expensive, limited, or delicate fabric can be damaged by pins, which can be problematic for overall quality and condition. Pinning minimally or avoiding pins altogether may make you more comfortable.
- Do you want to reuse your pattern pieces? If so, repeatedly pinning may limit the life of the template. One option is tracing the pattern piece onto parchment or printer paper and saving the original template. That way, you can pin all you want.
- Some fabrics don't need it:
- Keep in mind that some fabrics are more slippery than others. Materials such as felt, fleece, flannel, and most interfacing types are "sticky" and may not need help to stay where they are. If you're attaching two pieces of fabric together, test to see if they slip before pinning.
- If your piece is small or sturdy enough, you may be able to hold it while cutting or sewing without the use of pins. Or you can use alternatives...
- Keep in mind that some fabrics are more slippery than others. Materials such as felt, fleece, flannel, and most interfacing types are "sticky" and may not need help to stay where they are. If you're attaching two pieces of fabric together, test to see if they slip before pinning.
- Pattern/Fabric Weights - Metal pieces of weighted bags of fabric used to hold down pieces while you cut. Make your own pattern weights!
- Fabric Clips - You can purchase sewing-specific clips, craft clips, Japanese sewing clamps, or use office binder clips for a tighter grip. Available in metal or plastic.
- Basting Tape - Also known as seam tape. A double-sided repositionable adhesive tape that is attached to a folded piece of fabric or two pieces of fabric in order to keep together while sewing. It can also be sewn through.
- Tacking/Basting - Tacking or basting temporarily hold several layers of fabric in place while machine sewing. Tacking can be done either by hand or machine and can be removed later.

- Marking/Drawing - You can combine this with the others or simply hold down your pattern with one hand and use a disappearing/removable fabric marker or pencil.

How to Prep Fabric for Pinning and Sewing
Before getting to the pinning, you need to prepare everything for your project. What to do first? Here are a few steps for preparing:
- Clear your work surface of anything you don't need. Make sure everything you do need is within reach. Assure you have enough space and the fabric is not going to fall off of get damaged by anything it's laying on.
- Get to know your fabric before you sew:
- Look for the selvage and grain (learn more about these by visiting our Glossary of Sewing Terms). You want to find these parts of the fabric in order to decipher how your fabric will act when you sew it. Does it stretch? Will it shrink? Will it unravel at the edges?
- If you're working with a directional print, keep in mind where you want the pattern to show and how.
- Look for the selvage and grain (learn more about these by visiting our Glossary of Sewing Terms). You want to find these parts of the fabric in order to decipher how your fabric will act when you sew it. Does it stretch? Will it shrink? Will it unravel at the edges?
- Flatten out or press your pattern piece (if needed) and fabric carefully to ensure that your measurements will be as precise as possible.
- Read the full pattern/project instructions so that you fully understand everything you will be doing.
- Cut out your pattern from your paper. Make sure when you are doing this that you cut just outside of the line. It is much better to have pieces that are a little too big than too small. This will also allow for some error while cutting your fabric.
Note: Keep in mind whether or not there is a seam allowance included in the template. If not, you'll need to cut a larger piece or keep in mind when cutting fabric so that you can cut wider than the paper.

How to Pin a Pattern to Fabric
Note: The way you pin your pattern to your fabric depends on what kind of fabric you are pinning. If you are using a delicate fabric, you want to use as few pins as possible or maybe even decide to opt for pattern weights instead.
Silk, for example, does not heal well from too many pinpricks. Since we've discussed this earlier in the article, determine your best plan based on that info before pinning:
- Again, gather all of your materials and make sure your space is clean. You want to pin your fabric on a flat, clean surface.
- Read the FULL directions to your pattern before doing anything else. You do not want to miss specific instructions.
- Cut out your pattern.

- Lay out your fabric. Most patterns have specific instructions as to how to lay out your fabric. You will often need to layer the fabric in two layers to cut two pattern pieces. Consult your pattern to determine where the sides of the fabric should face.
- Your pattern will have an arrow to show you how to follow the grain of the fabric. The grain of the fabric is the direction the fabric has been weaved. You often want to sew along the strongest part of the fabric which is with the grain.

- Pin your pattern! You will want to pin your fabric in a way in which makes it easier to cut. This means you do not want your pins sticking over the edge. You will want to place pins along the long edges. You will not need a ton. All you need is enough to keep your fabric steady while you trace or cut out your pattern. Additionally, make sure to pin at all corners to ensure that you are able to cut these sections out precisely.

How to Pin a Pattern to Sew
Horizontal and Vertical Pinning
Sewists pin in all kinds of ways. You need to find the way that works best for you. Many skip the pins all together and use binder clips or pattern weights to trace. If you do want to know how to pin a pattern with pins, you can either pin horizontally or vertically. These two methods look like the images shown below.

But Which One Should I Use?
You can really use either method. Both have their pros and cons. Pinning vertically can require less pins and may end up with a more precise cut. Horizontal pinning can make the fabric bunch more.
Horizontal pinning, however, means that any damage the pins do will be closer to the seam of your project. This means any damage it does will be practically invisible when you wear the garment.
Horizontal pinning also allows you to easily remove the pins as you sew. You never want to sew over pins! It could damage your fabric, machine, and pins.

Pinning a Pattern to Sew
In order to pin a pattern to sew, you follow the exact same instructions as when pinning the pattern onto the fabric to cut it out. Do exactly as your pattern tells you, double-checking to make sure that the right sides of the fabric are facing in the right direction.

Pin Out How to Pin Fabric for Sewing Guide!
Want More?
How to Use Pattern Weights >>>
Now that you know how to pin fabric for sewing, what are your other favorite sewing tips and tricks?
Let us know below in the comments!
Your Recently Viewed Projects

Thanks for your comment. Don't forget to share!
Lynn K
Nov 28, 2018
Even though I've been sewing for years I always learn something from posts like the one above. Not everyone has a handy friend or family member to teach them how to sew so instructions like those above can be really valuable. Thank you for this very detailed and informative piece which has now been printed and stuck on my workroom notice board.
Report Inappropriate Comment
Are you sure you would like to report this comment? It will be flagged for our moderators to take action.
Thank you for taking the time to improve the content on our site.

![Know Your Skirts Guide [Infographic]](http://irepo.primecp.com/2021/10/509029/Know-Your-Skirts-Infographic-square21-nw_Large400_ID-4536247.png?v=4536247)