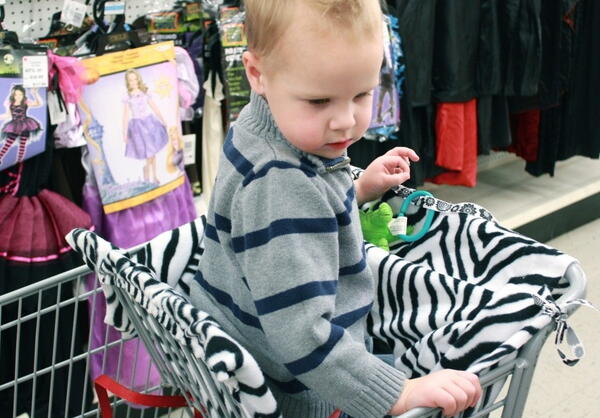
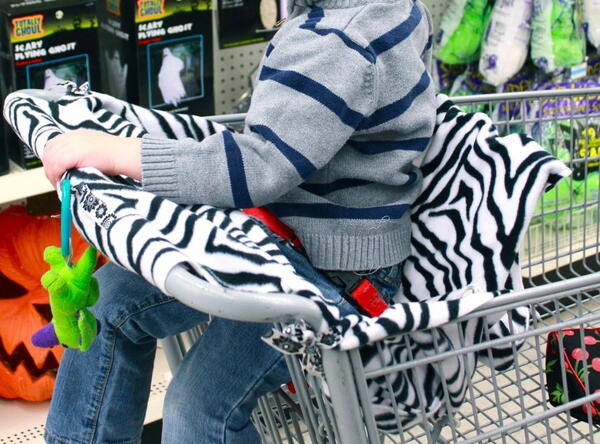
Shopping Cart Cover Sewing Pattern
Don't miss out on this free printable shopping cart cover pattern! This DIY cart cover will help keep your child comfortable on shopping trips. It's easy to make and use, too!

When it comes to baby sewing patterns, you want to make sure they're soft and sanitary for your little one.
This Shopping Cart Cover Sewing Pattern is free and easy to make. This sewing project will help keep your baby or toddler entertained while you shop but that's not all!
Having a covering over the sometimes dirty, cold, and sharp cart is a game changer for people who shop with little ones.
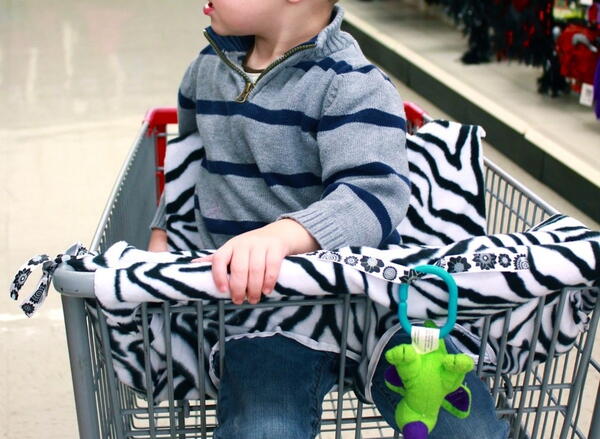
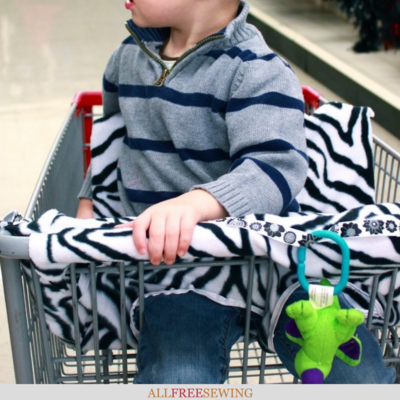
You can even attach toys to the cart for even more entertainment. We all get bored while shopping sometimes but it's particularly difficult for babies, toddlers, and younger children to stay quiet and still while you power through your trip.
This free baby shopping cart cover pattern also includes a video and written tutorial. No matter your skill level, you're in good hands.
Let Maureen Wilson walk you through each step towards making this cart cover that will protect your child and make them more comfortable while sitting in the cart.
Use soft and fun fleece fabric so that the DIY shopping cart cover for your baby is not only soft but easy to fold up and wash when you get home.
As mentioned, you can attach any sort of toys or other distractions to keep your kiddo happy and occupied. Whatever you want, you can customize! Maureen makes it that easy.
Sign Up For More Free Patterns >>>
DIY Shopping Cart Cover Video Tutorial
Watch the video here or on YouTube and you'll see what you need to make your own cart seat cover and how to do it. Maureen also provides lots of tips and suggestions throughout the video to help you even more.
Written Shopping Cart Cover Tutorial
Materials List:
• One yard fleece
• Ribbon, 3 yards
• Elastic, about 14 inches
• Velcro, 12 inches
Skill Level: Easy
Project Type: Make a Project
Time to Complete: Under an Hour
Sewn By: Machine
How to Make a DIY Shopping Cart Cover:
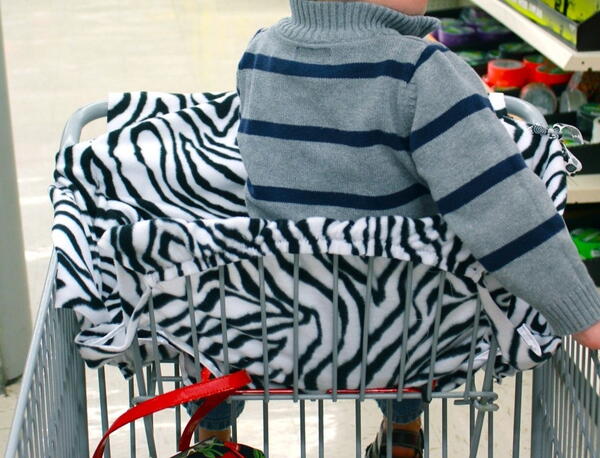
- Cut one yard of fleece into the following pieces. You'll have a total of four pieces: a large 20x26 inch rectangle that will be the Seat & Front, a 20x20 inch square that will be the Back, and two 8x13 inch Side Pieces. It's important that you use fleece because this project has raw edges and fleece won't fray.
- We'll start by making slits for the straps on the square Back Piece. Mark 3 inches in from the sides and 2 inches up from the bottom edge. We're going to make these slits about 8 inches long because some carts have the straps down low by the seat and some have them attached to the top of the back. Make one slit on the left and one on the right.
- Next, we'll add elastic to the top of the Back Piece, so that it will slide over the back of the cart seat and keep the cover from sliding. Add a 1-inch-wide piece of elastic to the top of the Back Piece, on the wrong side of the fabric. It goes on the short end farthest from the slits. Stretch the elastic taut as you sew with a zig-zag stitch.
- Measure 12 inches up from the bottom edge of the Back Piece, and fold the elastic edge down to that mark. Next, sew the left and right folded sides, to create an elasticized pocket area. Use a 1/2-inch seam throughout this tutorial. The wrong sides should be together.
- Put the Back Piece aside and get out the large seat rectangle. Pin a Side Piece to the left and right long sides of the Seat Piece. Line up the short top edge of the Side Piece with the top short edge of the Seat Piece. The right sides should be together. Sew the long side edges on both the left and right sides with a straight stitch.
- Now we'll add the Back Piece. Lay the Back Piece face down on the Seat Piece, matching up the top edge. You will be pinning the end without the elastic to the top center of the Seat Piece. (You aren't doing anything with the Side Pieces at the moment.) Sew together with a straight stitch.
- Your project should now resemble a cross shape. Next, we'll pin the top of the Side Piece to the edge of the Back Piece. Fold the Side Piece upward and line the edge up with the edge of the Back Piece. You will only be sewing 6 inches from the seam at the bottom, leaving a loose flap of fabric at the top that will fold over the side of the cart.
- Sew the Side Piece to the Back Piece, with a seam that is 6 inches long. This will create a box corner.
- Now we need to add the ribbon ties. This will allow you to tie the cover onto the cart for extra security. Cut 4 ribbons that are 10 inches long.
- Fold under the edge of one ribbon to prevent fraying, then pin it towards the bottom of a Side Piece. Pin it along the side edge, about 3 inches from the bottom. The ribbon should be face-up and pointing outward. Sew with a zig-zag stitch. Repeat with another ribbon on the other Side Piece.
- Pin the other two ribbons to the bottom center edge of the Side Pieces. Again, the ribbons should be face up and extending outward.
- Line up the edges of the Side and Seat Pieces and sew together the full length of the Side Piece's edge. Again, this will create a box corner, with the ribbons poking outward.
- Carefully singe the ends of the ribbon with a lighter to prevent fraying.
- Now we'll cut the circles for the leg holes. I made the center of my circle 8 inches down from the seam that joins the Back and Seat pieces. Make the circles rather large for ease of use.
Suggestions for Finishing Touches:
- First, you can finish the edges of the slits and leg holes with ribbon trim. Fold under the raw edge of a piece of ribbon, and fold the ribbon in half around the raw edge. Stitch in place. (This isn't mandatory since the fleece won't fray, but it does make your project look nice.)
- Second, you can add Velcro that will wrap around the shopping cart handle. If you don't add Velcro, the flap of fabric will hang loosely over the handle. To add Velcro, cut 3 pieces about 2 inches long, and sew horizontally to the underside bottom edge of the fabric.
Add the coordinating Velcro about 3 inches down on the underside of the fabric. Sew these pieces vertically. This will allow you to adjust for variations in handle sizes… Target, for example, has very large cart handles.
- Third, you can add a ribbon toy bar. This is simple to do. Fold under the raw edges of a ribbon strip. Add two more pins at regular intervals. Zig-zag stitch the ends, then tack down where you had pinned. This creates three loops for adding toy rings. You could also attach a Tippy Sippy Leash so your little one doesn't drop his cup or bottle on the floor
How to Use the Shopping Cart Cover:
To use this super simple shopping cart cover, slide the elastic over the back of the seat. Tie the corner ribbons, and attach the Velcro around the handle.
This shopping cart cover rolls up into a tidy packet. Start rolling from the end without the elastic, then tuck the edges inside of the elastic pocket area.
Want More?
35+ Zero Waste Sewing Ideas >>
What's your favorite thing to make for babies?
Let us know!
Your Recently Viewed Projects
Thanks for your comment. Don't forget to share!
LynM
Jan 10, 2017
I would never have thought of something like this until my youngest daughter had two premature babies. Suddenly it was super important that their environment be kept as sanitary as possible to avoid infections. A cart cover like this would be a fabulous way of protecting the little ones from the accumulation of germs on shopping trolleys from all the people who handle them each day. And I love the idea of attaching toys and even a Sippy Cup to keep the little one amused.
nanmills2 8418579
Aug 01, 2014
I had to watch the video then pause it to see the pattern. I would have liked to have had a bit more detail on the pattern.
Report Inappropriate Comment
Are you sure you would like to report this comment? It will be flagged for our moderators to take action.
Thank you for taking the time to improve the content on our site.