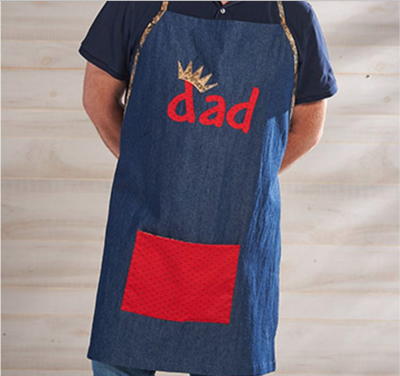
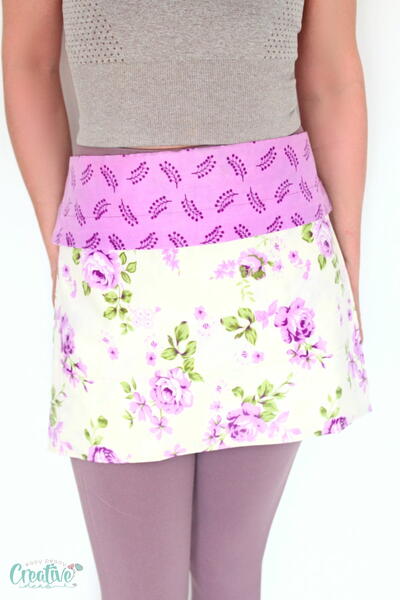
King of the Grill DIY Apron

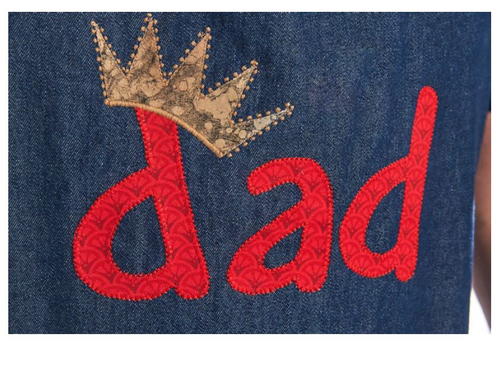
If your dad or husband loves cooking, especially outside in the summer time, you'll want to make him the King of the Grill DIY Apron. This sewing pattern mainly uses one and half yards of denim and an adorable applique that says Dad with a crown. He'll really feel like a grill master when you give him this apron for Father's Day or another occasion. Even if you haven't sewn anything before, you can try this sewing tutorial out because even a beginner can do it. Get your kids to help you with this DIY gift and you can add other personalized applique for your wonderful Dad.
Time to CompleteIn an evening

HolidayFather's Day
Project TypeMake a Project
Materials List
- 1 1/8 yard of 45”- wide or wider denim (If your fabric can be cut on the crosswise grain, you’ll need only 7/8 yard.)
- 3/8 yard of a 45”-wide contrasting cotton print (contrast #1 [gold])
- 1 fat quarter of contrasting cotton print (contrast #2 [red])
- Paper-backed fusible web
- Dual Duty XP All-Purpose thread to match appliqué fabric and apron
- Sewing machine
- Basic sewing supplies
- Iron and ironing board
Cutting
WOF = Width of Fabric
-
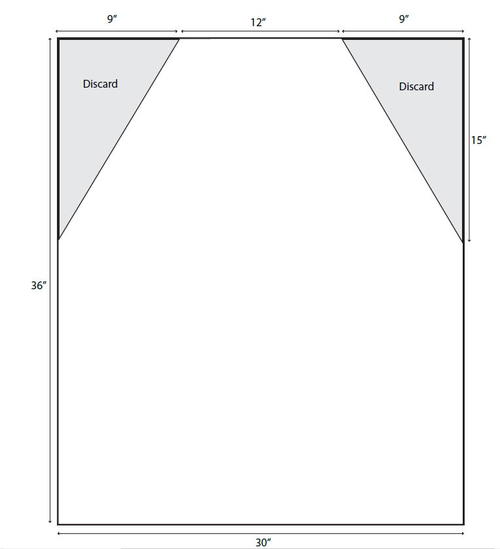
From the denim, cut: 1 rectangle, 30” x 36”. Trim as shown below to create the apron shape.
-
From contrast #1, cut:
1 rectangle, 8” x 11”, for the pocket
1 strip, 1” x WOF, for trim
2 strips, 2” x WOF, for strap and ties -
From contrast #2, cut:
1 rectangle, 8” x 11”, for the pocket -
Note: The appliqué patterns are reversed and ready
for tracing onto paper-backed fusible web.
Instructions
Seam allowances are 1/4”.
-
Trace the letters and crown onto the paper side of your fusible web. Remember to trace two of the letter “d.” Trim loosely around each shape to separate. Place the letters on the wrong side of one contrasting fabric and fuse in place, following the manufacturer’s instructions. Fuse the crown to the wrong side of the other contrasting fabric. Cut out the applique shapes along the traced outlines.
-
Press 1/4” to the wrong side along one long edge of the 1”-wide strip cut from contrast #1. Lay the strip on the apron with the right side of the strip against the wrong side of the apron, aligning the strip’s unpressed long edge with one slanted edge of the apron and allowing the trim to extend at least 1” beyond the leading edge of the apron. Sew the strip to the apron’s slanted edge.
-
Press the trim to the right side of the apron and cut off the excess trim 1” beyond the apron raw edges. Edgestitch the pressed edge of the strip to the apron, concealing the seam allowances, and trim the excess even with the apron edges.
TIP: Sewing a straight-grain trim to the apron’s bias edges stabilizes the apron edges. -
Repeat steps 2 and 3 to finish the second slanted edge of the apron with the remainder of the 1”-wide strip.
-
Press 1/2” to the wrong side along both side edges of the apron. Press an additional 1/2” to the wrong side. Edgestitch the hems in place.
-
Press 1/2” to the wrong side along the apron’s top and bottom edges. Press an additional 1” to the wrong side on both edges and edgestitch the hems in place.
-
Sew the two pocket rectangles together along all four edges, leaving an opening in the bottom edge for turning. Trim the corners diagonally to reduce bulk and turn the pocket right side out. Press the pocket flat, pressing the seam allowances to the wrong side along the opening.
-
Fold the pocket and apron in half to find and mark their vertical centerlines. Position the pocket on the apron, matching the centerlines, with the bottom of the pocket 5” above the bottom edge of the apron. Edgestitch the pocket sides and bottom to the apron.
-
Remove the paper backing from the appliqué shapes. Arrange the letters on the apron with their bottom edges about 9 1/2” below the top edge of the apron. Use the apron’s centerline as a guide and rotate the letters slightly in different directions for a casual appearance. Fuse the letters to the apron. With matching thread, stitch the letter edges to the apron.
TIP: Satin and blanket stitches may be the traditional way to appliqué fused shapes, but feel free to try different stitches. The fusible web will secure the appliqué edges fairly well, so even open stitch patterns will work. For the sample, we chose a decorative stitch to add baubles to the crown. -
Position the crown on the apron and fuse. Stitch the edges with matching thread.
-
Remove the selvages and sew the 2”-wide strips of contrast #2 together to make a long strip. Press the strip in half lengthwise with wrong sides together. Open the strip and fold both long edges to the wrong side to meet at the center crease; press. Refold the strip along the original crease and press once more to create a 1?2”-wide strip with the raw edges enclosed.
-
Cut a 24” piece from the strip for the neck strap. Open the folds and press 1?4” to the wrong side on each short end. Refold and press again. Edgestitch both long edges.
-
Position one end of the strap on the apron wrong side at an upper corner, overlapping the apron by 1”. Sew a small rectangle through all the layers to attach the strap to the apron.
-
Sew the other end of the strap to the remaining upper corner of the apron in the same way. Be sure the strap is not twisted.
-
Cut the remaining piece of the pressed strip in half. Open the folds and press 1?4” to the wrong side on both short ends of each strip. Refold and press again, then edgestitch the long edges of each strip; these are the waist ties.
-
Position and sew one tie on the wrong side of the apron at each waist corner as in step 13.