Stylish Nursing Cover Tutorial
Learn how to make a nursing cover that's ideal for anyone. It's a chic and pretty lightweight nursing poncho that's easy to carry, wear, and use.

For mothers who prefer a little privacy while nursing, this modern DIY nursing cover-up poncho provides a chic solution.
Follow the Stylish Nursing Cover Tutorial to create a cover-up that doubles as a cute car seat cover.
Once you learn how to make a nursing cover, you will be so much more comfortable and secure when breastfeeding in public. Not to mention trendy!
If you've looked for nursing cover tutorials before, you know that the options aren't always flattering.
This fashionable cover-up allows mothers to nurse in public areas without having to give up their personal style.
Plus, if you're a visual learner, then be sure to scroll down. You'll find the corresponding video tutorial by Maureen Wilson at the bottom of the page.
Nursing Poncho Tutorial
This isn't just any nursing cover-up. It's unique and can be customized. Plus, so much more.
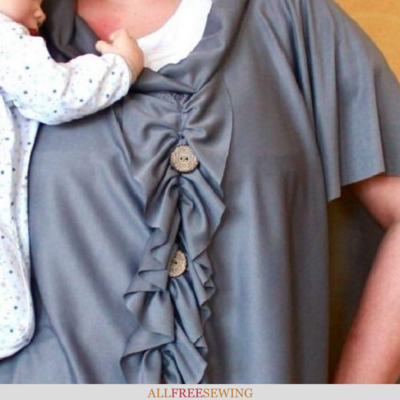
Made By Marzipan’s Stylish Nursing Shawl:
- is made from lightweight, wrinkle-free jersey
- features a classic cowl neck that allows you to peek at baby
- has a shawl style that provides coverage without drawing attention
- does double-duty as a car seat cover
Materials Needed:
- 1-3/8 yd knit fabric
- Ballpoint needle
- Flexible measuring tape
- Large buttons (optional)
- Sewing machine
- Pins, needles, chalk, and other notions

Supply Tips:
Select a 60-inch knit fabric for this project. You want it to be lightweight, but make sure it isn’t too sheer. You’ll need a total of 1-3/8 yards for this project:
- 1 yard for the shawl
- 1/4 yard for the cowl
- 1/8 yard for the ruffle strip
If you ask the fabric store employee to cut the fabric into those three measurements for you, you’ll save some time.

Stylish Nursing Cover Tutorial:
- Begin by folding the yard of fabric in half so that it is 30 inches long.
Note: I chose to cut my fabric to 30 inches wide at this point, but it’s probably best to wait until you’ve finished sewing. That way you can try on the garment and decide just how much coverage you’d like before you cut.
- So, your piece of folded fabric should be 30 x 36 inches. We’re going to cut a neck hole that’s 10 inches wide on the fold. So measure 13 inches in from the left side and mark, then mark again at 23 inches. (Again, I chose to cut my fabric first, so my measurements are a little different in the video).
- Lay the folded fabric on a hard surface and sketch a neckline between the two marks. The trick to making a cowl neck is that the front neckline needs to be deeper than the back neckline. The front should be about 5 inches deep. Be careful to only cut through the top layer of fabric.
- Trace a neckline on the second layer of fabric. The back neckline should be about 2-1/2 inches deep.
- Find the circumference of the neck opening by measuring with a flexible measuring tape. Follow the curves carefully to get an accurate measurement, then add one inch for seams.
- Cut the 1/4 yard piece of fabric to the length of that measurement.
- Fold the fabric in half widthwise, right sides together, and sew along the short end to make a tube. Use a ball-point needle and a zig-zag stitch when sewing knit fabrics for best results. Set aside.
- Next, we’ll make the ruffle. This is optional, but I think it adds some interest to the garment. Ruffle the 1/8-yard strip of fabric by sewing down the center with a basting stitch. Leave the thread long and do not backstitch.
- Adjust the ruffle by pulling on the threads. Pin to the garment. (You may trim the excess fabric if it’s too long.) I pinned mine off-center for an asymmetrical look. Sew in place with a straight stitch.
- Now we’ll add the cowl neck. Fold the tube piece in half, wrong sides together.
- With the garment right side out, lay the raw edge of the cowl piece inside of the neckline and pin, overlapping the fabrics by about half an inch. Line up the seam of the cowl with the shoulder area. When you’re finished pinning, it will look like a turtleneck.
- Sew the fabrics together, using a zig-zag stitch. Sew directly over the raw edge of the neckline for a cleaner finish.
- Fold the cowl neck down. I like to add a single stitch to tack down a couple of spots on the cowl, to help it keep its shape without having to fuss with it every time I put it on.
- Finally, add decorative buttons to the ruffle strip.
- Now you can try on the nursing cover and trim it width-wise as needed. Be sure to cut an even amount of fabric from both sides. (Knit fabric won’t fray, so you don’t need to finish these edges.)


Nursing Shawl Video Tutorial:
Watch exactly how each of these pieces comes together by watching this nursing cover-up video tutorial right below:
Read NextStylish Nursing Cover Tutorial