This project was submitted by one of our readers, just like you.
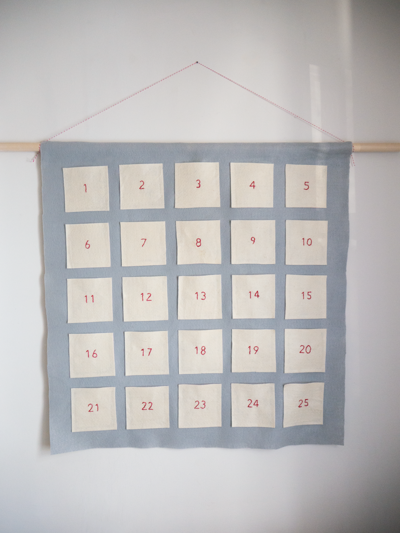
Embroidered Advent Calendar

Embroidered Advent Calendar
"It was fun fun fun and felt so good to complete a new Christmas project...even if it necessitated taking the day off work! I drove to my friend Katy's house so we could stitch advent calendars for our families alongside one another. (She is a precise and intentional crafter, and so exerts a good influence on me.) Also, click through for a few ideas for what to tuck into the pockets if your recipients are little kids (keep in mind some of these are quite tiny and may not be appropriate for a home with babies)."
Project TypeMake a Project
Time to CompleteWeekend project
Sewn byHand

Materials List
- 1 yard gray felt
- 1/2 yard cream-colored felt
- Interfacing and an iron
- Red embroidery thread and an embroidery needle
- Embroidery tracing paper
- Fabric glue
- A wooden dowel
Instructions
-
Decide on the height and width of your pockets. I had been leaning toward 3"x3" but luckily Katy talked me into 4"x4". Attach interfacing to one side of the cream-colored felt, and then carefully cut out 25 matching squares.
-
In Photoshop or another image design program, create your numbers in your desired font and size (mine are approximately 1.5"). Reverse the image and then print (they should be backwards!). Trace with the pencil and embroidery tracing paper. Cut the numbers out of the tracing paper, and use the iron to transfer one number to each cream square.
-
Embroider the numbers, using the transfers as a guide. Embroidery is not a strong skill of mine, nor do I have very much education in it, but I can tell you I went over each digit twice for this calendar.
-
Decide on the distance you'd like between your pockets, and cut the gray felt to meet those needs (leaving minimum 6" at the top). My pockets have a distance of 1" between each, and 2" for the side margins. Glue in place around three sides (leaving the top open) and allow appropriate time to dry.
-
Fold the top 6" of the gray felt back behind itself, and glue in place so that there is enough room to thread the dowel through (once all is dry).

Read NextHoliday Snuggle Blanket