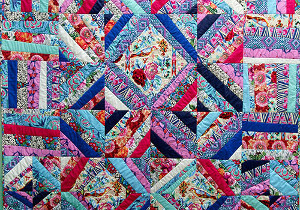
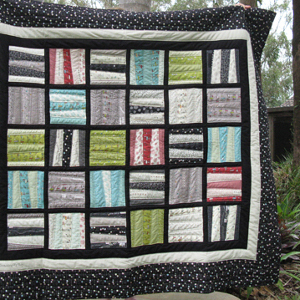
Hapi Quilt

This gorgeous, colorful quilt was inspired by a recent trip to Egypt. Hapi is the Egyptian god of the valley and the Nile. It is all about creation and moving forward, exemplifying the process of life. Hapi celebrates the magic of life, capturing the playful creativity inherent in all of us. With this free tutorial, you can learn how to make a quilt that is beautiful, unique, and makes a great addition to your home.
Materials
- 1-5/8 yd (1.5m) (A) Rowan Hapi by Amy Butler PWAB125 Celestial/Cream
- 5/8 yd (57.2 cm) each of the following Rowan Hapi by Amy Butler prints:
(B) PWAB116 Trapeze/Charcoal
(C) PWAB117 Tapestry Rose/Linen
(D) PWAB118 Glow/Navy
(E) PWAB120 Camel Blanket/Cloud
(F) PWAB122 Sun Flowers/Coral
(G) PWAB123 Heart Bloom/Rose
(H) PWAB124 Oasis/Azure
- 3/8 yd (34.3cm) each of the following FreeSpirit Designer Essential Solids:
(I) CSFSESS.SKYXX S14 Sky
(J) CSFSESS.ROYAL S16 Royal
(K) CSFSESS.CREAM S25 Cream
(L) CSFSESS.HOTRO S58 Hot Rose
(M) CSFSESS.FREBL S78 Freedom Blue
(N) CSFSESS.LTJDE S83 Light Jade
- 4 ½ yds (4.11m) (Backing) Rowan Hapi Linen/Cotton by Amy Butler LIAB003 Oasis/Periwinkle
- 5/8 yd (57.2cm) (Binding) Rowan Hapi by Amy Butler PWAB116 Trapeze/Charcoal
- 5 ¼ yds (4.8m) 45” (1.14m) wide muslin
- 81” x 96” (2.1m x 2.4m) Nature-Fil™ Blend Quilt Batting
- 1 large spool of coordinating Coats® Cotton thread
Additional Requirements
- Sewing Machine
- Scissors, rotary cutter and mat
- 24” (61cm) quilter’s ruler
- 15” (38.1cm) square (or larger) quilter’s ruler
- Iron and ironing board
- Marking pencil
- Hand sewing needle
- Package of quilter’s curved safety pins, straight pins
Preshrink your fabric; machine wash, warm water; tumble dry, low heat. TIP: Make a small diagonal clip in the corners of each fabric piece before washing to help prevent fraying. The first time a term is mentioned and followed by an asterisk (*) it is defined in the “Techniques & Terminology” section on Amy’s website: www.amybutlerdesign.com.
Cutting
- Lay Fabric A, RIGHT side up in a single layer on your rotary mat. Position your square ruler over a bird design placing the ruler like a diamond (points of the square at the top, bottom, left and right) and centering the bird to cut 1 square: 12 ½” x 12 ½” (31.75 x 31.75cm)
- Reposition your ruler and cut 4 squares: 9” x 9” (22.86 x 22.86cm)
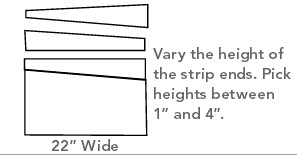
- With RIGHT sides together, fold the remaining Fabric A in half matching the selvage edges*. Cut along the fold to get 2 pieces approximately 22” (55.88cm) wide. Randomly cut uneven strips across the WOF from each fabric piece, varying the height of the ends of strips from 1” (2.54cm) to 4” (10.16 cm). Repeat to cut random strips from Fabrics B-N
- Muslin: Cut 10 strips: 12” (30.48cm) x WOF from these, cut: (16) 12” x 12” (30.48 x 30.48cm); (16) 12” x 9 ½” (30.48 x 24.13cm). 6 strips: 9 ½” (24.13cm) x WOF from these, cut: (16) 8” x 9 ½” (20.32 x 24.13cm)
- Backing trim the selvage edges and cut 2 strips: 80” (2.03m) x WOF
- Binding cut 8 strips: 2 ½” (6.35cm) x WOF
Instructions
Seams are ¼” (.64 cm) unless noted.
WOF=Width of Fabric
MAKE THE CENTER PANEL
Note: To give this quilt its scrappy look, randomly select strips when piecing. Trim strip excess and use when smaller pieces are needed. You will need to use all of the strips to complete the quilt top.
Block A
- Place one 12” x 12” (30.48cm x 30.48 cm) muslin foundation on a flat surface. Randomly select 2 strips from Fabrics A-N. Place the two strips RIGHT sides together matching one long raw edge. Lay the strips onto the muslin foundation so the matched edge runs diagonally across the foundation from the bottom left to the top right and pin in place. Tip: To give your quilt character offset the diagonal a little, but make sure the strips will cover the muslin square when pressed open. Stitch ¼” (.64 cm) from the matched edges.

- Open the strips so the RIGHT sides are facing up and press them away from the seam. Pin them in place.
- Select a third strip, place one long raw edge RIGHT sides together with the raw edge of a previously sewn strip and pin in place. Stitch a ¼” (.64 cm) seam along the pinned edge. Turn the strip RIGHT side up and press it away from the seam.
- Repeat Step 3 to add strips to both sides of the center to completely cover the muslin base.

- Using your rotary cutter, mat and ruler, trim the block to an 11” x 11” (27.94 cm x 27.94 cm) square.
- Repeat Steps 1-5 to make a total of 16 Block A.
Center Block
- Select 4 Block A’s. Lay the first Block A RIGHT side up with the diagonal seams running from the bottom left to top right corners. Use your ruler and pencil measure and mark 2 3/8” (6.03 cm) down from the top along the right Block edge. Then measure and mark 2 3/8” (6.03 cm) from the left across the bottom Block edge. Draw a line connecting the 2 marks. Cut along the drawn line. Repeat with the remaining 3 Block A’s.
- Place the first cut Block A and the 12 ½” x 12 ½” (31.75 cm x 31.75 cm) Fabric A square RIGHT sides together matching the diagonal raw edge to one side of the square. Pin in place. Stitch a ¼” (.64 cm) seam along the pinned edge starting and stopping ¼” (.64 cm) from each end and backstitch* at each end. Repeat to attach the remaining 3 cut Block A to the Fabric A square. Press the seam allowances* towards the Fabric A square.

- Fold the 12 ½” x 12 ½” (31.75 cm x 31.75 cm) Fabric A square RIGHT sides together along one diagonal. Match the raw edges of the cut Block A’s at one end of the fold and pin in place. Stitch a ¼” (.64 cm) seam along the pinned edge starting at the outside edge and stopping at the Fabric A seam line. Backstitch at each end. Press the seam allowance open. Repeat to join the cut Block A’s at the other end of the fold. Refold the Fabric A square along the other diagonal and sew the cut Block A’s together. Press the Center Block flat.

Center Panel
Paying close attention to the block orientation arrange the Center Block and the remaining 12 Block A’s. Pin and sew together the blocks in rows. Note: To make the middle row sew the side Block A’s together before attaching them to the Center Block. Press the seam allowances to one side. Then sew the rows together to complete the Center Panel.
MAKE THE SIDE PANEL
Note: No muslin foundations are used for Blocks B & C.
Block B
- Randomly select two Fabric A-N strips that are at least 15” (38.1 cm) long. Place the two strips RIGHT sides together matching one long raw edge and pin. Sew a ¼” (.64 cm) seam along the pinned edge. Press the seam allowance to one side.
- Select a third strip, place one long raw edge RIGHT sides together with the raw edge of the strips sewn in Step 3A and pin in place. Stitch a ¼” (.64 cm) seam along the pinned edge and press the seam allowance the one side. Continue adding strips until the pieced strip is 11 ½” (29.21 cm) long.
- Trim the pieced strip to 13 ½” wide x 11” (34.3 cm x 27.94 cm) long.
- Repeat Steps 1-3 to make a total of 4 Block B

Block C
- Repeat Steps 1-2 of Block B using Fabric A-N strips that are at least 12 ½” (31.75 cm) long. Continue adding strips until the pieced strip is 14” (35.56 cm) long.
- Trim the pieced strip to 13 ½” wide x 11” (34.3 x 27.94cm) long.
- Repeat Steps 1-2 to make a total of 4 Block C.
Side Panels
Arrange two Block B and two Block C in a column. Pin and sew together the blocks to form a Side Panel. Press the seam allowances to one side. Repeat with the remaining Block B and Block C to make a second Side Panel.
MAKE THE TOP AND BOTTOM PANELS
Block D
- Using a 12” x 9 ½” (30.48 x 24.13 cm) muslin foundation, repeat Steps 1-4 of Block A to cover the mfoundation with Fabric A-N strips.
- Trim the block to 11” wide x 8 ½” long (27.94 cm x 21.6 cm).
- Repeat Steps 1-2 to make a total of 8 Blocks. (The remaining 8 muslin foundations will be used to make Block Reverse D.)
- Lay the first Block RIGHT side up with the diagonal seams running from the bottom left to top right corners. Use your ruler and pencil measure and mark 2 3/8” (6.03 cm) down from the top along the right Block edge. Then measure and mark 4 7/8” (12.38cm) from the left across the bottom Block edge. Draw a line connecting the 2 marks. Cut along the drawn line. Repeat with the remaining 7 Blocks to make 8 Block D.

Block Reverse D
- Repeat Steps 1-3 of Block D laying the strips onto the muslin foundation so the matched edge runs diagonally across the square from the top left to the bottom right. Make a total of 8 Blocks.
- Lay the first Block RIGHT side up with the diagonal seams running from the bottom right to top left corners. Use your ruler and pencil measure and mark 2 3/8” (6.03 cm) down from the top along the left Block edge. Then measure and mark 4 7/8” (12.38 cm) from the right across the bottom Block edge. Draw a line connecting the 2 marks. Cut along the drawn line. Repeat with the remaining 7 Blocks to make 8 Block Reverse D.
Bird Blocks
- Place the first Block D and one 9” x 9” (22.86 cm x 22.86 cm) Fabric A square RIGHT sides together matching the diagonal raw edge to top left side of the square. Pin in place. Stitch a ¼” (.64 cm) seam along the pinned edge starting and stopping ¼” (.64 cm) from each end and backstitch at each end. Repeat to attach a second Block D to the bottom right edge of the Fabric A square. Then attach two Block Reverse D to the remaining 2 sides of the Fabric A square. Press the seam allowances towards the Fabric A square.
- Repeat Step 3 of Center Block, folding the 9” (22.86 cm) Fabric A square to join the side seams of the D and Reverse D Blocks.
- Repeat Steps 1-2 to make a total of 4 Bird Blocks.
Block E
- Using an 8” x 9 ½” (20.32 cm x 24.13 cm) muslin foundation, repeat Steps 1-4 of Block A to cover the foundation with Fabric A-N strips.
- Trim the block to 7” wide x 8 ½” long (17.78 cm x 21.59 cm).
- Repeat Steps 1-2 to make a total of 8 Block E. (The remaining 8 muslin foundation will be used to make Block Reverse E.)
Block Reverse E
Repeat Steps 1-3 or Block E, laying the strips onto the muslin foundation so the matched edge runs diagonally across the square from the top left to the bottom right. Make a total of 8 Block Reverse E.
Corner Blocks
- Place one Block E and Block Reverse E, RIGHT sides together matching one long edge and pin. Sew a ¼” (.64 cm) seam along the pinned edge. Press the seam allowance to one side. Repeat to make a total of 8 Half Corner Blocks.
- Lay 2 Half Corner Blocks flat so that the diagonal seams make a diamond. Sew the two halves together to make a Corner Block. Repeat to make a total of 4 Corner Blocks.
Top and Bottom Panels
Arrange two Bird and Corner Blocks in a row. Pin and sew together the blocks to form the Top Panel. Press the seam allowances to one side. Repeat with the remaining Bird and Corner Blocks to make the Bottom Panel.
ASSEMBLE THE QUILT TOP
- Sew the Side Panels to the left and right sides of the Center Panel. Match the seams between the blocks. Press the seam allowances towards the Side Panels.
- Next sew the Top and Bottom Panels to the Center Panel. Press the seam allowances towards the Center Panel.
- Your Quilt Top is now complete. Please set it aside while you make the Quilt Back.
PIECING THE QUILT BACK
Place the two Backing 80” x WOF (2.03 m) pieces RIGHT sides together, pin and sew together along the entire length. Press the seam to one side. Your Quilt Back is now complete.
FINISHING YOUR QUILT
- Place the Quilt Back on a flat, open surface with WRONG side up; smooth wrinkles.
- Place the batting on top of the Quilt Back; smooth wrinkles.
- Center the Quilt Top on the batting with RIGHT side up, creating a sandwich with the Quilt Back, batting and Quilt Top; smooth wrinkles.
- Using quilter’s curved safety pins, carefully pin the 3 layers together about every 8”, or hand baste* the layers using long running stitches.
- Begin quilting in the center of your quilt and continue to the outside edges. The sample quilt was quilted using the stitch-in-the-ditch* technique.
- Trim the Quilt Back and batting even with the Quilt Top.
MAKE AND ATTACH THE BINDING
- To join the strips for the binding*, and place 2 strips perpendicular to each other with RIGHT sides together. Match the raw edges. With a marking pencil, draw a diagonal line on the WRONG side of the fabric, then pin in place along the drawn line. Stitch a seam diagonally long the marked line and backstitch at each end.

- Cut diagonally across the matched corners leaving a ¼” (.64 cm) on the outside of the stitching line to create a seam allowance. Press the seam open. Trim any fabric “tails” along the edges. Continue to attach the remaining strips to complete the binding.
- With WRONG sides together, fold the binding in half lengthwise matching the raw edges. Press a crease along the folded edge.
Attach binding for hand sewing method
Note: If attaching the binding entirely by machine, refer to instructions in (parenthesis):
- Place the RIGHT side of the Quilt Top facing up (down). Start at the center along one side edge, and match the raw edges of the binding and Quilt, pinning as you go and stop at the first corner.
- Leave the first 5” (12.7 cm) unstitched, then sew a ¼” (.64 cm) seam, stopping ¼” (.64 cm) from the first corner and backstitch at each end. Remove the quilt from your machine and clip the threads.
- To form a neat mitered corner, fold the binding away from the corner forming a 45° angle. Then fold it back even with the next sides’ raw edge and pin it in place. Leave the folded edge of the binding even with the first edge that was sewn.

- Begin stitching again at the edge of the Quilt, backstitching as you begin. Continue to pin and sew along the edge, stopping ¼” (.64cm) from the next corner and backstitch again.
- Repeat Steps 3-4 to miter the remaining corners and sew the rest of the binding in place. Stop stitching 10” (25.4 cm) from where you first began. Backstitch again.
- Cut the binding so it overlaps the beginning edge by 6” (15.24 cm). Open the beginning edge and cut it at a 45° angle. Fold this edge ½” (1.27 cm) under toward the WRONG side of the binding and press.
- Insert the end of the binding under the beginning folded edge. Adjust it so it lays flat within the other end tucked inside the fold. Pin and stitch the rest of the binding in place. Press the binding away from the Quilt Top.
- Turn the Quilt over so the Back (Front) Panel is facing up. Flip the binding over the edge from the front (back) to the back (front). Line up the folded edge of the binding so it just covers the stitching line that attached it to the front (back). Adjust the mitered corners and pin them in place.
- Hand stitch the binding in place (or machine stitch close to the inner folded edge and backstitch at each end). Be sure to add a fabric label to the back of the Quilt, hand stitching it in place to document your name, address, date and any information you may want to include (perhaps a dedication or a name for the Quilt). Future generations will thank you for this.
Congratulations! Your quilt is complete!
Read NextSimple Lazy Quilt Tutorial