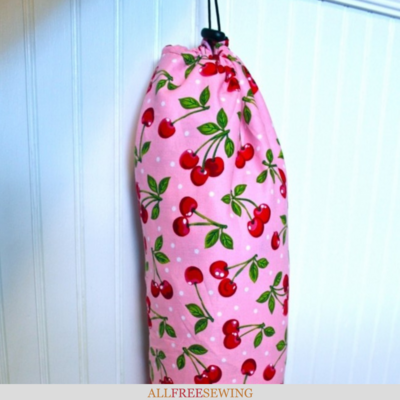
Cute Cloth Grocery Bag Dispenser DIY
This amazing DIY grocery bag dispenser is one of the easiest sewing projects ever (and just as useful)!

Learn how to sew a small drawstring bag and you'll be able to reach for a plastic bag whenever you need one. Most of us don't like to admit it, but there is an area in our home where we shove plastic bags.
No more! This plastic grocery bag dispenser is incredibly easy to make and can be customized to work in your area. Make it larger or smaller, choose a fabric pattern to match your kitchen, and more.
Once you check out this Cute Cloth Grocery Bag Dispenser DIY you can easily recycle plastic bags and keep them organized for easy use.
We love this adorable cherry fabric but your options are endless. Any cotton fabric works for this. You can even use a fat quarter for a slightly smaller version of this DIY bag holder.
Watch Maureen Wilson create this project from start to finish in the video tutorial found at the bottom of this page.
Sign Up For More Free Patterns

Cute Cloth Grocery Bag Dispenser DIY
This plastic bag holder is one of the easiest sewing projects you can work up. It's simple, fast, and incredibly useful.
Materials Needed:
- Cotton fabric, 18 W x 26 L
- 1/4-in elastic, 6 in.
- 2 eyelets (& eyelet setter)
- 1 shoelace
- 1 Safety pin (optional)
- Toggle
- Sewing machine
- Other sewing notions
Grocery Bag Holder Tutorial:
- Begin by cutting a piece of cotton fabric into a rectangle that’s 18 inches wide by 26 inches long. (If you’d like a slightly smaller one, you could use a fat quarter of fabric instead.)
- Lay the fabric face-down on your ironing board. Fold one short edge of the fabric up a 1/2 inch and press. Then fold up another 1/2 inch and press again, encasing the raw edge.
- This will be the bottom casing for our elastic. Sew 1/4 inch in from the bottom of the casing.
- Now flip the fabric around to the opposite short end. With your fabric face-down, fold the bottom edge up 1 inch and press. Then fold another inch and press again. This will be the top casing for the drawstring closure.


- Next we need to add two eyelets in the top casing for our drawstring to go through. The eyelets will be 2.5 inches apart, between the two fold creases at top. (They eyelets will be set IN the casing, but will only go through one layer of it.)
Unfold the edge you just pressed. Find the middle of your fabric rectangle, then find the middle of the right side. Add your eyelets there. (You don’t have to be too precise, as long as they’re in that general area.)
- Fold the casing edge back in place. You can press again if needed. Sew the casing 1/4 inch from the inside edge.
- Now we can add elastic to the bottom casing (the end without the eyelets). Cut a piece of 1/4-inch wide elastic to 6 inches in length. Use a safety pin to feed it through the bottom casing. Stitch both ends to keep it in place.


- Next we’ll sew the long sides together. Fold the fabric in half lengthwise and pin.
- Begin sewing at the bottom (the end with the elastic) and sew a 1/2 inch seam down the length of the fabric. STOP when you reach the bottom edge of the top casing. (You don’t want to sew it shut, or you won’t be able to add your drawstring!)
- Since we have a raw edge, we need to zig-zag it to prevent fraying. Again, stop when you reach the bottom edge of the top casing.

- Turn your bag right side out. Feed one end of a shoelace through an eyelet on your top casing. You’ll have the opening at your seam as well, just keep feeding the shoelace past it and out through the other eyelet.
- Now we need to sew that hole along the seam shut. Fold the fabric so that the hole is aligned with the long seam.
Continue that seam by sewing the casing with a 1/2 inch seam, then zig-zagging over the raw edge. (You will be sewing over the shoelace, that’s okay because it has enough give on the other side.)
- Finally, thread each end of the shoelace through a toggle to create a drawstring. Tie the ends of the shoelace in a knot to create a loop for hanging.


- To use your bag dispenser, widen the top by loosening the toggle. Fill will plastic bags, and tighten the toggle again. Tug a sack through the elastic at bottom, and another will take its place. You can hang it on the back of the pantry door for easy access.

Grocery Bag Holder Video Tutorial:
For visual learners, here is an awesome video tutorial showing you exactly how to make this beauty. Are you ready to get sewing?
Want More?
35 Zero Waste Sewing Ideas >>
Do you still use plastic bags or do you prefer reusable bags?
Let us know in the comments!
Read NextEasy Afternoon Clutch Pattern
Your Recently Viewed Projects
Thanks for your comment. Don't forget to share!
Agnes Creates
Nov 02, 2018
What a clever idea! Thank you Maureen for this tutrial! My war with plastic bags is over! LOL
Cheryl E
Apr 17, 2017
Quick and easy to sew, this grocery plastic bag dispenser really is useful to corral those plastic bags that seem to find their way into every kitchen nook and cranny. I have made a few of these as gifts and they always seem very welcomed, especially since they are put to immediate use!
Report Inappropriate Comment
Are you sure you would like to report this comment? It will be flagged for our moderators to take action.
Thank you for taking the time to improve the content on our site.