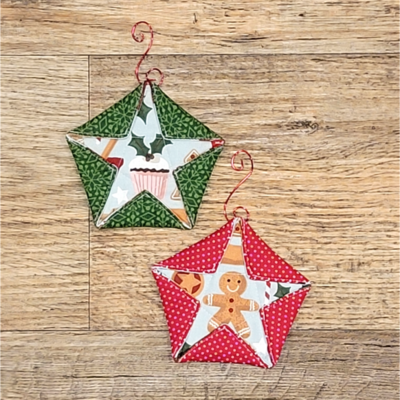
Holiday Clam Shell Cases
 Decorate and embellish to your liking, these Holiday Clam Shell Cases call for your creativity!
Choose a traditional red and green color scheme for your cute ornament or opt for a more modern look.
Learn how to sew an ornament you'll have hanging on the tree for years to come. You can even make several as small gifts!
Personalize the clam shell with initials and memorable pieces.
Materials:
- Clover Clam Shell Kits (comes in small, medium and large sizes)
- Fabric for outside batting and inside batting
- Clover fabric marking pencils
- Clover wonder clips

Directions:
- The kit contains 6 templates, 3 Outside Pieces and 3 Inside pieces – notice the Inside piece is smaller.

- Trace around template with one of Clover’s fabric marking pencils. You will have 3 outside fabric and 3 outside batting pieces – 3 inside fabric/3 inside batting pieces when finished.

- When cutting the batting pieces cut out on the line.

- When cutting the fabric pieces cut at least 1 inch away from marked line.

- Yes! I know my cutting isn’t perfect…..just remember…..this isn’t brain surgery. Save all that energy for the embellishing of your Clam Shell.

- Time now to “sandwich” your fabric, batting and template….and….YES!!! ….The template STAYS INSIDE the petal.
- Okay….I’m not the best photographer! The wonder clips were invaluable with this part of the process. If you haven’t tried them….you MUST!!


- You can see the crisscrossed stitches….just one side to the other until the fabric-batting sandwich is snug around the template.

- This is where you need to refer to your instruction sheet…the placement of the inner petals to the outer petals is important to the finished look. There are now two sides and a bottom piece and the inner to outer placement is important.
- Now the fun begins and you will start to stitch your three petals together….please check your instructions for stitching tips and other helpful hints.
Your Recently Viewed Projects

Thanks for your comment. Don't forget to share!
fabulousgrannies 6 823713
Dec 08, 2012
Fabric is my middle name, we can make 1000s of these cute clam shells thanks
zebracat 8818725
Dec 07, 2012
Pretty darn cool! I can't wait for the day when I can sit still to craft and sew my heart "kin-tent". LOL!
akaStacy
Dec 07, 2012
This is an interesting idea. It doesn't look too complicated. I think it would be very unique!! Good luck on the contest everyone!!
videolady2150 9286 840
Dec 07, 2012
LOVE THIS ORNAMENT!!! I LOVE TO MAKE GINGERBREAD MEN CHRISTMAS ORNAMENTS
KristinDragos
Dec 07, 2012
This looks like it'd be a pretty quick and easy way to use up some scrap fabric too. Very neat idea.
Ellen M
Dec 07, 2012
I would never have thought to use these for ornaments - very clever. Thanks for the idea and tutorial!
jneuman88
Dec 07, 2012
Sounds interesting ... I can't quite picture how these go together, so I will just have to pick up a kit and try it!
esbtucker 9764493
Dec 07, 2012
The picture at the top does not seem to match the project, but the project looks fun!
congrovel 4855272
Dec 07, 2012
These look fairly simple to make and so cute! Would make nice stocking stuffers too. Could be personalized easily.
Report Inappropriate Comment
Are you sure you would like to report this comment? It will be flagged for our moderators to take action.
Thank you for taking the time to improve the content on our site.
![DIY Ugly Christmas Face Masks [Printable Templates]](http://irepo.primecp.com/2021/10/506869/Ugly-Christmas-Face-Mask-square21-nw1_Large400_ID-4506155.png?v=4506155)
![How to Make a Christmas Fabric Face Mask [Printable Templates]](http://irepo.primecp.com/2021/10/506887/Christmas-Face-Mask-square21-nw_Large400_ID-4506395.png?v=4506395)