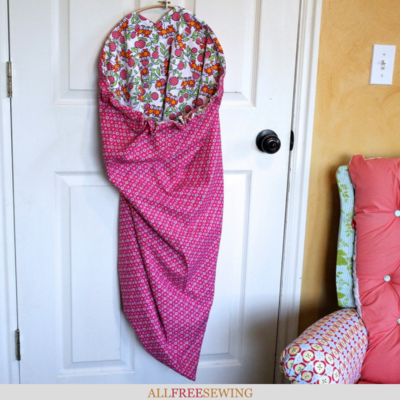
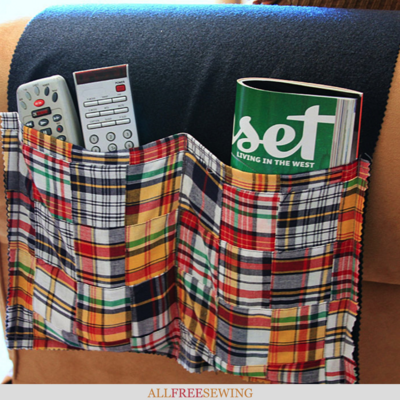
DIY Remote Control Holder
With this tutorial, you'll learn how to sew a remote control organizer that hangs over your chair or couch arm.

Are you always losing that remote control in the couch cushions, under the coffee table, and maybe even in more unusual places...like your fridge?
Try sewing this DIY Remote Control Holder and you’ll never lose your remote control again. This DIY home organizer tutorial is quick and simple, taking only an hour to make using felt, fabric, and a wooden dowel.
Since we all know that TV remotes have a way of disappearing, it's not uncommon to want a solution. This remote organizer is simple to sew and will control clutter and keep your remote and other objects you might need while watching television on hand.
Save yourself some money and DIY your own handy dandy holder. Sewing a remote control holder will remind you how much you love creating functional items for your family and friends. You can even sell them at a craft fair!
You will love this over-the-arm remote control caddy that will eliminate clutter and save you time from always hunting down that remote.
Sign Up For More Free Patterns
DIY Remote Control Holder
Materials List:
• Felt
• Fabric
• Sewing machine
• 1/2" dowel
• Fiskars Pinking Shears (9")
• Fiskars Cutting Mat (24" x 36")
Skill Level: Easy
Project Type: Make a Project
Time to Complete: In an Evening
Sewn By: Machine
DIY Remote Control Holder Instructions:
- Cut felt to your desired size—I used 15" x 25". You may want wider or longer based on your couch size, and the number of pockets that you’d like to create.

- Trim the fabric to fit the width of felt, and at least 3/4 the height of your tallest remote. Hem upper edge.
- Lay fabric over felt, then sew the outer edges & bottom edge to create a large pocket. Be careful to NOT sew the upper edge.
Tip: Don’t worry about raw edges. We’ll deal with those at the end!
- Create the desired number of pockets by stitching over the top of the fabric. Using a zigzag stitch will ensure that the pockets are strong.
- Use Fiskars Pinking Shears to trim all sides. This will reduce fraying, and eliminate the need to hem all edges.
- Fold the top edge of the felt and straight stitch to create a pocket for the wooden dowel. Slip the dowel through.
- Lay the DIY remote control holder over the furniture arm, tucking the dowel between the cushions to help secure it.

Want More?
Read NextDiy Fleece Blanket With Tassels
Your Recently Viewed Projects
Thanks for your comment. Don't forget to share!
Cheryl E
Jul 24, 2018
Having an easy to sew holder for several remote-control devices would simplify TV watching for sure. The remotes seem to have a life of their own and travel to unexpected places. I like that the directions indicate to use a dowel rod in a pocket on the opposite end from the remotes to keep the holder nicely tucked down in the chair or sofa.
Laura P
Aug 15, 2017
What a cute idea! I love the flannel print. This would be great to make for the fall when people are indoors more and watching more TV!
Report Inappropriate Comment
Are you sure you would like to report this comment? It will be flagged for our moderators to take action.
Thank you for taking the time to improve the content on our site.