DIY Bike Handlebar Bag
Make your own DIY handlebar bag for your bike! This full tutorial is just what you need for better summer bike rides.

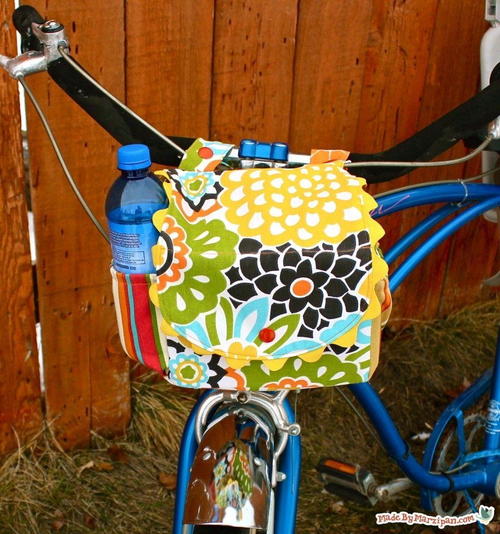
Pack everything you need for a fun bike ride right inside a DIY Bike Handlebar Bag. Follow this tutorial to make your own creative DIY bike saddlebag. This free sewing pattern fits both children's and adult bikes. It's a neat idea and a helpful project that results in something you'll end up using all the time this summer.
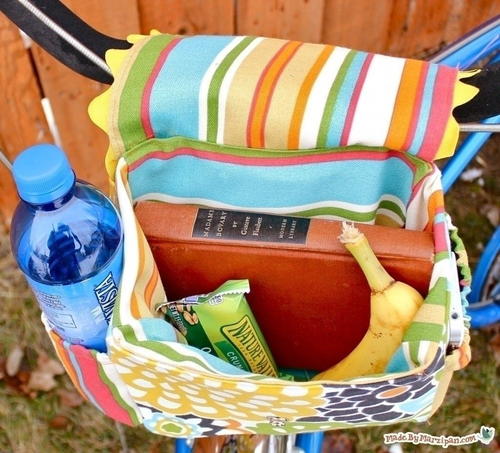
This satchel is a perfect addition to your bike. Use fabric of your choice to make it look amazing on your bike, your husband's, or your children's. Keep water, books, snacks, keys, wallet, and more in this handy DIY bike bag.
Follow Maureen Wilson as she walks you through how to make a handlebar bag, starting with tips on choosing the fabric, measurements, and then the written instructions. There is also a video tutorial found at the bottom of this page for visual learners to watch her in action.
Sign Up For More Free Patterns >>>
Project TypeMake a Project
Time to CompleteIn an evening
Sewn byMachine

Materials List
- 1/3 yard outer fabric (*see note about fabric in next section)
- 1/3 yard inner fabric (*see note about fabric in next section)
- Heavy duty snaps (3)
- 1/4-in. elastic, 1/3 yard
- 1/2 yard of Ric-rac (poly)
- 1 sheet plastic canvas (18 x 12)
How to Make a Handlebar Bag
Let's begin by talking about fabric choices. Because this bag is designed for outdoor use, it's a good idea to choose a fabric that's water-resistant. You can use oilcloth or a vinyl tablecloth. Or you can select an outdoor canvas that's specially treated to be mildew-resistant, such as the one I used. Take note of the fabric care instructions listed on the bolt of cloth. If your fabric can withstand ironing, it will make your finished project tidier if you press your seams as you go.
Start by cutting your fabrics to the measurements listed.
Outer Fabric:
- 8-1/2 x 7 in. (2, main front / main back)
- 7 x 5 in. (2, sides)
- 8-1/2 x 5 in. (1, bottom)
- 8-1/2 x 11 in. (1, flap)
- 4 x 8 in. (2, snap tabs)
- 8-1/2 x 7 in. (2, main front / main back)
- 7 x 5 in. (2, sides)
- 8-1/2 x 5 in. (1, bottom)
- 8-1/2 x 11 in. (1, flap)
- 11 x 7-1/2 (2, pockets)
How to Make the DIY Bike Bag Lining:
-
Begin with the bag lining. If you've watched my Stroller Bag tutorial, you'll notice this bag follows many of the same steps. Sew the lining side panels to the lining bottom panel, sewing one to each short end with right sides together. Sew with a 1/2-inch seam.
-
Pin one of the main lining rectangles to the strip we sewed. Line up the short side of the large rectangle with one of the outer strip segments. Right sides should be together. Pin. When you reach your seam joining the strips together, it's time to turn the strip and pin it along the long side of the main piece. When you reach the next seam, turn again and pin the remaining side strip to the other short side of the main piece.
-
Sew the sides and bottom in place with a 1/2-inch seam. When you reach a corner, tug gently on the fabric diagonally; you want the corner to be free of pleats.
-
Finally, add the other main piece by pinning it to the rest of the bag, right sides together, matching up the edges. Sew with a 1/2-inch seam. Snip off the excess fabric at the corners, being careful not to cut your stitches. Set aside.
How to Make the Bike Bag Flap:
-
Lay the two bag flap pieces right sides together and pin. To round the flap, trace the edge of a plate and cut along the curve.
-
If you want to add trim to the pocket flap, do it now. I chose a 100% polyester ric-rac. Keep in mind that you'll be sewing this with a 1/2-inch seam, so pin accordingly.
-
Lay the other flap piece on top, right sides together, and pin. Sew along the sides and curve, leaving the straight short edge open.
-
Cut off the excess trim. Then notch the curved seam, being careful not to snip your stitches. Turn the flap right side out.
-
Add a 1/8-inch topstitch around the edge of the flap. Consider using a contrasting thread for a pop of color.
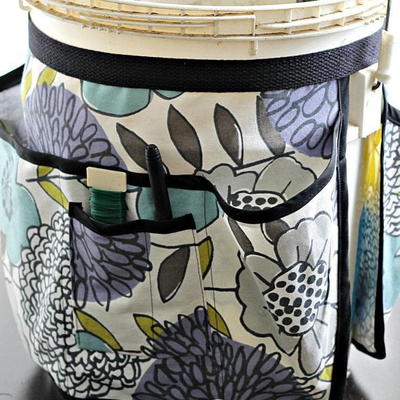
How to Make the Bag Side Panels & Pockets:
-
Find the two outer side pieces. Fold them in half so they measure 5-1/2 x 7-1/2 inches and press along the fold. The pattern should be on the outside. Sew a seam a half-inch below the fold to create a casing for the elastic.
-
Change your machine to a basting stitch, or the longest stitch available. Sew along the bottom raw edge of the side pocket pieces with a 1/4-inch basting stitch. Do not backstitch.
-
Gently pull on the bottom thread to ruffle the fabric. Adjust the fabric so that it fits the bottom of the side pocket panel. Pin in place, lining up the raw edges of both pieces.
-
Cut 6 inches of elastic for each pocket. Use a safety pin to thread it through the casing. Pin the sides of the pocket panel to the side panel. Pull the elastic taut so that the pocket panel fits the dimensions of the side panel. Pin the ends of the elastic to the sides of the pocket piece.
How to Assemble the Outer Bag:
-
Sew the sides and bottom of the pocket to the side panel with a 1/4-inch straight stitch, leaving the top open. Do this for both side pocket pieces.
-
Assemble the outer bag as you did the lining. Pin the side pieces to the short ends of the bottom piece and sew with a 1/2-inch seam. Make sure that you are sewing along the bottom of the pockets.
-
Pin the side and bottom strip piece to the front bag piece. Sew with a 1/2-inch seam. Then sew the last main rectangle to the bag.
How to Make the BIY Bike Bag Straps:
-
Fold the strap piece in half lengthwise and sew down the raw edge with a 1/2-inch stitch. Turn right side out.
-
Fold in one raw end of the tube and topstitch shut with a 1/8-inch seam. Continue adding a decorative topstitch all the way around the strap.
How to Assemble the DIY Bike Handlebar Bag:
-
To assemble the bag, turn the lining inside out. Pin the flap piece to the inside back of the bag, with the underside of the flap touching the back of the bag. Rather than lining up the flap with the top edge, extend the flap about an inch and a half past the edge of the bag to give it more durability.
-
Next, add the straps. The seam of the straps should be face up (NOT against the flap). Line the raw edge of the strap up with the edge of the flap and pin in place.
-
Finally, make sure the outer bag is right side out, then slide it into the lining. Right sides will be touching. Match up the side seams and pin all the way around.
-
Sew with a 1/2-inch seam, leaving the front panel of the bag open for turning. Turn right side out through the front opening.
How to Finish the Bag:
-
I used plastic canvas to stiffen my bag in a way that will be weather-proof. Cut pieces of canvas for the front and back, sides, and bottom of the bag. Fold them and gently insert through the front opening, sliding them into position.
-
Once your plastic is in place, fold in the edges of the front hole and topstitch shut. Your bag should be able to stand on its own now.
-
Add the snaps. If you'd like, you can add two coats of high-quality nail polish to make your snaps match your bag. Fold the flap down and mark where your snap should go. The little hole punch tool that comes with the snap kit had no problem punching through the plastic canvas. Add snaps to the straps and to the panel of the bag. When adding to the straps, be certain that you add one half to the front of the strap, and the other on the backside of the strap.
-
Fold the flap down and snap. Use chalk to mark the line where the flap folds over the edge of the front piece. Topstitch along this mark and the flap will fold down more naturally along this line.
-
Attach to your bike and you’re ready to roll!
DIY Bike Handlebar Bag Video Tutorial:
If you like sewing tutorials in video form, then you're in luck! Watch the video below to learn how to make your own bike bag or to help you understand the steps shared above:
Want More?
6 Back to School Sewing Projects eBook >>
How often do you ride a bike?
Let us know in the comments!
Read NextDIY Reusable Dryer Sheets
Your Recently Viewed Projects
Thanks for your comment. Don't forget to share!
KLC
Apr 15, 2019
I love biking but I haven't done it much since I live in Chicago and it can be scary. I'm making this for my sister, though!
sisterbrittanylewi s 8213162
Oct 17, 2017
Where is the video tutorial? I can't see it on this page. Thanks!
Linda
Jan 25, 2017
I plan to make this for my bicycle and one for my walker. I like trying new projects, it is always the best to improve sewing knowledge and experience for me.
Weberme
Jun 15, 2016
Wow so cute and so easy using this tutorial and bonus video to walk you through the steps. I have got to make some for my three grandkids and the 2 adult bikes after I finish theirs. I know they will love them. I am so glad that it was mentioned about putting the plastic sheets in bag before closing so it will stand on its own. Never would have thought of that and to use a vinyl tablecloth is a great idea. Has anyone made one yet?
scherimanson7615
May 29, 2013
I think I am going to make a custom basket liner to fir my bicycle basket using her instructions and tutorial. Wish me luck :)
Report Inappropriate Comment
Are you sure you would like to report this comment? It will be flagged for our moderators to take action.
Thank you for taking the time to improve the content on our site.