Brilliant Bunting Easy Baby Quilt Tutorial
How do you make a baby quilt? Follow this easy tutorial and you'll see how simple it can be (even for beginners)!

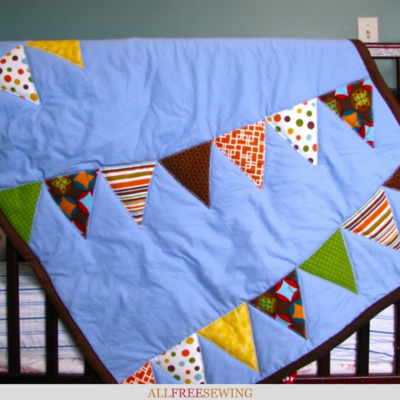
Even beginners can handle this Brilliant Bunting Easy Baby Quilt Tutorial. Ideal for the little ones, this calming blue blanket pattern features bright and fun buntings spread across from end to end. It's one of the most wonderful baby sewing projects.
This quilt pattern is both simple and sweet. Make a baby quilt for an expecting friend - it makes the perfect gift for a baby shower. Not only is this baby quilt soft, cute, and easy to make but it's unique as well. Just follow Maureen Wilson as she leads you through each step. You can also watch the corresponding video tutorial.
We love this design because the simple bunting triangles are fantastic stash-busters. Use whatever scrap fabric you have to make these cute buntings. The baby blanket has so many possibilities.
You can do ombre, eclectic, by patterns or colors, and more. The options are truly endless. You don't even have to use the sky blue if you prefer another background that will match the baby's room.
Sign Up For More Free Patterns >>>
Project TypeMake a Project
Time to CompleteWeekend project
Sewn byMachine

Materials List
- Cotton or flannel fabric, 2 pieces of 32 x 40 inches
- Batting, 32 x 40 inches
- Bias tape, 2 packs (3 yds each)
- Fabric scraps for triangles (21 total)
- Bunting triangle template (optional)
- Sewing machine, thread, & straight pins
- Double-sided fusible webbing (such as Wonder Under)
- Iron
- Scissors
Easy Baby Quilt Tutorial:
-
It's important that you wash and iron all your fabrics first. Cotton and flannel can shrink in the wash, so you might regret it if you don't.
-
You can use a ruler to measure out your triangles, or you can print my triangle template to use as a guide. Because I'm working with small scraps, I can get the most out of my fabric by cutting my triangles individually. Cut 21 triangles.
-
Once your triangles are cut, place them on the rough side of a sheet of double-sided fusible webbing. Iron them well and allow to cool. Peel off the paper backing. The underside of the fabric should feel waxy. If it's fuzzy, you need to iron longer before removing the paper. Separate the triangles.
-
Lay out three rows of triangles in a pleasing pattern. Lightly press the iron on each triangle to tack in place. Then, take it to your ironing board, and iron firmly in place, making sure to get each point.
-
Now we'll layer our fabrics. We're going to sew directly on top of our quilt, so there will be no need to tie it. Put the backing on the bottom, then batting, then the bunting piece.
-
Pin around the perimeter of the quilt, and add a few pins in the middle. This will keep the layers from sliding while sewing.
-
Start with the middle row, and use a zig-zag stitch to sew along the top of your triangles, connecting them in one long row. Then, sew around the edges of each triangle, turning your fabric to follow the shapes.
-
You'll need two packages of bias tape. It's possible to make your own, but we're keeping things simple.
To use the tape, unfold one half, and pin the unfolded edge along the top of your fabric as shown. For the long sides, you can trim the end of the tape to fit, and sew in place. For the short sides, you want to leave 3 inches of excess tape at each end so we can make corners with it. -
Make sure your thread matches your tape. Use a straight stitch and sew in place by stitching in the ditch of the first fold line. Remove the pins. Now you'll fold the bias tape up and over the edge of your quilt. Sew in place close to the inner edge of the bias tape.
-
You should have some excess tape at the ends. Fold downward and line up the edge of the excess tape with the tape that's sewn down. Adjust the seam at the corner so that it's at a nice angle. Sew along the inner edge, lining up your seam with the seam you sewed previously. Fold the raw edge under and sew.
Brilliant Bunting Easy Baby Quilt Video Tutorial:
Watch Maureen in action with this video version of the tutorial above.
What color scheme are you going to use for your bunting baby blanket?
Your Recently Viewed Projects
Thanks for your comment. Don't forget to share!
Seth
Nov 30, 2018
Such a sweet baby quilt and I like that it looks relatively easy to make. I say 'relatively' because, as someone about to leap off the cliff into the world of quilting, all quilting seems a bit beyond my skill level right now. I am frozen with fright but determined to start. Someone push me, please! Hahaha!
doreenwales 949836 1
Jun 16, 2012
What a great project made easier by the clear video showing how too
Report Inappropriate Comment
Are you sure you would like to report this comment? It will be flagged for our moderators to take action.
Thank you for taking the time to improve the content on our site.