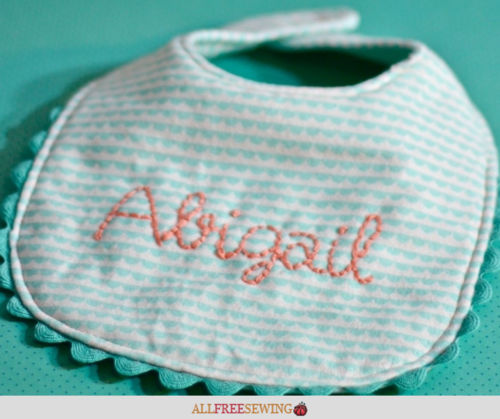
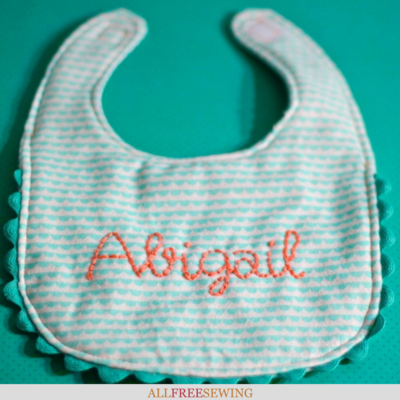
Elegantly Embroidered Baby Bibs Sewing Pattern
If you're looking for baby bib patterns that stand out from the crowd, check out this embroidered name baby bib tutorial.

Even if you've never embroidered before, these Elegantly Embroidered Baby Bibs are beautiful and a great sewing pattern to try.
Follow the easy steps to learn how to make a baby bib that's both special and looks professional. Making your own personalized baby bib will set your gift apart from the rest of the baby shower gifts.
This beautiful baby bib sewing pattern comes with a free printable template that creates a wonderful gift for any baby.
You will use a machine for the main bib and then hand embroider the name. You can also watch the video tutorial Maureen Wilson created at the bottom of this page. This DIY baby bib could not be easier with this full tutorial.
Sign Up For More Free Patterns >>>
Project TypeMake a Project
Time to CompleteUnder an hour
Sewn byBoth Hand and Machine

Materials List
- 1/4-yd flannel
- 1/4-yd thin batting
- Velcro (1-inch)
- Embroidery floss
- Embroidery needle
- Sewing machine
- 3/4-yd trim (optional)
- Baby bib pattern template
Make a Baby Bib Instructions:
Tips:
- For this project, you’ll need 1/4-yard of flannel fabric. If you plan to use the same fabric for front and back, a single fourth-yard cut will be enough for both sides.
- You’ll need some thin batting, to give the bib softness and structure. You can add trim, such as rick-rack. And you’ll need embroidery floss and a sewing needle.
- Finally, you’ll need to print the free bib template, as well as the name or picture you’d like to embroider. I like to use a script font for this, such as this free Fineliner font from dafont.com.
- Click on any image to enlarge.
-
Begin by cutting a piece of flannel and batting to the same dimensions as your sheet of paper (8.5" x 11"). Cut out the bib pattern. Cut out the printed name or image as well, but leave a wide enough border for pinning.
-
Your flannel should be on top of the batting. Decide where you’d like the name or image placed. Layer the cut bib piece on top, and you should be able to see through the paper to make sure you have a nice placement. (I’ve found it’s easier to wait to cut the fabric into the bib shape; it prevents fraying of the edges while you’re embroidering.)
-
Pin the name in place, and thread your embroidery needle. I like to use all the strands when embroidering, and I also double it. This helps the embroidery to stand out if you have a boldly patterned fabric. Make sure you have a good knot on the end of your thread.
-
We’re going to use a basic backstitch for this project. It’s simple to do, but may feel a little… well, backward, at first! To backstitch, poke your needle up through the fabric about 1/4-inch away from where you’d like your stitch to start. Instead of going forward on the fabric, backtrack and poke your needle down through the fabric, 1/4-inch behind where your thread came up.
-
Continue sewing by poking the needle up 1/4-inch past your last stitch, then poke it down right next to where your last stitch began. You want your stitches to touch.
-
Trace your printed word with your embroidery floss. If you run out of floss, don’t worry… just tie it off in a knot on the back, rethread your needle, and continue sewing. For the dots on the letter "i," you can tie a regular knot, or a French knot if you’re feeling fancy.
-
Once you’re finished embroidering, remove the pins. Gently peel off the paper. It should be thoroughly perforated, so it’s pretty easy to remove. If you have tiny closed areas, you can pick them up by piercing them with the tip of your needle. With this tracing method, you really can embroider anything, and it will turn out beautifully.
-
Now it’s time to create the bib. First iron the fabrics. Stack the embroidered fabric on top of another piece of flannel, and pin the paper bib through the layers of fabric. Make sure that the embroidery is nicely centered beneath the pattern.
-
Using good scissors, cut out the bib shape. (If you don’t own a nice pair of sewing scissors, it’s best to cut the two pieces separately.)
-
Next, we’ll add the trim. This step is optional, but it sure looks cute. Pin the trim along the bottom edge of the embroidered bib piece. Keep in mind that you’ll be sewing with a 1/4-inch seam, so think about how much of the trim will show. Pin cut edges under themselves so they won’t fray later.
-
Then add the other flannel bib piece, face down, right sides together. In other words, the patterns should be touching. Pin together.
-
Sew the pieces together with a 1/4-inch seam. Leave a 2-inch hole for turning, right before the curve on the neckpiece.
-
Turn the bib right side out, and press. Fold the raw edges of the hole inward, and press that as well. Pin the hole shut.
-
Now we’re going to sew the hole and add a decorative topstitch. I’m switching to a peach thread to add a pop of color. If you’re a beginning sewer, it’s best to stick with a thread that will blend in with your fabric. Stitch the hole shut using a 1/8-inch seam, and continue sewing all around the bib.
-
Finally, we’ll add a Velcro closure. Sew the rough piece of Velcro to the underside of the left flap. Sew the fuzzy Velcro to the top of the right flap. All finished!
Embroidered Baby Bibs Video Tutorial:
If you are a visual learner, then you'll appreciate this video version of the tutorial you read through above. Take a look:
What's your favorite material to use for baby bibs?
Read NextThe Fastest Burp Cloth Tutorial
Your Recently Viewed Projects
Thanks for your comment. Don't forget to share!
Report Inappropriate Comment
Are you sure you would like to report this comment? It will be flagged for our moderators to take action.
Thank you for taking the time to improve the content on our site.