You Asked, Angel Answered

You've seen her video tutorials and followed her patterns, now you can ask Angel Hickman Peterson your personal sewing questions! She'll provide her answers right here on the site. Let this talented designer help you improve!
January 11, 2012:
One question I'm often asked:
"Can I sew over pins?"
Answer:
The short answer is no you shouldn't, you should remove the pin just before it gets under the foot. However there is documented proof - a video on AllFreeSewing's YouTube channel that shows me doing otherwise. So here is the long answer. As a general rule you should remove the pins to prevent your needle breaking or hurting the timing of you machine. While some machines may claim they can "slip" past the pins, I have it on good authority that removing the pins is just good practice and a good habit to get into. I do find sewing over pins to manipulate the cloth under the needle useful on sharp turns and curves. That being said, I have sewn over pins and broken a needle or two in my day. So I will try to do better in setting a good example with proper pin removal!
December 28th, 2011:
Annie Thomas Wall asked:
“Where can I find a tailor’s dress form?”
Answer:
Annie, finding a true tailors dress form can be a quite a trick – especially if you are on a budget. First of all I would like to point out (for the novices) just because something is in a dress form – doesn’t mean it’s for sewing! Decorative dress forms have become quite popular and while they look great they have very little practical purpose.
Your best bet to find a good tailor’s dress form is to hit up your local want Ads. Online places (like Craig’s list and newspapers online) are a great resource for a seamstress on a budget. Plus you might get to meet the person who’s selling it and get a few tips too (bonus!).
If you don’t mind buying new online is a great place to research and get just what you want. For example, a quick search brought up this site - Atlanta Thread, which had male tailoring forms. The internet is now a much more secure and resourceful place to find the exact tool you’re looking for and you’ll get a feel for pricing too.
December 21, 2011:
One question I'm often asked is:
"Do I need to do anything special to sew with fleece?"
Answer:
It’s fleece season. It’s a wonderful warm fabric that is easy to sew on. You just have to make sure you take a few steps.
- Use standard thread. No need for anything special - regular thread will work great.
- Use a medium weight needle. Fleece is a little thicker fabric and requires a slightly heavier needle than cotton.
- Pin the fabric. Even though it doesn’t easily slide under the needle be sure to pin the fabric to avoid issues of it bunching under the needle.
- Clean out your machine, often. Fleece Is fuzzy, and that fuzzy goodness gets into your machine as you sew. Be sure to take a minute to sweep out your machine after your fleece project (maybe even during).
- Know your fleece. Micro fleece and Minky require a little more finishing than regular fleece.
- Use interfacing when making button holes. Fleece needs the reinforcement of the interfacing so the button hole won’t stretch out of shape.
Fleece is a great fabric, I know I am biased but Fleece is Fun! If you want to start sewing with fleece I recommend The Basic Hat With Ribbon as a good first project.
December 14, 2011:
As a sewing blogger, I get a lot of questions emailed to me, one of the most common is:
“I'm just getting into sewing – what kind of machine should I get?”
Answer:
Buying your first sewing machine can be a daunting task. Here are a few things to look for and ways to get the best machine you can.
Things a good machine should have:
- A solid straight stitch. If the straight stitch isn’t perfect, and can’t sew through thick layers, the machine isn’t going to be able to handle the most rudimentary tasks.
- Weight. A good machine will have some weight to it and be able to keep steady while you manipulate the cloth.
- All the parts. If you are choosing to buy a second hand machine, make sure that all of the pieces (sewing feet, pedal, cord, etc.) are there. If they aren’t, pass on the purchase; odds are it wasn’t well cared for.
Things to avoid:
- Buying it at the big box store. Yes I know it’s a lot cheaper than the sewing machine store but you get zero tech support. Odds are if you buy it at a specialty store you will pay more but many stores offer lessons with the purchase of the machine making it worth it. If you have trouble help is a phone call away.
- Buying the machine with all the bells and whistles. Yes there are machines out there that look like the helm of the Star Ship Enterprise. If you are just getting started you don’t need it. The only stitches you need are a straight stitch, zig zag, satin and to be able to do a button hole. That’s all you need to do 90% of sewing projects. The rest are extras that are nice but completely unnecessary.
- Buying blind. Before you purchase any machine new or used do a little research on the internet. Many places have reviews of machines of all makes and models and you’ll be able to tell which machines have longevity and which have problems before you buy.
December 7, 2011:
Tammy Creecy Gravell asked:
How can I fix some older quilts whose tops have tears in some of the pieces? They are not heirloom ones, just well used and loved.
Answer:
Mending is quickly becoming a lost art. Our society has made everything too disposable – so I love the fact that you want to repair your quilts even though they aren’t heirlooms! There are a couple of different paths you can take to mending a quilt.
One way is to stop the fraying or tear from continuing. Turn under the raw edges of the tear and sew them down. Next hand sew an applique piece on top of the tear in the same or similar fabric.
That is the most delicate and proper way to mend, if you want a more quick patch solution, simply us an iron on adhesive (like wonder under) on the same or similar fabric and iron a patch over the tear, it's not as pretty a solution, but it will stop the tear and let the quilt live another day.
November 30, 2011:
Tina Saracina Michaud asked:
I can't seem to line up my points, any suggestions?
Answer:
When it comes to points, corners, indents, etc. pins rule. Pins, one of basic sewing tools often get thrown by the wayside. Some think they take too much time, others think they have outgrown them. The truth is even the most advanced seamstresses still use pins. Pins have a purpose. When it comes to getting points to line up, pin the points (like on a star pillow) should be pinned first, then pin in between them. This will ensure the points will line up and that you will get a nice crisp seam. Now if you are talking quilting, often when you are lining up fabric and patterns are not meeting properly it either, measurements are off or you aren’t pressing the seams and setting the seams every time. And yes even in quilting if the seam is longer than a few inches you should use a pin or two.
November 23, 2011:
Tracy Bower asked:
I'd love to find an explicit tutorial on using French seams for clothing and bedding. Patterns a plus.
Answer:
Ooo, la la! French seams are a wonderful way to finish off fabric – especially ones that at prone to fraying easily (taffeta anyone?) French seams have been used for hundreds of years and are the ultimate way to elegantly finish off ends. They are a tool that should be in every seamstress’s sewing repertoire.
Tracy one of the great things about AllFreeSewing.com is that it is a wonderful resource for tutorials and methods. I would like to direct you to Sarai’s tutorial that you can find here – that walks through step by step (with great pictures) on how to make a French seam.
Pillows are a great way to get started with French Seams – you could try making the Easy Ribbon pillow out of fray - prone fabric to get your feet wet or try the five minute pillow.
November 16, 2011:
Marge Thomas asked:
Where is a good place to find patterns online?
Answer:
I guess the easy (and slightly cheeky) answer would be AllFreeSewing.com. The truth is there are a lot of great free tutorials out there that offer a pattern to download.
It seems like everyone is moving toward digital, even the well-established pattern publishers (like Butterick) are starting to offer a “printable pattern”. I love Etsy, and there are several designers that offer an array of patterns that you can purchase from. I am all about supporting the little design houses featured there (many of them also have tutorials on AllFreeSewing) – but you do have to be careful when buying a digital pattern:
Here are a few tips to digital patterns:
1. Look at the person’s feedback/ rating – this is a good indicator of how good their patterns are.
2. Look at the graphic design of their website and quality of their pictures. These are indicators of how nice the patterns are laid out.
3. Look for troubleshooting support. I know from experience that everyone can read directions differently. So if you get confused on a step how easily can you contact the designer to answer a question?
Digital download is the way everything is going. As a sewing enthusiast it’s a good idea to start getting comfortable with printable patterns.
Have you started your Christmas sewing yet? Now is the time to get started on sewing some gifts for friends and family, like an easy knit scarf or a Teeny Tiny Tote. Perhaps a 50’s headband would add a little flair under the tree for your friend. Or a hoodie vest for the man in your life. You can really get into the Christmas spirit with Santa hats in sizes for you whole family… and hey that comes with a digital pattern!
November 9, 2011:
Vina Hoffman asked:
"I am making blue jean purses and need to find a good closure for the top."
Answer:
Vina there are probably as many closures as there are purses! When deciding on a closure I always ask myself how is this bag going to be used?
If it’s a large bag where the contents are less likely to easily spill out a simple magnetic closure (available here at cutratecrafts. com) is a clean and simple option that closes the bag without much fuss.
A smaller bag that is shallow and with a wide opening will require a sturdy zipper, as more stress will be put on it.
Once you’ve made your jean purses complete your outfits with an Anthropologie Inspired Scarf or a Fabric Headband or even add some cute accessories to them like a No-Sew Satin Flower Clip.
November 2, 2011: Perfect Fit
Samantha Seals asked:
"I'm having trouble getting the right fit in vests at the side seams. The arm holes seem too deep and there's always a bulge over the bust line. I'm following a standard pattern and I make my vests reversible."
Answer:
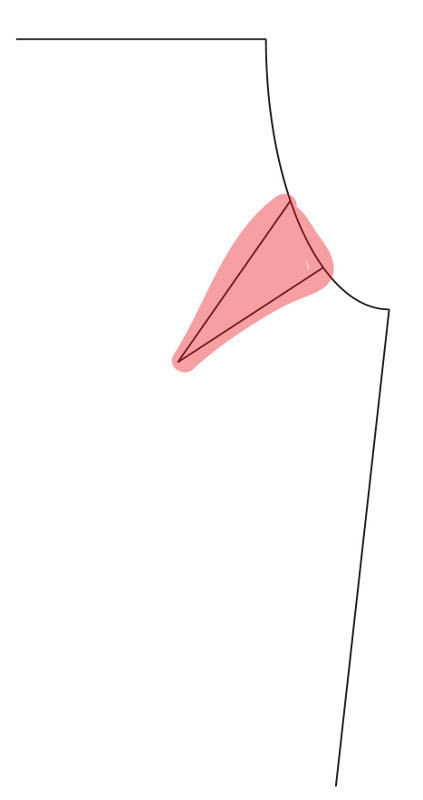
Samantha one of the things I love about sewing is making something to fit perfectly. That is the point of making something custom, right? To make the bulge go away the pattern needs to be modified with a dart from the arm hole to the bust point (see the picture). This will fix the large arm holes and any unflattering bumps that can happen.
For a couple of different vest ideas you can check out the Easy Ruffled Vest or the stylish Jersey Fabric Vest . Or for a different kind of cover up you can try the Cowl Capelet.
Dart example:
October 26, 2011: Sewing With Knits
Velicia Steadman asked:
“I want to make a faux fur coat this winter. Will my standard needle work? Also, do you have tips for sewing leather?”
Answer:
Wow Velicia, I love the idea of the textures of leather and faux fur – very chic and very in this fall. I have done some sewing with faux fur and here is what I have discovered.
The most important tool to have on hand is a lint roller. When you are cutting out your fur pieces they are going to shed everywhere. You should consider cutting these outside to spare yourself the mess.
When it comes to needle size a standard foot and needle should work. But before your start sewing please be aware of a few things:
- The nap of the fur (which way the fur lays) for example: if you are making a fur collar you will want the fur to lay all the same direction.
- Also if you are using a pattern that requires you to “double up” the fabric – you will need to cut 2 single pieces, one normal and one “flipped” (so the right side of the pattern piece is down one the cloth).
While I have done some sewing with fur, I have to confess leather is outside my range of expertise. But this is why we have friends and the internet! So after a little research among my fellow sewing enthusiasts and a couple of searches here is what I have discovered.
The following tools are essential for sewing on leather:
- A leather needle
- A Teflon presser Foot
- Double sided clear adhesive tape (made specifically for sewing)
The proper needle helps pierce the leather, while the Teflon foot reduces drag on the material. Since you can’t pin leather pieces together (holes are a no, no) the adhesive tape helps keep the material in place while you sew. Note: don’t sew through the tape, be sure to have it outside your seam allowance. The biggest tip with leather is go slow, and be sure sew a practice scrap before working with your pattern pieces as you will need adjust your tension.
Leather and fur make for a delicious Autumn wardrobe, but if you aren’t ready for the expense you can make a cute Cowl Capelet or Bow wrap out of easy and affordable fleece.
October 19, 2011: Sewing With Knits
Annette Brown asked:
“I see so many seemingly simple knit garments in stores that I just know I could sew if I wasn't intimidated by sewing with knit material. What's the secret?”
Answer:
Annette here’s the secret - there are four things you need in order to be successful with knits.
1. You need a Jersey Ball Point needle for your sewing machine. This simple piece of equipment is essential for success with knits – it grips the cloth just right to avoid bunching or tension issues while sewing.
2. You need to know which way the fabric stretches or the crosswise grain. Knits have a big stretch and it’s important to cut out items the correct way (several patterns will have an arrow that will help you line up the cloth correctly with the proper grain)
3. You need to know what stitch to use. If you are sewing a seam that will have a lot of stress on it, (for example the sides of a basic hat) you’ll want to sew using a zig zag stitch. The zig zag stitch has a little give to it and will stretch a little with the cloth, making it less likely for the seam to pop.
4. You need to practice on an old t-shirt. I bet that you have a t-shirt in a bottom drawer that you don’t wear anymore. Practice (especially with knits) does make perfect. Try sewing something simple (like a child’s basic pant) to get your feet wet. If you mess up, unpick and try again – you can do it!
Once you have mastered sewing on knits you can try a couple of free pattern tutorials like the Back to School Pleated Skirt and the Boutique Style Pant both of these patterns can be made from knit or fleece.
Do you have a sewing question for Angel? Leave your question on our Facebook page or contact us.