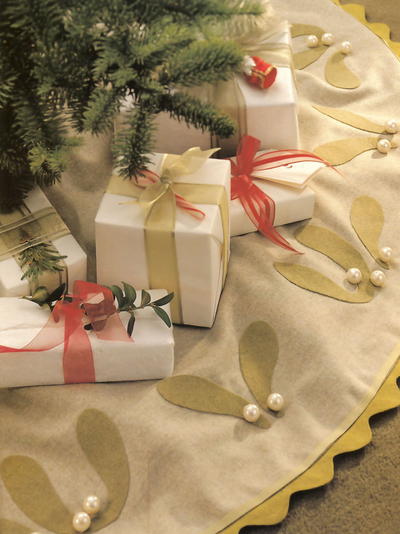
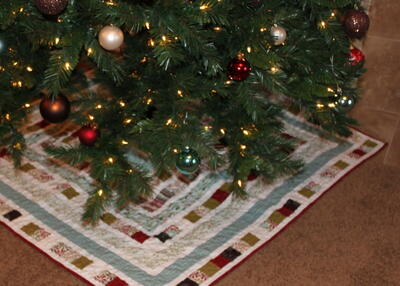
Mistletoe Applique Tree Skirt

Spruce up your Christmas tree this year with this Mistletoe Applique Tree Skirt. This tree skirt pattern will add some loveliness to your home this holiday season. The tree skirt features a green wool flannel background, with soft green appliques and trim, giving it a monochromatic flair. Added pearls and mistletoe leaves turn this DIY Christmas tree skirt into something elegant and warm your friends and family won't believe you made this yourself. Homemade Christmas decorations always make the holidays extra special, so go ahead and work up this pattern. Your family is sure to cherish this tree skirt for many years to come.
Project TypeMake a Project
Sewn byMachine

Materials List
- 1¾ yards of pale green wool flannel, 60" wide, for background
- ¼ yard of medium green wool felt, or wool flannel, for appliqués. Note: if you can’t find wool felt in the color you want, you can make your own by machine washing wool in hot water. Dry it in the machine; then iron it with steam to remove wrinkles.
- 1¾ yards of lining fabric in a coordinating color
- 46 cream pearl beads, 14 mm
- 6⅛ yards of green rickrack, 2" wide
- 6⅛ yards of light green grosgrain ribbon, ¼" wide
- Sewing thread in a coordinating color
- Beading thread
- Fabric glue
- Thumbtack
- Chalk pencil
- Masking tape
- Spray adhesive (or preferred applique method)
- 8 Velcro self-adhesive dots
- Small square of corrugated cardboard
- Tape measure that has a metal end with a hole in it
Making the Circles
-
Press the wool fabrics and the lining fabric flat using an iron. Set the lining fabric and medium green wool aside.
-
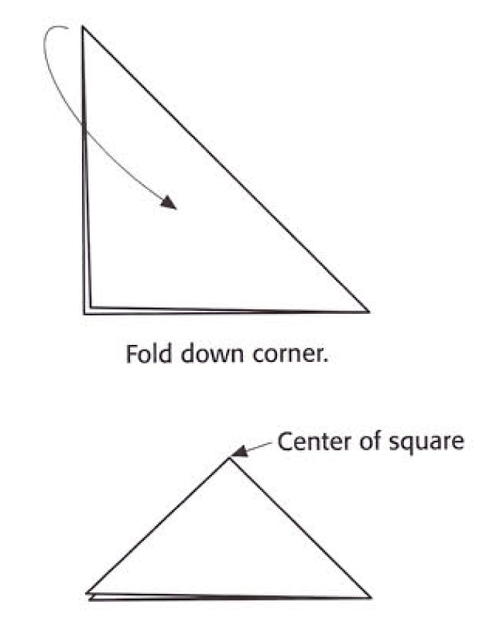
Lay the pale green flannel on a clean, flat work surface. To find the center of the largest possible circle, lift one corner of the fabric and fold it toward the opposite corner so that adjacent sides align, creating a triangle. Excess fabric will extend beyond the triangle. Cut away the excess.
-
Fold the triangle in half, aligning the edges. The top center point is the center of the fabric. Using straight pins, mark this center point.
-
Unfold the fabric triangle, wrong side up, and smooth it flat. Place a small square of cardboard over the center point and secure it in place with masking tape. Don’t worry about the tape ruining the fabric. The center will eventually be cut away, and the lining will cover this side, as well.
-
Turn the fabric to the right side, taping down the corners to secure them. The corners, too, will be cut away.
-
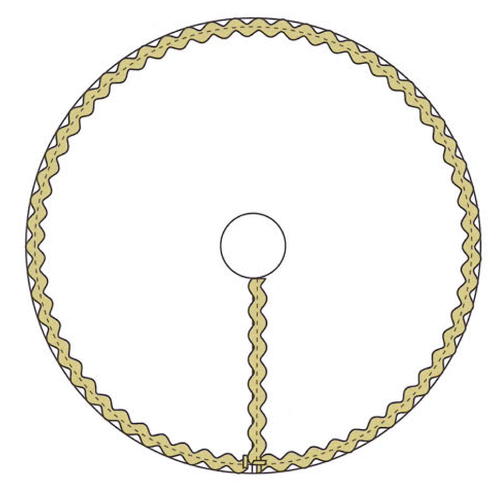
Create a compass by pushing a thumbtack through the end of the tape measure, into the center point of the fabric and into the cardboard. Extend the tape measure. Using a chalk pencil, measure and mark three points: one at 4", one at 27", and one at 28". Continue moving the tape measure and marking these points around the entire square of fabric, creating three circles.
-
Using a ruler and the chalk pencil, mark a straight line from the center of the circle to a point along the outer edge of the circle. Cut along the 28" line, discarding the excess fabric. The 27" circle will be the stitching line.
-
Cut along the straight line to the center of the circle. Then cut away the center circle, cutting along the 4" line. The center circle will create the hole for the Christmas tree.
-
Using pins, measure and mark a ½" seam allowance on each side of the straight line that you cut to the center of the circle.
-
Repeat steps 2–9 to cut out the lining fabric. Set both fabrics aside.

Attaching the Appliqués and Rickrack
-
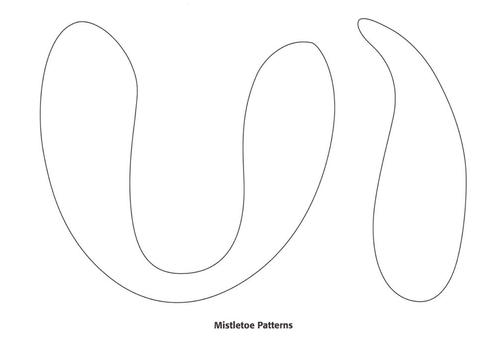
Using the mistletoe patterns, cut 10 double leaves and 26 single leaves from the medium green wool flannel.
-
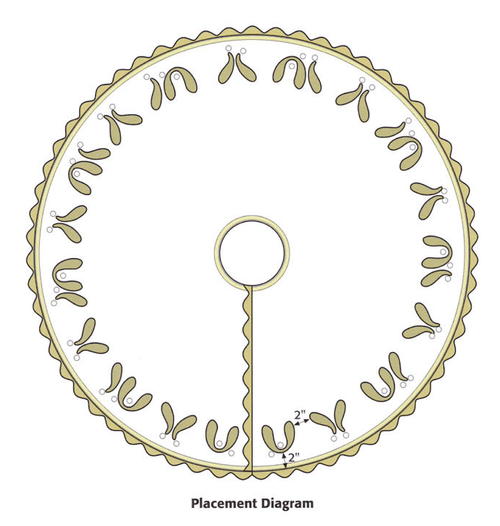
Place the light green wool flannel, right side up, on a clean, flat work surface with the center front (opposite the cut line) most accessible. Pin all the leaves in place as shown in the placement diagram. Each leaf should be 2" from the seam line (the 27" circle), with about 2" between leaf groupings.
*Designer’s Tip: Before removing the appliqués to apply the spray adhesive, place a few pins around the outside of the leaves to mark their places. -
Lift off one leaf at a time and place it wrong side up on clean paper. Apply a light coat of spray adhesive, then turn the leaf right side up and return it to its original position, pressing down to make sure it adheres. Repeat around the entire skirt to adhere all the appliqués. Lightly press each appliqué with an iron.
-
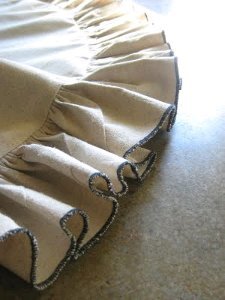
With the wool flannel right side up, pin the rickrack along the outer edge of the skirt, positioning the center of the rickrack on the seam line as shown below. Pin around the entire circle, trimming the rickrack even with the cut edge at the center back. Turn up ½" at each end. Pin another length of rickrack along one edge of the straight opening. At the outer edge, turn up ½" at the end. Then machine stitch the rickrack in place down the center of the rickrack, removing pins as you work.
Finishing
-
Pin the skirt top to the lining, with right sides together and raw edges even. As you pin, make sure the fabrics lie flat and unwrinkled. To prevent slipping, place pins in the interior of the skirt as well as along the edges.
-
Machine stitch around the outer edges, along the curved seam line, and along the opening that has rickrack attached. Using a ½" seam allowance, stitch around the center circle and partially down the remaining straight side, leaving a large opening for turning. Trim close to the stitching line around curved seams. Notch the fabric around the outer curve and clip around the inner curve. Clip excess fabric from the corners.
-
Turn the tree skirt to its right side, flattening the seams and pushing out the fabric at corners.
-
Thread a hand-sewing needle with beading thread. Slip the hand holding the needle inside the opening of the skirt and stitch the beads in place as shown in the diagram.
-
Turn in the raw edges along the opening and slipstitch them closed. With your sewing machine, edge-stitch around the center hole.
-
Around the outer edge of the tree skirt just above the rickrack, use fabric glue to adhere the ¼" grosgrain ribbon, beginning and ending at the center back seam. Trim the ribbon ⅜" beyond the edges and turn the ends under, gluing them in place. Apply the grosgrain ribbon around the center hole in the same manner.
-
Along the straight opening, adhere the loop side of the Velcro dots along the underside of the rickrack, placing the dots about 4½" apart, or on every other bump. Adhere the hook side of the Velcro dots on the right side of the tree skirt, about ⅛" from the edge, so that the hook dots align with the loop dots.
Read NextHow to Make a Christmas Tree Skirt