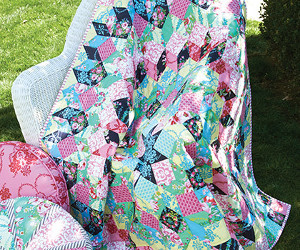
Beauty Queen Starburst Quilt
Piece together FreeSpirit’s vivid Beauty Queen Fabrics by Jennifer Paganelli to make this exciting Starburst Quilt for someone special! This tutorial shows you how to make a quilt that is full of beautiful colors and unique geometric shapes. You and your family will love snuggling under this eye-catching quilt when the weather gets chilly. This gorgeous quilt would look beautiful in a girl's bedroom or a decadent living room.

Materials
- 1 yd (.91m) PWJP083.MIDNI
- 5/8 yd (.57m) PWJP087.PINKX
- 3/8 yd (.34m) PWJP088.YELLO
- ¼ yd (.23m) PWJP086.YELLO
- ½ yd (.46m) PWJP088.GREEN
- 3/8 yd (.34m) PWJP085.GREEN
- 5/8 yd (.57m) PWJP085. BLUEX
- 3/8 yd (.34m) PWJP086.PINKX
- 3/8 yd (.34m) PWJP083.PINKX
- 1 yd (.91m) PWJP083.YELLO
- ¾ yd (.69m) PWJP088.MIDNI
- ½ yd (.46m) PWJP084.PINKX
- ¼ yd (.23M) PWJP085.MIDNI
- 3 ½ yd (3.20m) backing fabric
- Coats® Cotton Covered Quilting & Piecing Thread, Color No. 8050, Buff, for piecing
- Coats® Cotton Machine Quilting Thread to coordinate with prints
- 62” (157.5cm) square quilt batting
Additional Requirements
- Sewing Machine
- Rotary cutter/mat/plastic ruler
- Iron, pressing board
- Water-soluble fabric marker and/or chalk marker for dark
- fabrics, optional
- Template plastic, optional
- Craft scissors for templates, optional
Designer's Tips on Fussy Cutting
This quilt was cut using a combination of ‘fussy cutting’ to cut some pieces and a rotary cutter, ruler, and mat to cut remaining pieces. ‘Fussy cut’ means to cut pieces centered over a particular motif. Some PWJP083.MIDNI and PWJP083.YELLO diamonds were ‘fussy cut’ alternating right and left half of flower motif. PWJP008. MIDNI squares were ‘fussy cut’ over wreath and bouquet motifs. To ‘fussy cut’ pieces, make plastic templates from the patterns provided (below). Trace around templates and cut out pieces using scissors. Trace a portion of fabric motif onto template to align template easily on fabric to cut remaining pieces. Reverse template to cut both left and right mirror images for some pieces.
Cutting
Tips for cutting squares: Cut 3 3⁄8” wide (8.59cm) crosswise strips. Cut strips at 3 3⁄8” (8.59cm) intervals to make squares. Each crosswise strip yields twelve squares.
- Cut four 3 3⁄8” (8.59cm) squares from PWJP083.PINKX.
- Cut sixteen 3 3⁄8” (8.59cm) squares each from PWJP086.YELLO and PWJP088.GREEN.
- Cut twenty-eight 3 3⁄8” (8.59cm) squares from PWJP086.PINKX.
- Cut thirty-six 3 3⁄8” (8.59cm) squares from PWJP008.MIDNI.
- Cut forty-eight 3 3⁄8” (8.59cm) squares from PWJP083.YELLO.
- Cut fifty-six 3 3⁄8” (8.59cm) squares from PWJP087.PINKX.
Tips for cutting diamonds: Cut 2½” (6.4cm) wide crosswise strips. Trim ends diagonally at 45-degree angle. Measure and cut diagonally at 2½” (6.4cm) intervals.
- Cut twelve diamonds from PWJP083.YELLO.
- Cut fourteen diamonds each from PWJP008.MIDNI and PWJP085.MIDNI.
- Cut twenty diamonds from PWJP088.GREEN.
- Cut twenty-eight diamonds from PWJP083.PINKX.
- Cut thirty-six diamonds each from PWJP088.YELLO and PWJP085.GREEN.
- Cut fifty-two diamonds from PWJP083.MIDNI.
- Cut sixty-four diamonds from PWJP085.BLUE.
Tips for cutting triangles: Cut six 5¼” (13.34cm) squares. Cut each square in half diagonally—twice—to make four triangles.
- Cut twenty-four triangles from PWJP083.YELLO.
- Cut six 2½” wide (6.35cm) crosswise strips from PWJP084.PINKX for binding.
Instructions
Note: Seam allowances are ¼” (0.6cm) unless noted.
Hint: Stitch all seams right sides together. Make points of diamonds and corners of squares match.
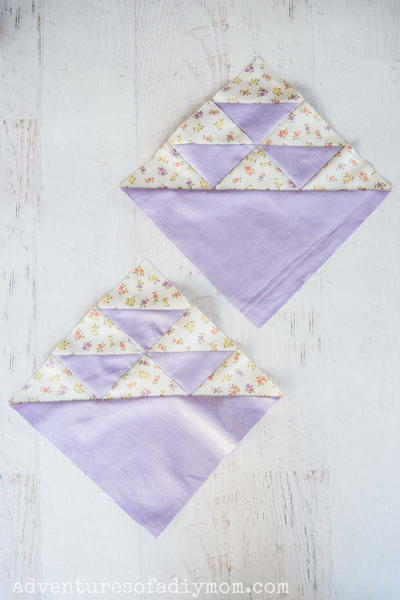
Center Square:
- Arrange eight PWJP083.MIDNI diamonds for center of starburst, alternating left and right flower motifs.
- Pin together in pairs with lower pin at corner of seam line. Tip: Measure and mark point with small dot before stitching, if necessary.
- Sew together, stitching from center point to end of seam line at side point.
- Trim seam allowance at center point.

- Sew inner edge of one diamond to one side of a PWJP086.YELLO square beginning and ending at corners of seam lines.

- Sew inner edge of other diamond to adjacent edge of square, beginning and ending at corners of seam lines. Press seams toward diamonds. Tips: Always sew squares to diamonds pairs in this manner.

- This completes a two-diamond unit. Make four two-diamond units for quilt center.

- Sew each pair of diamonds to another, stitching from center point to end of seam line at side point.
- Sew one pink square between points of diamonds to complete two half stars. Press seams toward diamonds.

- Sew half stars together along edges of diamonds, beginning and ending at corners of seam lines.
- Sew one pink square between points of diamonds. Press seams toward diamonds.

Row 1:
- Sew a yellow diamond to a green diamond. Sew one PWJP008.MIDNI square between diamonds.

- Join third diamond to pair. Sew PWJP086.PINKX square between points of diamond. This completes a three-diamond unit. Press seams toward diamonds.

Sew three-diamond units to squares of center star, beginning and ending at corners of seam lines.

Sew side edges of diamond units together, beginning and ending at corners of seam lines. Press seams toward diamonds. Hint: Be certain quilt lies flat after each row is joined. If it puffs up in center, decrease seam allowance slightly when joining sides of diamond units. If quilt ruffles around edges, increase seam allowance slightly when joining sides of diamond units.
Row 2:
- Arrange PWJP088.GREEN and PWJP085.BLUE diamonds in two-diamond and three-diamond units.
- Place PWJP083.YELLO squares between points.
- Sew units together.
- Sew units to squares of Row 1.
- Sew side edges of diamonds together. Press seams toward diamonds.

Row 3:
- Arrange PWJP083.PINKX, PWJP008.MIDNI, and PWJP085.MIDNI diamonds in two-diamond and three-diamond units.
- Place PWJP087.PINKX squares between points.
- Sew units together.
- Sew units to squares of Row 2.
- Sew side edges of diamonds together. Press seams toward diamonds.

Row 4:
- Arrange PWJP085.GREEN and PWJP088.YELLO diamonds in two-diamond and three-diamond units.
- Place PWJP086.PINKX and PWJP008.MIDNI squares between points.
- Sew units together.
- Sew units to squares of Row 3.
- Sew side edges of diamonds together. Press seams toward diamonds.

Row 5
- Arrange PWJP085.BLUE and PWJP083.MIDNI diamonds in two-diamond and three-diamond units.
- Place PWJP083.YELLO squares and triangles between points.
- Sew units together.
- Sew units to squares of Row 4.
- Sew side edges of diamonds together.
- Sew to edge of fabric on seams, joining two triangles along edge of quilt. Press seams toward diamonds.

Corners:
- Arrange squares in diagonal rows in corners of quilt.
- Sew squares together in rows. Press seams in one direction.

- Sew a single PWJP087.PINKX square to yellow squares, beginning at inner corners of seam lines and ending at edge of fabric.
- Repeat Step 41 to join each row, matching seam lines. Press seams in one direction.
- Trim batting and backing to be 1/8” (0.3cm) larger than quilt top.
- Fold binding strips in half lengthwise. Press.
- Pin binding to quilt front, raw edges matching.
- Use 3⁄8” (1.0cm) seam allowance to sew binding to quilt.
- Open binding and press on right side.
- Fold binding to wrong side and press.
- Stitch in the ditch or sew binding to backing using a slipstitch.
- Machine quilt Starburst Quilt as desired.

Read NextBirds In The Air Quilt Block
Your Recently Viewed Projects
Thanks for your comment. Don't forget to share!
sandiebenoist 5573 430
Mar 02, 2017
I love this quilt design. I wish you had just listed a color for fabrics rather than numbers.
Report Inappropriate Comment
Are you sure you would like to report this comment? It will be flagged for our moderators to take action.
Thank you for taking the time to improve the content on our site.