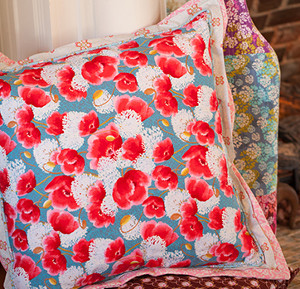
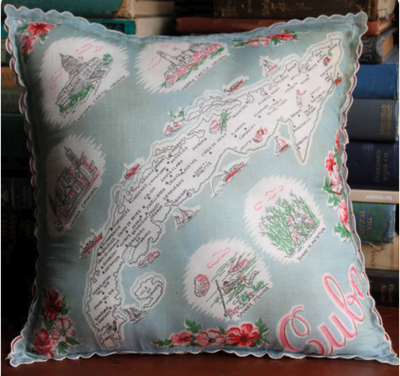
Memory Lane Pillows
Our memories are like pauses in our lives when we pin that moment to a board so as not to lose it. These pillows will take you on a trip down "Memory Lane", from beautiful poppies that wave in the fields every year, agapanthus, to filigree screens and intricate railings. Keep your memories close with these pillows. This tutorial includes instructions to learn how to make a pillow sham with ties and a double flange pillow with welting.

Pillow Sham With Ties
Materials
- 1 ½ yd (1.37m) FreeSpirit Memory Lane by Nel Whatmore, PWNW045.DARKB for pillow sham
- 1 ½ yd (1.37m) FreeSpirit Memory Lane by Nel Whatmore, PWNW046.BROWN for pillow insert
- 1/4 yd (.23m)FreeSpirit Memory Lane by Nel Whatmore, PWNW045.DARKB for ties and facing
- Coordinating Coats Cotton thread
- 24” pillow insert
- Fabric Scissors
- Sewing Pins
- Sewing Needle
- Sewing Machine & Thread
- Ruler
- Fabric marker
- Iron
- Hand sewing needle
Cutting
- Cut two 25” (63.5cm) squares from each sham and insert pieces.
- Cut six 10” x 2 1/2” (25.4 x 6.35cm) tie pieces.
- Cut two 6” x 25” (15.2 x 63.5cm) facing pieces
Instructions
Note: Seam allowances are 1/2” (1.27cm) unless stated otherwise. WOF means Width of Fabric.
Pillow Insert
- With right sides together, pin pillow insert sections.
- Stitch, leaving an opening large enough for turning and inserting the pillow form.
- Trim across corners.
- Turn pillow right side out. Insert pillow form. Slip-stitch opening closed.
Pillow Sham
- Fold each tie in half lengthwise, right sides together.
- Stitch, leaving one end free.
- Cut corners diagonally. Turn right side out and press.
- With right sides together, baste ties at upper edge of pillow, centering one tie on each section and placing remaining ties 5” (12.7cm) from the side edges.
- Finish lower edge of facing by pressing under 1/4” (.64cm) on lower edge and again. Stitch close to pressed edges.
- Pin pillow sham sections, right sides together, matching sides, lower edge and side facings. Stitch across sides and lower edge. Cut corners diagonally. Turn right side out. Turn facing to inside. Press.
- Place pillow insert into sham and tie.
Pillow with Welting
Materials
- 3/4 yd (.69m) FreeSpirit Memory Lane by Nel Whatmore, PWNW043.TEALX for pillow top
- 1-1/4 yd (1.14m) FreeSpirit Memory Lane by Nel Whatmore, PWNW047.PINKX for outside flange and back
- 1/4 yd (.23m) FreeSpirit Memory Lane by Nel Whatmore, PWNW045.BLUEX for inside flange
- 1/4 yd (.23m) FreeSpirit Memory Lane by Nel Whatmore, PWNW048.BLUEX for welting
- 7/8 yd (.8m) FreeSpirit Memory Lane by Nel Whatmore, PWNW048.BLUEX for lining
- Batting
- Filler cord for welting
- Hook and loop tape
- Coordinating Coats Cotton thread
- 24” pillow insert
- Fabric Scissors
- Sewing Pins
- Sewing Needle
- Sewing Machine & Thread
- Ruler
- Fabric marker
- Iron
- Hand sewing needle
Cutting
- Cut one 25” (63.5cm) square from top fabric.
- Cut four 29” x 3 1/2” (74 x 8.9cm) outside flange sections
- Cut back sections one 22” x 29” (55.9 x 74cm) wide, one 15” x 29” (38.1 x 74cm) wide
- Cut four 27” x 3” (68.6 x 7.6cm) inside flange sections
- Cut batting 29” (74cm) square
- Cut lining 29” (74cm) square
Instructions
Note: Seam allowances are 1/2” (1.27cm) unless stated otherwise. WOF means Width of Fabric.
Make and Apply the Welting
- Cut 85” (216cm) of 2” (5.08cm) bias strips from welting fabric the as shown below.

- Sew the 2” (5.08cm) strips into one long strip. Pressthe strip in half with wrong sides together, lengthwise.
- Insert welting cord into pressed strip. Using a zipper foot, stitch and placing the cording as close to the fold as possible, stitch close to the cording. It is important to keep the raw edges of the fabrics together as you sew. This will enclose the cord in the fabric.
- Pin the welting matching the raw edges of welting to cut edges of pillow front. Clip welting and ease around the corners.
- Using a zipper foot, stitch welting to pillow top over previous stitches. Stop stitching 2” (5.08cm) from where the ends will meet. Open out stitching on welt and cut off the filler cord so it lines up with the beginning of the welting.
- Fold under the end of the welting fabric and wrap it around the beginning. Finish stitching welting to pillow front.
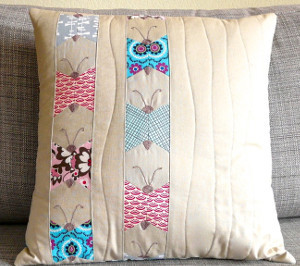
Double Flange
- With wrong sides together, press each inside flange section in half lengthwise.
- Place pressed inside flange on right side of outer flange with cut edges even. Baste cut edges together.
- With right sides together pin flange sections to pillow top over welting.
- Stitch flanges to top, starting and stopping stitching 1/2” (1.27cm) from corners.
- To miter corners, place pillow right side up, fold under unstitched edges of the flange (wrong sides together) diagonally at the corners so that it meets the intersection pillow front, and press. Note: It may take some refolding to get the miter “just right”.
- Refold the flange, wrong sides together, aligning the pressed creases. Stitch flange through all the layers. Trim off excess. Press.
Prepare Front
With wrong sides together, sandwich batting between front and lining sections. Baste.
Joining Front and Back
- Form a facing by turning edge of back section to inside ½” (1.27cm) then again 1” (2.54cm). Stitch close to pressed edge. Repeat for remaining back sections.
- Lap hemmed edges so that the back is 29” (74cm) square. Baste lapped edges together.
- Place hook and loop tape under lapped edges and stitch.
- With right sides together, pin back sections to front positioning the backs so that the facings overlap.
- Stitch around the entire outer edge. Trim corners.
- Turn right side out, press. Insert pillow.
Read NextHow to Make a Neck Pillow for Travel