How to Make a Neck Pillow for Travel
Prepare for comfort! You'll travel in the lap of luxury wherever you go with this simple travel pillow pattern.
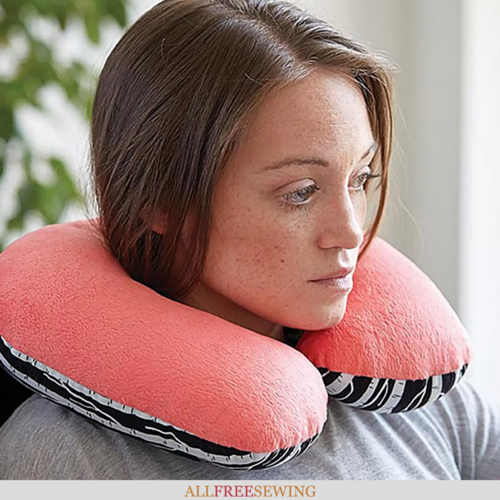
If you spend hours flying from city to city, you know how important it is to ride comfortably. That's why you should never embark on a journey without this truly first-class luxe DIY travel pillow.
With a custom-sketched pattern, this neck pillow template is guaranteed to fit your individual contour needs.
The tutorial shows you exactly how to make a neck pillow for travel that you won't want to leave home without! The seam is notched for a streamlined, non-bumpy feel that will have you snoozing in no time.
This giftable travel accessory even has a minky fabric exterior that will feel ultra-plush against your delicate neck skin. Get the best sleep of your life anywhere you go with this free neck pillow pattern.
It's not just for plane travel, either. Use this as a passenger when you're on your next car road trip or on a train ride that's just a bit too long.
You don't even have to leave the house! This comfy neck pillow can be utilized at home while you're watching TV in an uncomfortable chair or on your couch. Why not be as relaxed and restful as you can be no matter where?
P.S. Sign Up For More Free Patterns You'll Love!
How to Make a Neck Pillow for Travel
Skill Level: Beginner
Project Type: Make a Project
Time to Complete: Under an Hour
Sewn By: Both Hand and Machine
Materials List:
• Rotary cutter (28mm)
• Cutting mat (24'' x 36'')
• Minky fabric
• Cotton print fabric for pillow back
• 1'' Pattern paper
• Pen
• Pins
• Sewing machine
• Needle and thread
• Fiberfill
• Scissors

Travel Neck Pillow Tutorial:
- Draft your own pattern. Sketch a U-shape on to 1" wide pattern paper, using the grid lines for accuracy. The U-shape should be about 18" at its widest and 14" at its highest. Cut out your pattern.
Tip: Folding the pattern paper in half with help you achieve a symmetrical shape.

- Lay your two fabric pieces on top of each other. Using the cutting mat to protect your work surface, pin the pattern to both layers. Next, use the 28mm rotary cutter to carefully cut out the pillow shape from both fabrics.

- Pin the two cut fabric pieces together with the right sides of the fabrics facing each other. Next, sew around the perimeter of the pillow with a 1/2" seam allowance. Leave a 5" hole in the top edge for stuffing the fiberfill.

- To help the curves of your pillow lay flat, clip the seam allowance. Use your scissors to cut small triangle notches into the seam allowance around the curves of the pillow, making sure you do not cut into the stitches.

- Turn the pillow to the right side through the hole you left in the top edge and stuff the pillow with fiberfill until firm. Hand-stitch the opening closed using a needle and thread.
Try it on for size and prepare to be at max comfort levels!


Want More?
Read NextPetal Pillow
Your Recently Viewed Projects


Thanks for your comment. Don't forget to share!
Report Inappropriate Comment
Are you sure you would like to report this comment? It will be flagged for our moderators to take action.
Thank you for taking the time to improve the content on our site.