This project was submitted by one of our readers, just like you.
Indian Ethnic Dupatta

Indian Ethnic Dupatta
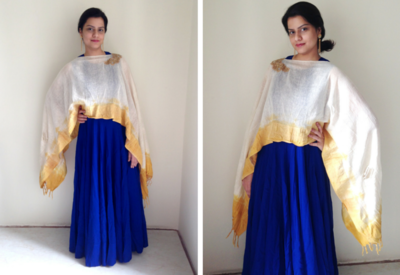
"What to wear to an Indian wedding? Your answer lies in this natural dyed and embroidered cape dupatta. Easy to make and on trend! Today’s DIY is an easy dupatta design in the trending cape style, inspired by the likes of Tarun Tahiliani and Pratyusha Garimella. I converted a basic off-white hand-loom dupatta into a edge dye (natural dyeing) dupatta cape with placement embroidery. You could use net dupatta with ready embroidery, printed Georgette dupatta, multi-colored silk dupatta or any fabric of 2.5 mtr of your choice. I will be showing a step-by-step tutorial of the dupatta cape – from neckline shaping, embroidery attaching to edge dyeing.
I paired my light gold embroidery – turmeric colored – dupatta design with a floor length cobalt blue gown. You could even pair this dupatta cape with ecru palazzo and beige top. Get creative with the styling!"
Project TypeMake a Project
Time to CompleteIn an evening
Sewn byHand

Materials List
- Dupatta (2.5 mtr fabric of approx 38" width)
- Matching sewing thread – 1 piece
- Hand sewing needle – 1 piece
- Measuring tape
- Embroidery bootas/ patches
- Pearl pins
- Scissors
- Fabric marker/ pencil
Instructions
-
Fold the dupatta into half width-wise. Leave about 2.5" extra on the side which would fall in the front. – Next fold the dupatta half length-wise. This mid-point would be our guide for the neckline.
-
Measure the circumference of your head (or the broadest part above the neckline) and subtract 1" from this. Then divide the new number by 4. We subtract the 1" because we will be folding a seam around the neckline thereby increasing the circumference measurement. – Using this measurement mark a point from the mid-point of the dupatta fabric
-
Cut all four folded layers. Place your scissors about 0.25" below the mid-point at the vertical fold- this provides with the needed curve around the neckline. – In case you want a more defined neckline shape use a paper pattern from an existing suit neckline and cut in shape. Remember to add 0.5" seam allowance around the neckline pattern.
-
Fold a 0.5" seam along the neckline and pin it. I prefer to first work one half and then move onto the next half. – Using slip stitch/ blind hem stitch sew around the neckline. – The two corners are a little tricky to work with, just make sure it looks neat from the front even if the hem folds become uneven. – The bottom right picture shows the front view of the neckline after hemming.
-
Once the neckline is complete put it on to place the embroidery. – The benefit of placing embroidery while wearing the dupatta cape is that it helps understand the contours of the shoulder and body making the embroidery sit well.
-
Similar to the embroidery attaching technique in the embroidered kurta post, use basic running stitches around the embroidery shape to sew it in place. – Depending on the choice of your embroidery’s thickness and intricacy, this step will be time consuming. – Once I took of the cape dupatta I clicked a picture of the embroidery and removed the additional bootas because it was difficult to work with the pins. This step is optional.

Read Next45+ Pin Cushion Patterns