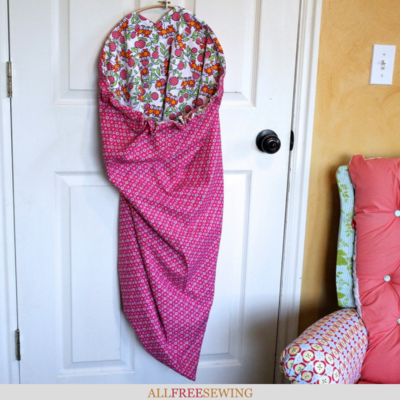
DIY Hanging Laundry Bag (Reversible!)
Free up some space with this unique DIY laundry hamper sewing tutorial!

Make your own laundry bag that not only holds your dirty clothes but saves space with its ingenious design.
This DIY Hanging Laundry Bag is reversible, which means you can change the look to your latest decor, and it also hangs anywhere in the room, whether that's in the closet or on the back of your door.
This stepped-out hanging laundry bag tutorial delivers a product that can hang conveniently on your door so that it doesn't use up your floor space.
We're always seeing DIY laundry bags with no details on how to make them. Not here! We have a laundry bag with instructions and it's so easy that even a beginner can give it a try!
This hanging hamper is a fantastic choice for kids, too, since it's fun and can be customized with their choice of fabric.
If you need to store the hamper for later use, simply empty and collapse it. You can't beat this DIY folding laundry basket, especially when you see the price of them at storage stores.
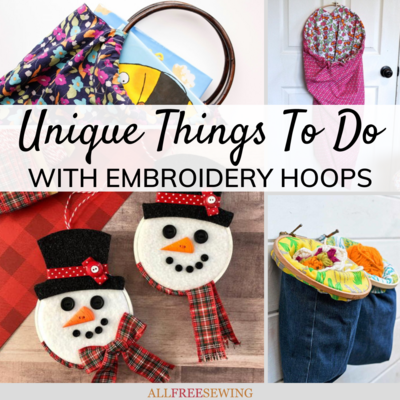
Plus, the only hardware in this DIY laundry hamper is the embroidery hoop, which makes fitting it into a closet or storage bin a cinch.
Our exclusive laundry bag tutorial is a must-make for anyone who has clothing and needs a place to place the day's dirty pieces.
For more space-saving sewing tutorials, click here!
DIY Laundry Bag Materials:
- Two pieces of fabric (one yard each).
- Embroidery hoop (size 20" circle size or larger if desired).
- General sewing supplies.
DIY Hanging Laundry Bag Instructions:
- Begin by washing, drying, and pressing your fabrics.
- You should have a yard of each fabric. Fold one piece in half, right sides together. This makes a long rectangle of approximately 22 x 36 inches. (You don't need to bother removing the selvage for this project).
- Fold one of the top corners down 3 inches, forming a triangle flap of fabric. Pin. Fold back the other top corner to match. Pin. (You'll sew along this diagonal fold in a minute).
- Repeat steps 2-3 with the other piece of fabric.
- Sew each corner flap with a 1/4-inch seam. Follow the diagonal folded edge. Repeat with the other piece of fabric.
- Fold the piece of fabric in half once again, right sides together. The sewn corners should be at the top. Pin together the long open edge, as well as the bottom. Do not pin the top edge with the sewn corners. Repeat with the other piece of fabric.
- Sew along the pinned edges (do not sew the unpinned top edge). Since we didn't remove the selvage, we need to be sure that your seam allowance is wide enough to capture the selvage edges. A seam should work fine. Continue sewing to the end of the fabric. You will be sewing over the folded area as well.
- Repeat on the other piece of fabric.
- Carefully trim the excess fabric at the two bottom corners to reduce bulk, being careful not to snip your stitches. Do this for both pieces of fabric.
- Your pieces should look like long pillowcases with missing corners. Both pieces should be identically sewn. Press the seams.
- Turn one piece right side out, and the other inside out. Match the folded corners of both bag pieces. Pin.
- Insert the right-side-out bag piece into the inside-out bag piece. Patterns will be touching.
TIP: It helps to hold the top edges of the fabric and give the bags a good shake.
- Align the top edges of both bag pieces and pin around the circumference.
- Sew around the circumference of the bag with a 1/4-inch seam. Be sure that you are only sewing through two layers of fabric; you don't want to sew the bag shut.
- Turn right side out through the hole at the folded corners.
- Right now your hamper looks like a long tube with a diamond cut out of the center. Push one piece of fabric down inside the other. Again, it helps to hold the top edge where the fabrics meet and give the bag a good shake.
- Align the top edge evenly and press.
- For the casing of the hoop: measure and mark a horizontal line two inches from the top edge of the bag.
- Sew along your mark, being careful to only sew through two layers of fabric.
- Remove the inner ring from the hoop and remove the screw.
- Slide the hoop through the casing, then tighten the screw.
TIP: You can use a wooden hoop for lightweight items, but select a plastic hoop when holding heavier items.
")
Sign up for our newsletter, Sewing it Up, for more free patterns!
Do you sort your clothing into separate laundry bags or keep everything in one?
Let us know in the comments!
Read NextChair Cover Sewing Pattern
Your Recently Viewed Projects

Thanks for your comment. Don't forget to share!
Cheryl E
Apr 27, 2018
Using an embroidery hoop for the hanging hamper is quite clever. Embroidery hoops can be found for pennies in thrift stores along with acceptable fabric pieces. Although the instructions show 20 steps to complete the project, just reading though them I was able to see how easy it would be to make.
Marilyn B
Jan 17, 2017
This is a nice project with great instructions! The fact that you can hang this hamper up is great for saving floor space, and the hoop makes it easy to fill! And you can toss it in the wash as well! I am wondering if you could hack this idea by using two king sized pillow cases! Great project, thanks for sharing!
Report Inappropriate Comment
Are you sure you would like to report this comment? It will be flagged for our moderators to take action.
Thank you for taking the time to improve the content on our site.