This project was submitted by one of our readers, just like you.
Origami Candle Mat

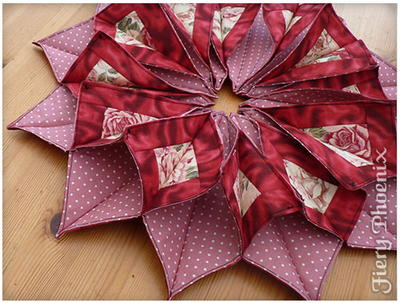
Origami Candle Mat
"This is a stunning table mat which looks complex but in reality is a very simple make. You can gussy it up with fancy trimmings, quilting, binding, buttons and bows. However I'm going to take you through the basic and slightly more complex options. Once you have made one the sky is the limit with extras. This pattern is a simple design based on the 30 degree, 12 petal, dresden blade template. There is a downloadable version which you can print out from me... or if you have your own template you can use that."
Project TypeMake a Project
Time to CompleteIn an evening
Sewn byMachine

Materials List
- Backing Fabric - 1/2 yard
- Front Fabric 1/4 yard
- Border fabric 1/2 yard
- Fusible Interfacing 1/2 yard
- Co-ordinating threads (3 bobbins)
Instructions
-
Before we begin sewing attach the fusible interfacing to all 12 squares of fabric 1.
-
Sew the border strips to the smaller squares of fabric. I chain piece these one side at a time, then clip apart. Press open towards the darker fabric, and repeat for the remaining sides.
-
Pair up fabric 1 and 2 squares right sides together for all 12 sections. Sew around all 4 edges leaving a 2" gap for turning. Clip the corners diagonally to reduce bulk.
-
Turn the squares and press out the corners using a chopstick. DO NOT use scissors, pins or anything which could mark or cut the fabric.
-
Press the squares flat and ensure the turning gap is folded under.
-
Top stitch around the edge, which gives a nice professional looking finish and closes the turning gap at the same time.
-
Using the template mark the sew lines on fabric 1.
-
Pair up the squares and sew along the marked stitch lines. This will join up all 12 petals and the mat should lay flat.
-
To give the petals their delicate curves we will sew a top stitched spine through the centre of each panel.
-
Now on the final stage of sewing the tips of the petals together. Take the edges of the panel and draw them together across the centre of the base. Pin all 12 to make sure you have them meeting correctly. This will give you a good idea of how the final mat will look.
-
I use the button hole stitch set with a stitch length of 0 and using step 2 to join the petals together.
-
That's it for the basic versions of the Fabric Origami Candle Mat. As I mentioned before you can add embellishments, buttons, bows, ribbons, sequins and more to pretty the mat up. You can also make a quilted version using wadding and binding once you have quilted the panels together.

Read NextEasy-Sew DIY Ikea Curtains
Your Recently Viewed Projects
Thanks for your comment. Don't forget to share!
Cheryl E
Sep 29, 2018
This origami design candle mat is pretty enough on its own even without a candle to place in the center. There is a helpful template to download as a .pdf file for the 6-inch petals. The 3-D raised design is what appealed to me as it gives the candle mat lots of style.
Linda
Jan 18, 2017
This candle mat pattern is one I had been searching for and was surprised to find it on all free sewing. It's simple to make but I wanted to add it to my collection of projects.
Report Inappropriate Comment
Are you sure you would like to report this comment? It will be flagged for our moderators to take action.
Thank you for taking the time to improve the content on our site.