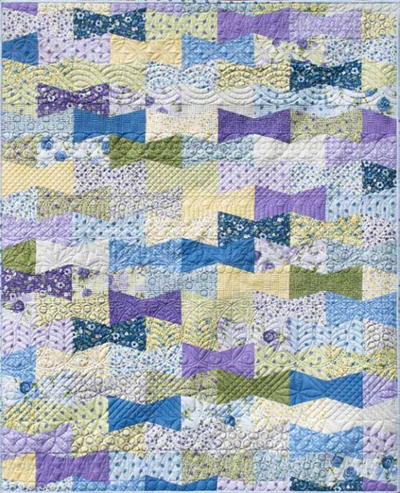
Dapper Free Throw Quilt Pattern

Get ready to welcome springtime by designing a beautiful throw quilt from our friends at RJR Fabrics. Made in shades of lavender, moss, and baby blue, this Dapper Free Throw Quilt Pattern can be downloaded directly to your computer, and comes with instructions for creating a throw and twin size quilt. This spring quilt pattern uses 2D piecing techniques to create its unique design, and uses a tumbler pattern that's the perfect combination of modern and traditional quilting. Welcome warmer weather by creating this beautiful spring quilt pattern and download the free quilting instructions today!
Click Here to Download the PDF Pattern!
Throw Quilt finishes at 50" x 61"
Twin Quilt finishes at 68" x 83"
Fabrics Used in This Pattern
This quilt pattern features RJR's June's Cottage collection from Briar Hill Designs. You can find the June's Cottage collection here.

This quilt design makes me think of a classroom full of children, dressed in their best for picture day, or perhaps a recital. Using a variety of prints brings sweet hair bows and handsome bow ties to mind. The quilting was inspired by an equally dapper Fair Isle sweater! We accomplished the look by using a wide array of border pantographs which stretch across the width of the quilt.
The quilt is made with 5” x width of fabric strips or 5“ charm squares. Patterns includes instructions for a twin size quilt and a throw, which is also a great size for a wheelchair lap blanket or a toddler bed.
Before beginning, please:
1. Read the full pattern instructions.
2. Remember, seam allowance is always 1/4”. A consistent 1/4“ is as valuable as a BFF.
Materials Needed:
Because colour placement is planned on this quilt, you’ll need the use of a design wall/floor/table for arranging the pieces.
- Paper printouts of templates A, B and C (These are located in the downloadable PDF at the top of the page).
Throw size 50” x 61”
- 5 Charm packs of June’s Cottage, or 1/3 yd of all prints
- 56” x 68” batting
- 4 yds fabric for backing (I used 3298-001 Garden Wall -perennial)
- 1/3 yd for 120“ of binding (I used 3297-003 Rosebud- raindrop)
Twin Quilt 68” x 83“
- 10 Charm packs of June’s Cottage, or 1/2 yd of all prints
- 74” x 90” batting
- 5 1/4 yds fabric for backing (I used 3298-001 Garden Wall -perennial)
- 1/2 yd for 225“ of binding (I used 3297-003 Rosebud- raindrop)

Cutting Instructions:
Please Note: If you have any directional prints that you want to be upright in the quilt, cutting directions will be a little different; instructions and diagrams are included below.
Using Precuts:
Starting with 4 charm packs, plus 6 sets of duplicates from the 5th charm pack, cut the 5” squares to shape of template A, right side of fabric facing up.
You should have at least four identical pieces of every print. Working your way through all cut pieces, match up two identical prints. These two identical prints when arranged narrow side together make the shape of a bow!
Select 18 single squares to fill in the sides of your quilt with half bow pieces. Cut using template A, right side of fabric facing up. (All templates are located in the PDF download at the top of this page).
Select 11 squares and cut a template B and template C out of every one, right side of fabric facing up.

Using Yardage:
Cut one (two for twin) strip(s) 5” x width of fabric from every fabric. Keeping strips folded in half, stack up to 3 strips at a time. Pin template A to fabric with a flat head pin, then cut along sides of template with an acrylic ruler and rotary cutter. Rotate template, align with angled, raw edge of fabric and cut. Repeat along width of fabric. You will get 10 pieces per width of fabric.

For directional prints, cut 5” strips into 5” x 5” squares. Lay out matching squares with right side of fabric facing up, and upright, and cut template A as in diagram. This will provide you matching left and right sides of the bow. You will get 8 pieces per width of fabric.


For Throw, please cut:
- 90 matching sets of prints cut from Template A, totaling 180 pcs
- 18 single prints cut from Template A
- 11 matching sets of prints cut from template B and C, totaling 22 pcs
For Twin, please cut:
- 189 matching sets of prints cut from Template A, totaling 378 pcs
- 27 single prints cut from Template A
- 15 matching sets of prints cut from template B and C, totaling 30 pcs
Quilt Layout:
At your design wall with your stack of matching prints, lay out your bows 5 (7 for twin) across, and 18 (27 for twin) rows down. Bows from the second row are offset and nest the first row’s bows, with the top row’s left-most bow sticking out on the left side. Don’t be too concerned about similar colours being perfectly balanced throughout the quilt; it’s been suggested that it adds interest and gives the eye a place to rest when similar colours touch.

Now, use your 18 (27 for twin) single prints cut from Template A to fill in the sides of your quilt with half bow pieces.
Arrange matching B and C as bows on the top and bottom of your quilt. One set of matching B and C pieces will not be matched up. It will be divided to fill the remaining spaces of the top and bottom corners of the quilt.
How to 2D Chain Piece:
I love this technique and it’s been saving me time and chaos for years! We will be sewing this entire quilt using chain piecing side to side then top to bottom without cutting threads in between the pieces. This is helpful especially because colour placement matters in this quilt, and this helps us from confusing what gets sewed to what.
First, we will sew horizontal lines. The horizontal lines will be “zig-zagged” because you are sewing the angled side of the bows together. Starting at the top right corner of your quilt, working on the first and second row, pin the second row pieces to the first row pieces. Stack pinned pieces in order with top right corner on the top, and proceed to your sewing machine.


To properly sew together tumbler pieces, align fabric pieces so they are flush 1/4” in from the edge, or where your stitch line will be. This will create a teeny dog-ear on the top and bottom of the seam, which is just as it should be. Sew all these pieces in sequence, one after another without snipping stitches in between seams.
Finger press seams left, then right, then left in a pattern. This will allow seams to nest later on when you’re sewing columns together.

Carry your work back to the design wall. It should be easy to determine your top left corner since the top of the quilt is made with half pieces. Pin pieces from third row to the pieces previously sewn.
Proceed to the sewing machine, chain piece the whole bundle, finger press, and back to the design wall to pin on the fourth row’s pieces.
Continue until you’ve completed sewing all rows. Next is where the magic happens!


Keeping a small pair of snips is handy at this point if you need to trim some dog-ears. Starting at your sewing machine, at the top right corner of your quilt, and with the quilt facing up, fold over the right row and sew the connected columns together top to bottom, matching bow seams. Sew rows together alternating the direction they’re sewn; this helps keep your quilt square. Continue sewing vertical rows from the right side of the quilt to the left side of the quilt. Press these vertical seams away from centre. Your quilt top is finished!
Make a quilt sandwich using your pieced backing, batting and quilt top. Quilt as desired.
Binding the Quilt:
These instructions will give you a bias seamed, mitered, hand stitched binding - my all time favourite! Cut binding fabric into 2 1/4” x width of fabric strips. Attach into a long strip by sewing ends together on the bias. Trim and press seams.

Fold fabric in half width-wise and press. Using the side you will first sew down on the quilt surface, open binding and press a diagonal line, then fold in half as before and press.
Sew binding onto quilt top using a 1/4” seam allowance, starting in the middle of a side of the quilt, raw edge out, and leaving a 10” tail. When you come to a corner, come to within 1/4” of the end of the quilt, pivot and stitch off the quilt at an angle to the corner. Turn the quilt and place the binding as in the diagram. Slide under the presser foot, and sew continually until you reach the next corner where you will repeat these steps.

Once you are nearing where you began, leave a 15” opening and another 10”+ tail. Tuck end of tail into beginning of tail so that it lays flat on the surface of the quilt. Place a line of glue on the pressed bias line to attach both ends of tail, and press where the two overlap.
Open up binding until you can see pressed line on the wrong side of fabric. Sew exactly along this line. Once sewn, check that it’s just right, trim excess, and finish sewing binding to quilt.
Press binding away from quilt, fold binding to the back of the quilt, mirroring miters at corners, and hand stitch.
I’d love to see what you make with this pattern!!! Use #dapperquilt online to share your pics and tag us @briarhilldesigns!
What are you going to make next?
Check out my other patterns at BriarHillDesigns.etsy.com!
What's your favorite season? Let us know below in the comments!
Read NextBirds In The Air Quilt Block