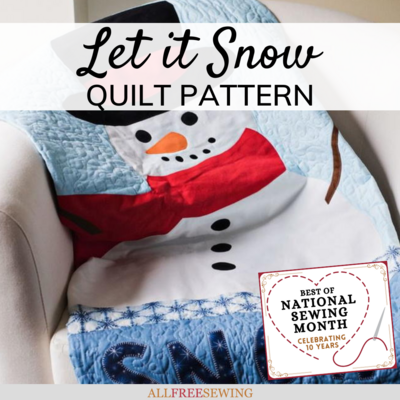
Let It Snow Quilt Pattern
This quilt pattern says "let it snow" and has the cutest snowman design ever!

Get in the mood for winter with this free quilt pattern that has us dreaming of snowy days indoors and hot cocoa by the fire. Blogger Carolina Moore is here with this fun Let It Snow Quilt Pattern that makes a beautiful winter wall hanging or a snuggle-worthy lap quilt.
Made using snowball quilt blocks, this free quilt pattern comes with a printable PDF of instructions and has printable applique templates, so that you don't have to stress about creating your lap quilt. Perfect for Christmas or to display all winter long, this adorable snowman quilt pattern is the best way to welcome winter!
This friendly snowman is a great way to welcome guests when you hang it in the foyer. It also makes a delightful (and useful) addition to your chair or couch during the holidays. Don't need another quilt? Gift one to your Christmas-loving family or friends, or sell it at your local craft fair.
Don't miss out on Carolina's quilt projects and tutorials on her blog, Always Expect Moore!
PS: This article is part of our National Sewing Month Celebration! Check it out here + enter to win our 5 free giveaways worth more than $1,000!
Sign Up For More Free Patterns
Make this fun snowman quilt in a weekend with quick piecing and simple applique. Use the fabric requirements listed or use scraps to make the snowballs in the quilt.
All seam allowances are ¼" unless otherwise noted.

Materials Needed
- 1 ¼ yard of light blue fabric for the middle (Snowman background)
- ½ yard of snowflake print fabric for border 1
- 1 yard of medium blue fabric for border 2 (behind Applique) and snowball block corners
- ¾ yard EACH of 3 prints of white/silver/grey fabric for snowball block centers
- ¼ yard of dark blue fabric for snowball block corners
- ¼ yard of very light blue fabric for snowball block corners
- 1 ½ yards of dark snowflake print fabric for outer border and applique letters
- 1 yard of white fabric for snowman applique
- ½ yard of black fabric for hat and coal applique
- ¼ yard of brown fabric for hands applique
- ½ yard of red fabric for scarf and hat band applique
- Scrap orange fabric for carrot nose applique
- 2 yards of Heat N Bond Lite for applique
- General quilting supplies
PDFs and Applique Templates Needed
Cutting Instructions
Light Blue Middle:
- Cut 1—30 ½" x 30 ½" square
- Cut 28—3 ½" x 3 ½" squares
Border 1
- Cut 2—3" x 30 ½" strips
- Cut 2—3" x 35 ½" strips
Border 2
- Cut 2—7 ½" x 53 ½" strips
- Cut 36—3 ½" x 3 ½" squares
Snowball Centers
- Cut a total of 28—7 ½" x 7 ½" squares
Dark Blue
- Cut 24—3 ½" x 3 ½" squares
Very Light Blue
- Cut 24—3 ½" x 3 ½" squares
Outer Border
- Cut 2—5" x 63.5" strips
- Cut 2—5" x 58.5" strips
Instructions for Creating Your Christmas Quilt Pattern:
Trace all applique shapes onto Heat N Bond Light. Fuse Heat N Bond to wrong side of applique fabrics.
Cut out applique. Set aside the snowman's right hand. On all other pieces, remove backing paper.
Arrange the snowman pieces on the 30 ½" x 30 ½" center square, and the letters on the 7 ½" x 53 ½" border 2 strips. The bottom of the snowman should line up with the bottom of the square. Be sure to keep all snowman pieces ¼" away from side and top edges so they won't go in to the seam allowance. Once you are satisfied with the placement, fuse in place following package instructions.
Stitch the 30 ½" long border 1 pieces to the sides of the center. Press seams out.
Stitch the 35 ½" long border 2 pieces to the top and bottom. Press seams out.
Remove the backing paper from the right arm. Check placement, then fuse in place.
Use a buttonhole stitch and matching thread to stitch around all the snowman and letters applique, securing it in place.

Stitch the 7 ½" x 53 ½" border 2 strips to the top and bottom. Make sure the words "let it" are on the top, and the word "snow" is on the bottom. Double-check to make sure the words are right-side up before you sew. Press seams out.

Collect the 28 snowball centers and 112 snowball corners.
Draw a diagonal line from one corner to the other on the backs of all the snowball corners using a chalk pencil or water soluble marking pen.
Place a snowball center right side up. Place a snowball corner right side down so that the line on the back does not point to the corner—it cuts off the corner. Stitch on this line.
Trim off the corner, leaving a ¼" seam allowance.
Repeat for all four sides.
Press corners open, revealing the snowball block.
Repeat, making a total of 28 snowball blocks.

Stitch the snowball blocks into rows of 7 blocks. Make 7 total snowball blocks. Stitch one row to each side of the quilt. Press seams in. Stitch the remaining rows to the top and bottom. Press seams in.
Stitch the 5" x 58.5" strips (outer border strips) to the sides of the quilt. Press seams out.
Stitch the 5" x 63.5" strips (outer border strips) to the top and bottom of the quilt. Press seams out.
Quilt and bind as desired.
Looking for even more free quilt patterns? Be sure to sign up for the FaveQuilts' newsletter, Piecing It Together! You can get free quilt patterns delivered directly to your inbox.

What's your favorite thing about winter? Let us know below in the comments!
Featured in our National Sewing Month collection!
Read NextBirds In The Air Quilt Block