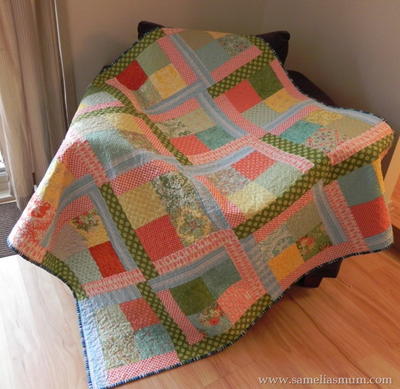
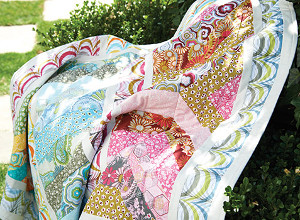
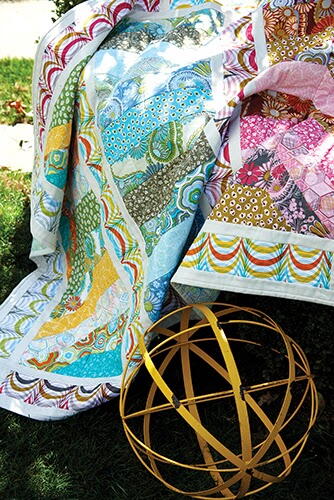
Lovelorn Quilt
Combine FreeSpirit’s floral, paisley, and geometric Lovelorn prints, available in multiple colorways, to make this stunning quilt designed by the fabric designer, Jenean Morrison. This tutorial will help you learn how to make a quilt that is full of vibrant color. Display this gorgeous quilt in your living room or bedroom for a bright splash of happy sunshine.
Materials
- 1⁄8 yd (.11m) each of the following FreeSpirit Lovelorn fabrics by Jenean Morrison:
(A) PWJM097.BLUEX
(D) PWJM098.BLUEX
(J) PWJM100.BLUEX
(Q) PWJM102.GRAYX
(V) PWJM104.BLUEX
(G) PWJM099.BLUEX
(S) PWJM103.BLUE
- 1⁄4yd (.23m) each of the following FreeSpirit Lovelorn fabrics:
(B) PWJM097.PINKX
(H) PWJM099.GRAYX
(I) PWJM099.ORANG
(W) PWJM104.GREEN
(C) PWJM097.YELLO
(E) PWJM098.PINKX
(F) PWJM098.YELLO
(U) PWJM103.YELLO
(T) PWJM103.PINKX
(X) PWJM104.MUSTA
(K) PWJM100.ORANG
(L) PWJM100.PINKX
(P) PWJM102.EMERA
(R) PWJM102.PINKX
- 1⁄3yd (.31m) of the following FreeSpirit Lovelorn fabric:
(M) PWJM101.BLUEX
- 1⁄2 yd (.46m) of the following FreeSpirit Lovelorn fabrics:
(N) PWJM101.ORANG
(O) PWJM101.PINKX
- 1 1⁄4 yds (1.14m) of the following FreeSpirit Lovelorn fabric:
(Y) CSFSESS.PEARL
- Coats® Dual Duty XP All-purpose thread to coordinate with prints
- 3 yds x 54” wide (2.75m x 1.37m) backing fabric
- 54” x 64” (1.37m x 1.63m) quilt batting
Additional Requirements
- Sewing Machine
- Rotary cutter/mat/plastic ruler
- Scissors
- Iron, pressing board
- Non-permanent marking too
Cutting Requirements
Note: WOF = Width of Fabric
- Cut one 3 1⁄2” x 12 1⁄2” (8.89cm 31.75cm) strip from Fabrics G and S.
- Cut two 3 1⁄2 ” x 12 1⁄2” (8.89cm x 31.75cm) strips each from Fabrics A, D, J, Q, and V.
- Cut one 6 7⁄8” (17.46cm) square each from Fabrics B, H, I, W, C, E, F, U, T, L, P, and R.
- Cut two 6 7⁄8” (17.46cm) squares each from Fabrics G, S, X, and K.
- Cut one 3 1⁄2” x 6 1⁄2” (8.89cm x 16.5cm) strip each from Fabrics C, E, K, and L.
- Cut two 3 1⁄2” x 6 1⁄2” (8.89cm x 16.5cm) strips each from Fabrics B, H, I, W, F, U, T, X, P, and R.
- Cut one 3 1⁄2” (8.89cm) square each from Fabrics C, E, F, U, T, and K.
- Cut two 3 1⁄2” (8.89cm) squares each from Fabrics B, H, I, W, X, N, and O.
- Cut four 3 1⁄2” (8.89cm) squares each from Fabrics P and R.
- Cut two 3 1⁄2” x 23” (8.89cm x 58.42cm) strips from Fabric N and O.
- Cut one 3 1⁄2” x 36 1⁄2” (8.89cm x 92.71cm) strip from Fabric N and O.
- Cut two 3 1⁄2” x 36 1⁄2” (8.89cm x 92.71cm) strips from Fabric M.
- Cut six 2 1⁄2” x WOF (6.4cm x WOF) strips from Fabric Y.
- Cut nine 1 1⁄2” x WOF (3.8cm x WOF) strips from Fabric Y.
- Cut six 1 1⁄2” x 36 1⁄2” (3.8cm x 92.71cm) strips from Fabric Y.
- Cut six 1 1⁄2” x 3 1⁄2” (3.8cm x 8.89cm) strips from Fabric Y.
Instructions
Note: Seam allowances are 1⁄4" (.6cm) unless noted.
- Cut each 6 7⁄8” (17.46cm) square in half diagonally. Sew one Fabric L and one Fabric H triangle together to make a triangle set.

- Draw diagonal line across wrong side of each 3 1⁄2” (8.89cm) square.

- Place a marked Fabric X 3 1⁄2” (8.89cm) square on Fabric L triangle as shown.

- Sew across line. Trim seam allowance to 1⁄4” (.6cm). Press triangle out.

- Repeat with Fabric R square on Fabric H corner to finish triangle unit.

- Make one each of the following triangle units.

- Arrange triangle units in two rows as shown. Sew units together within each row.

- Arrange 3 1⁄2” x 6 1⁄2” (8.89cm x 16.5cm) strips in rows. Sew together.

- Arrange 3 1⁄2” x 12 1⁄2” (8.89cm 31.75cm) strips in rows. Sew together. Hint: Refer to color quilt image for placement of strips, pieces, and borders.

- Sew Fabric Y 1 1⁄2” x 36 1⁄2” (3.8cm x 92.71cm) strips to both long sides of Fabrics N and O 1 1⁄2” x 36 1⁄2” (3.8cm x 92.71cm) strips.
- Sew to Fabric O to upper edge and Fabric N to lower edge of 12 1⁄2” (31.75cm) wide pieced blue strip.
- Sew 3 1⁄2” (8.89cm) pink pieced strips to upper edge of quilt center. Repeat, except sew green pieced strips to lower edge.
- Add strips of triangle units above and below strips.
- Sew a Fabric Y 1 1⁄2” x 36 1⁄2” (3.8cm x 92.71cm) strip to upper and lower edges of quilt center.
- Sew Fabric M 3 1⁄2” x 36 1⁄2” (8.89cm x 92.71cm) strips to upper and lower edges.
- Cut three Fabric Y 1 1⁄2” x WOF (3.8cm x WOF) strips each into two equal lengths.
- Sew each half-length strip together end-to-end with a full-length strip. Set aside four borders.
- Sew remaining borders to long sides of quilt center. Press and trim excess.
- Sew a 1 1⁄2” x 3 1⁄2” (3.8cm x 8.89cm) Fabric Y strip between 3 1⁄2” x 23” (8.89cm x 58.42cm) Fabrics N and O strips.
- Add Fabric Y 1 1⁄2” x 3 1⁄2” (3.8cm x 8.89cm) pieces to ends.
- Sew a Fabric N 3 1⁄2” (8.89cm) square to Fabric O end.
- Sew a Fabric O 3 1⁄2” (8.89cm) square to Fabric N end. Make a total of two side borders.
- Add borders to right and left sides of quilt center.
- Sew Fabric Y borders made in Steps 16 and 17 to right and left sides of quilt. Press and trim excess.
- Sew borders to upper and lower edges of quilt. Press and trim excess.
- Sew two lengths of backing fabric together along selvage edges to create a two-panel-wide backing.
- Layer quilt pieces, top to bottom, in the following order: Right side of quilt top, batting, wrong side of quilt back. Pin securely.
- Quilt or tie Lovelorn Quilt as desired.
- Trim excess batting and backing.
- Prepare binding from six Fabric Y 1 1⁄2” x 36 1⁄2 (3.8cm x 92.71cm) strips.
- Fold binding strips in half lengthwise. Press.
- Pin binding to quilt front, raw edges matching.
- Sew binding to quilt.
- Open binding and press on right side.
- Fold binding to wrong side and press.
- Stitch in the ditch or sew binding to backing using a slipstitch.
Read NextBirds In The Air Quilt Block
Your Recently Viewed Projects
Thanks for your comment. Don't forget to share!
meme5grand 2935128
Feb 09, 2017
Love the Lovelorn Quilt, BUT, can't see it. I believe this would be beautiful and a great challenge to make. Where can you purchase the material, if still available. Can you reprint the pic? Thanks, E
dfisher1 5537242
Feb 08, 2017
I would love to see a better picture of this quilt. It is hard to tell how it goes together. What does the design look like? I like the fabric from what I can see.
Linda
Feb 08, 2017
One of my favorites, which I intend to make in the near future in pastels of yellow, mauve, red, orange, tan, brown for fall.
lesleyswalker 3420 227
Feb 20, 2016
from the small picture of this crumpled quilt it is impossible to tell if I would like to do it or not.
Report Inappropriate Comment
Are you sure you would like to report this comment? It will be flagged for our moderators to take action.
Thank you for taking the time to improve the content on our site.