This project was submitted by one of our readers, just like you.
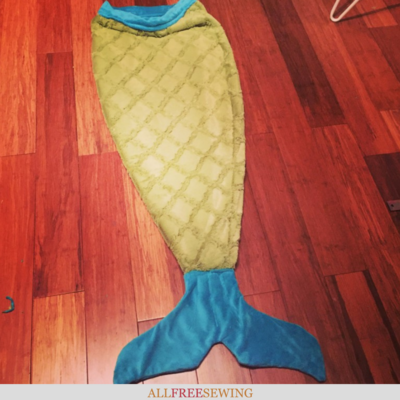
Mermaid Tail Blanket Free Sewing Pattern
Make a splash with this custom DIY mermaid tail for kids. This soft and cozy blanket is sure to be their new favorite blanket.

Mermaid Tail Blanket
Sew a fully lined Mermaid Tail blanket from fleece or Minky! Blog post includes written instructions, step-by-step video tutorial, and free PDF pattern download for the fin.
The full instructions are below but there is more when you click the link right below, including the printable, notes from the designer, and more images.
This is the best gift you could give your child or grandchild, especially if they love fairytales and fantasy stories. You can even make a miniature DIY mermaid tail for their favorite dolly.
Not only will this super warm and cozy blanket keep them feeling comfortable all day and night, but it will make them feel even more magical than they already do.
Project TypeMake a Project
Time to CompleteIn an evening
Sewn byMachine

Materials List
- 1 1/3 yd outer fabric (fleece or minky)
- 1 ½ yd lining & tail fabric (fleece or minky)
- Wrapping paper for pattern drafting
- Sewing machine
- Thread
- Scissors
- Chalk
- Washi tape (helpful seam guide)
- Straight pins
- Free PDF pattern download
Mermaid Tail Sewing Pattern Instructions
Cutting the Mermaid Tail Pieces
-
Start by laying out a piece of wrapping paper or taped newspapers that are the same dimensions as your outer tail fabric would be if folded in half (this should be about 24 by 60 inches).
-
Then fold the paper in half lengthwise so it’s about 12 x 60 inches long. (Drawing our pattern on only one half will allow us to cut it out symmetrically.)
-
I’ve included a printable pattern for the fin (click link above supply list). Print and cut out, taping together as shown. Then trace or tape this piece at the bottom of your wrapping paper, so you know how much fabric you have left to create the tail.
-
Make the bottom of the tail the same width as the top of the fin. Draw a diagonal line from the bottom of the tail to the outer edge of the paper, then curve inward at top. Unfolded, my tail piece is 20 inches across at top and 45 inches long.
-
Fold your outer tail fabric in half, right sides together (for my blanket, this is the green fabric). Pin the tail piece through both layers and cut out, creating two tail pieces. Do not cut a fin out of this material.
-
Remove the pattern, then re-pin the two fabrics, right sides together.
-
Fold the lining fabric right sides together and pin both the tail and fin pieces to the fabric. You’ll also need to cut 1 band piece along the fold. This piece needs to measure 4 x 39 inches. (I realize it says 4 x 40 in the photo, but I ended up trimming it down later, so 4 x 39 is a more accurate measurement.)
Sewing the Mermaid Tail
-
Sew the outer tail fabrics together on the long sides, leaving both the top and bottom open. Sew with a 1-inch seam. (Minky is notoriously slippery to sew with, and even experienced sewers may find themselves frustrated when the fabric shifts and the edges don’t align perfectly. However, 1-inch seams are generous enough to account for shifting, so don’t stress if your edges don’t stay perfectly matched as you sew.)
-
Turn the outer tail fabric right side out.
-
Repeat with the lining tail fabric. Do not turn.
-
Slide the lining fabric piece inside the outer tail piece. Pinch the two fabrics at top and shake so the pieces align.
Adding the Band to the DIY Mermaid Tail
-
Fold under the long edges of the band piece 1/2-inch and hem with a straight stitch.
-
Then fold the band piece in half, right sides together, so the short ends meet. (Please ignore the fact that my edges are unhemmed in the video clip, yours should be hemmed.) Sew the short ends together with a zig-zag stitch and a 1-inch seam, creating a loop.
-
Fold band in half lengthwise, wrong sides together. Sandwich the two tail fabrics in between the folded band fabric and pin all the way around.
-
Topstitch along your previous row of stitches.
Sewing the Mermaid Tail Fin
-
Sew the fin pieces right sides together, with a 1-inch seam. Leave the top open.
-
Clip and notch your seam allowances, being careful not to cut your stitches. Turn right side out.
-
Slid the tail inside of the fin piece. Turn down the raw edge of fin piece 1/2-inch and pin.
-
Sew straight across the folded portion of the fin piece, securing all layers.
-
I used chalk to sketch out some lines on the fin. These add a bit of texture and dimension. I’ve found it’s easiest to start sewing at the bottom of the fin and work towards the top. If you’d like, you could also topstitch around the entire edge of the fin piece with a 1/4-inch seam.
Want More?
15 Magical Mermaid Sewing Patterns >>
Who or what is your favorite fantasy character or creature?
Let us know in the comments!

Read NextThe Tropisch Dress Pattern
Your Recently Viewed Projects

Thanks for your comment. Don't forget to share!
M Altenberg
Feb 17, 2017
Mermaids are all the rage right now for the little girl set. What a fun project to make with my daughter. Looks easy to accomplish.
Weberme
Jan 20, 2017
Wow! What little girl would not like to cuddle up in this super soft mermaid tail while watching TV or lying in her room or even when going to bed. This is made with minky fabric so it is so soft and warm. So if you have ever wanted to make one for your little girl here it is. A super easy tutorial to make her one and why not make a couple more while you are at it so she can share one with her friend or make one for yourself and join in the fun.
Report Inappropriate Comment
Are you sure you would like to report this comment? It will be flagged for our moderators to take action.
Thank you for taking the time to improve the content on our site.