Roxanne Retro Headband Tutorial
For a cute rockabilly headband pattern you can sew yourself, check out this page!
For a 1950s rockabilly look with a modern style, follow this awesome Roxanne Retro Headband Tutorial. With these easy-to-follow instructions and just a few minutes, you can easily create your own fun and functional Roxanne Retro Headband.
This DIY headband is great for adding extra flair to any boring outfit and keeping your hair out of your face. If you're not into this classic retro look, feel free to use any other cotton, denim, or linen you want to use.
Sewn hair accessories are so easy to make and super comfy to wear so follow these steps and learn how to make your own handy headband. There is also a video tutorial to supplement the written tutorial below.
Sign Up For More Free Patterns >>>
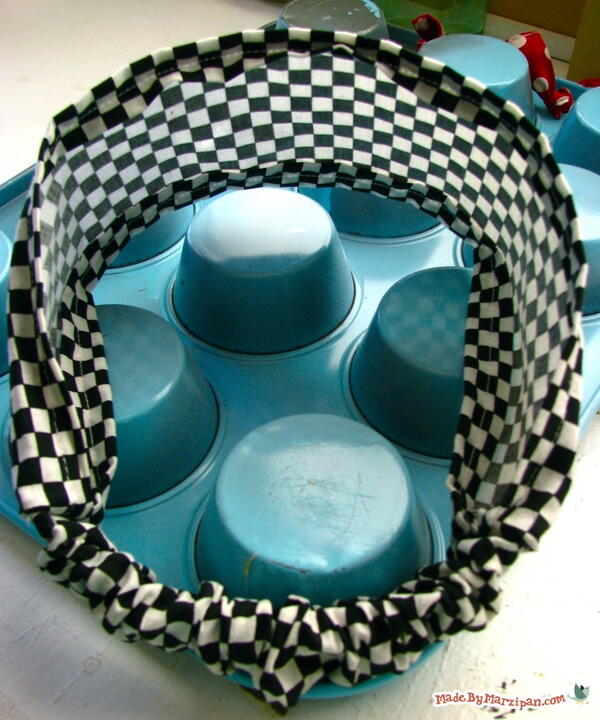
Roxanne Retro Headband
You only need a few materials to get started and there are also adjustments for child and baby sizes, so it's a fun accessory for the whole family if you want.
Materials Needed:
Large rectangle of cotton, denim, or linen: 18 x 5.5 inches
Small rectangle of matching fabric: 13 x 3.5 inches
Elastic, between 1-2 inches wide, cut to 6 inches in length
Sewing machine, thread, iron, safety pin
Adjusted Measurements for Children and Babies:
Child size:
Large rectangle = 17 x 4.75 inches
Small rectangle = 14 x 2.25 inches
Elastic = 5 inches
Baby size:
Large rectangle = 14 x 3.25 inches
Small rectangle = 9 x 2.25 inches
Elastic = 4 inches
Roxanne Retro Headband Tutorial
- You’ll need to cut two rectangles from cotton, denim, or linen. The large one should measure 18 x 5.5 inches. The smaller one should be 13 x 3.5 inches.
- Lay the large rectangle print side down. Fold over an edge .5 inch and press. Then fold it down another half-inch and press again, encasing the raw edge. Repeat on all four sides. Pin if necessary.
- Now we’ll do the same on the two short ends of the smaller rectangle. Leave the long sides alone.
- Sew the folded edges in place on both pieces. Just stitch down the center of the folds.
- Take the small rectangle and fold it in half lengthwise, right sides together. Sew along the raw edge with a quarter-inch seam to create a tube.
- Then turn the tube so that the seam is facing up, and press the seam open. Turn the tube right side out. Press with the seam face up and centered.
- Cut a piece of elastic to six inches in length. Add a safety pin to one end, and thread the elastic through the tube. Align the end of the elastic just below the opening, and sew the end shut using a zig-zag stitch.
Backstitch the entire length for durability. Remove the safety pin and sew the other end as well. Snip off stray threads.
- Next lay the elastic piece seam-side up on the front of the large rectangle. Fold in the corners of the large rectangle to meet on top of the elastic piece. Pin together, sandwiching the elastic piece in place. Sew together with a quarter-inch seam. Remove the pin and snip stray threads.
- Now bring the unsewn end of the elastic to the opposite end of the rectangle. Repeat the steps of folding, pinning, and sewing.
- You're all set!


Roxanne Retro Headband Video Tutorial
If you are a visual learner, then be sure to check out the video tutorial from Maureen right below!
Read NextBig Bow Ear Warmer Tutorial
Your Recently Viewed Projects
Weberme
May 25, 2018
These retro headbands can sure make a come back today because more of the old styles are making a comeback today. This headband can be wore by someone with long or short hair and summer is a great time to have at least one on hand. They are super easy to make and use very little fabric and maybe you have some in your stash that you have been saving for some small project. This is on my to do list for sure. Great beginner project too.
furrykidzpaperworx 9128646
Dec 25, 2012
Really like idea of this and it looks quite simple to make. Can use so many different fabrics. I will use it in summer mostly to keep hair out of my face/eyes. Love the idea of this.
Report Inappropriate Comment
Are you sure you would like to report this comment? It will be flagged for our moderators to take action.
Thank you for taking the time to improve the content on our site.

