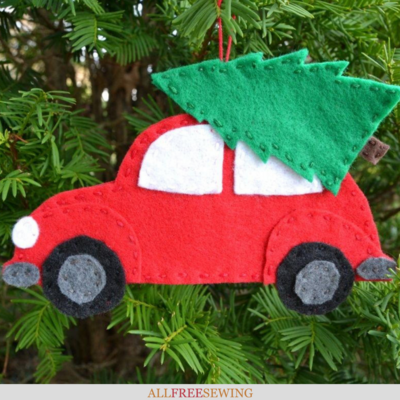
Christmas Tree With Vintage Car Ornaments Tutorial
This Christmas car ornaments printable is going to bring you back! This nostalgic DIY ornament is brimming with Christmas memories.

Journey back to memories of Christmases past with this easy DIY ornament made from felt. Cat W from MaryMarthaMama is here with this pretty Christmas Tree With Vintage Car Ornaments.
A beginner-friendly sewing tutorial that will bring you back to Christmases of yesteryear.
A great way to practice your hand sewing skills, this fun embroidery project is the perfect way to get a head start on the holidays.
This DIY Christmas ornament is also incredibly budget-friendly, so we know you won't be able to resist making a ton of these adorable tiny cars to hang on your tree this year.
This ornament was part of our National Sewing Month 2017 celebration but you can still celebrate anytime with this charming Christmas project!
Don't miss any of Cat's fun sewing projects on her blog, MaryMarthaMama!
Sign Up For More Free Patterns >>>
DIY Ornament Materials Needed
• Felt (red, white, gray, black, green, and brown)
• Embroidery floss (same colors)
• Needle
• Hot glue gun and glue sticks
• Ornament PDF (Click Here to Download the Free PDF)
Christmas Tree With Vintage Car Ornaments Tutorial
Cute little cars and trucks with Christmas trees on top are all over in Christmas decor this year. Now you can make your own little car ornament with just a few basic supplies and in just a few minutes.
Step 1
Print out the PDF of the patterns for the ornament. This ornament is a bit large so if you want a smaller one, then just adjust your printer settings so that it prints smaller.
Trace the patterns onto the felt and then cut out the pieces of felt. You will cut 2 of the main body of the car pieces and 2 of the Christmas tree pieces.

Step 2
Add your embroidery details. You can keep this simple like in the example or you can add more elaborate designs.
The example has embroidery floss colors that coordinate with the felt which gives it a little bit of texture but you could use different colors to add a little more contrast or pop.
You could even do some fun personalizing by adding a family name or date onto the ornament somewhere.

Step 3
Lay down the back piece of the main body of the car. Cut a piece of embroidery floss to use for hanging the ornament. Tie a knot in it and glue it down on top of the back piece of the car. Alternately, you could use a piece of coordinating ribbon.

Step 4
Glue the front down onto the back of the car. If you want to give your ornament a little more dimension, then you can add a little bit of Polyfil stuffing in the middle in between the front and back pieces before you glue them together.

Step 5
Glue the front of the Christmas tree piece onto the top of the car. Flip the car over and glue the back of the car onto the front one.

Now take your cute little ornament and hang it on your Christmas tree!

Be sure to check out Cat's blog, MaryMarthaMama, for even more fun sewing projects!
Want More?
"6 Sew Easy to Make Christmas Ornaments" eBook >>
Do you have an all-time favorite ornament on your tree? Let us know below in the comments!
Read NextFabric Star Christmas Tree Ornament
Your Recently Viewed Projects
Thanks for your comment. Don't forget to share!
CScarnegie
Sep 29, 2017
I LOVE THIS!! Old-fashioned cars with freshly cut trees are one of my favorite holiday motifs! I will definitely be making this for Christmas
Cheryl E
Sep 24, 2017
I love the image of the iconic vintage car carrying a Christmas tree tied to the roof. This project can be easily duplicated with a few pieces of colorful felt and a simple running stitch to secure them all together. Whether made as an ornament or even bit smaller as a package decoration it is really a sweet nostalgic idea.
JMc
Sep 24, 2017
Wow! This Vintage Car ornament is adorable- I want to make one for everyone on my list! Thanks for the great step by step instructions and photos.
Report Inappropriate Comment
Are you sure you would like to report this comment? It will be flagged for our moderators to take action.
Thank you for taking the time to improve the content on our site.