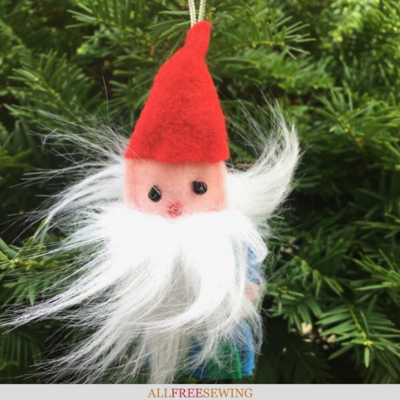
Christmas Gnome Ornament (or Pincushion)
Learn how to make a Christmas gnome ornament that doubles as a pincushion! This easy and fun project is perfect for the holidays.

What's cuter than a little gnome-shaped pincushion that can also be used as a Christmas tree ornament?!? Hint: nothing!
Get ready for the holiday season with this useful and adorable little gnome friend that can hold your sewing pins and then go rest in your tree. This is a must-make hand sewn pattern for the cutest small gnome.
It's a creative project that pulls double duty for whichever you prefer. Or, after he spends time on the tree, he can stay out and hold your pins instead of sitting the rest of the year in a box with your other homemade ornaments.
Not only is this an easy sewing project that is perfect for beginners or kids, but it's a great refresher on hand-sewing techniques, as well as for working with felt and fake fur. Plus, gnomes are one of the hottest trends this year!
Let's create this cheerful holiday decor (with that vintage appeal we all love) with a step-by-step tutorial for our exclusive Christmas Gnome Ornament (or Pincushion)! You can find this article and everything else shared during National Sewing Month this year by checking out our main National Sewing Month 2020 page.

Materials Needed for DIY Gnome Ornaments:
- felt sheets (about half a letter paper-sized piece of craft felt in each color you want for the hat, skin, and clothing of your gnome along with a contrasting color for shoes, etc. should be plenty)
- faux fur fabric (in a color of your choosing for the gnome's beard, etc.)- just a small amount
- polyester fiberfill (a hand-full)
- graphite or Emory shavings - or use the strawberry at the end of tomato pincushion! (optional)
- black (or another color) thin elastic for the belt
- string or thin cording for the loop at the top- about 6-7" long at least
- all-purpose or similar thread (in colors that match your materials)
- hand-sewing needle
- fabric scissors
- measuring tape or ruler
- pins
- seed beads for eyes and mouth (optional)

DIY Gnome Instructions:
Skill Level: Easy
Approximate Time to Complete: 2 hours
- Find a gnome drawing or style you like, either from books or the internet. The pincushion ornament you make can be any colors you'd like, not just a traditional gnome with a red pointy hat and blue clothing. You can also choose any skin and hair or beard colors you'd like for the gnome.
- Begin by cutting out the felt pieces and fake fur you will need for the gnome. The head and body will eventually be filled with polyester stuffing, so leave extra room for this filling.
Using fabric scissors, cut out:
*Front and back body shapes in felt- 2 slightly rounded (at the top) rectangles approximately 2.75" (inches) tall by 1.75" wide.
*Hat shape in felt- a half-circle approximately 3" wide by 1.75" tall.
*Face shape in felt- 2 circles or ovals that are approximately 1.25" tall.
*Small felt ovals for shoes (I made them green to be festive for the Christmas holiday).
- Now it's time to start constructing the gnome! Begin by cutting out 2 of the face shapes in felt. They should be about the same size. If you prefer the back layer to not be visible from the front, make the back later slightly smaller to hide it.
- Attach seed beads to create eyes and a nose on your gnome. These can also be hand-sewn on later if you prefer. Or you can skip this part entirely!


- Construct the head shape by stuffing some filling in between the two layers and hand-sewing all around. I went around twice with my needle and thread to make sure it won't come undone. I also added a bit more polyester filling before closing it up to give it extra shape.


- Cut out pieces of fake fur to make the beard and hair of the gnome. Be sure to not cut across the fur strands themselves- only cut the backing side. Make a triangle shape for the beard and a rounded rectangular shape for the hair on the back of the gnome's head. You might want to measure it against your gnome's size before cutting it out.


- Next, attach the beard and hair made from the fake fur to the head using a hand-sewing needle and thread. Hide the stitches underneath the faux fur so they aren't visible.


- Next, stuff the body shape with polyester fiberfill or a similar material. Add the polyester until it is puffy but not overfilled and bursting. Hand stitch around the shape twice (at least) for security.


- If you'd like you can now add shoes to the gnome's outfit. These were attached with a crossed-stitch secured several times.

- As gnomes have a belt in most depictions, I tied a piece of elastic around his waist. This should be sewn closed with a matching thread.

- Attach the gnome's head to the body in this step. I used the fluffiness of the faux fur beard and hair to hide the hand-sewn stitches and cleanly attach these two sections. The gnome should be secure enough that it won't come apart easily if snagged.

- Finally, it's time to make the signature gnome feature- a cone-shaped hat! It's usually in red but you can pick any color. There are no rules when making a gnome!
Place your half-circle of felt on your workspace and select a matching thread color.
- Knot the string you are using for the ornament, leaving about 2.5-3" above the top of the hat when the string is looped.

- Construct the hat by placing the looped string (knot end down) and strawberry shape inside the red half-circle. Close and hold the felt until it is tight around the string and becomes a cone shape, hand-sewing it as you go along.


- Trim off any extra material at the bottom of the hat. It should have a relatively flat edge all around.

- Now, attach the hat to your gnome! You may want to place some extra polyester stuffing inside the base of the hat before closing it up.

- Trim any loose threads on the gnome pincushion and make sure all of the adornments are securely attached. I did add extra faux fur to give my gnome more of a mustache, as well as little hands at his sides. Any features you want to add will just personalize your gnome even more!
Note: Check the gnome for pins and remove them if you are placing it on a Christmas tree or doorknob. Be sure to always double-check the long fake fur.


Want More?
No-Sew Fabric Christmas Gift Tag Ornaments >>>
What other kinds of pincushion ornaments could you make for the upcoming holiday season?
Let us know in the comment section below!
Read NextFabric Star Christmas Tree Ornament