This project was submitted by one of our readers, just like you.
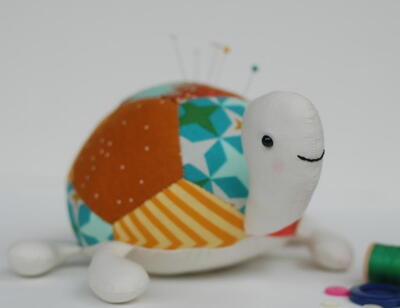
Tilly the Turtle

Tilly the Turtle
From the Blogger: "Tilly the Turtle is a great scrappy project to make in an afternoon. Combine some handwork and some machine sewing to create an adorable turtle you'll love to keep or give as a gift.
If you enjoy English Paper Piecing, this is a perfect project for you. You'll use pentagons to create the turtle's clever shell. Tilly the Turtle makes an awesome pincushion in the sewing room, but she’s also fun as a softie to play with!"
Project TypeMake a Project
Time to CompleteIn an evening
Sewn byBoth Hand and Machine

Materials List
- 12" x 12" scraps of 5 different fabrics
- 1 pair of 8mm safety eyes with washers
- Black embroidery floss or Perle cotton, 12"
- Fiberfill stuffing, 3 ounces
- Coordinating thread
Tilly the Turtle
Instructions:
-
First, let’s do some English Paper Piecing (EPP) with the pentagons and partial pentagons. You’ll need 6 pentagons cut from the 4 shell fabrics. If you’re unfamiliar with how to do EPP, this video will show you how to cut and baste the pentagons and the partial pentagons.
-
You’re going to make a pentagon flower by attaching five pentagon petals to a center pentagon. Select one pentagon to be the center, then stitch a pentagon to each of its sides.
-
Sew up the seams between each pentagon. Leaving the papers in place, you’ll now add a partial pentagon between each of the petals.
-
Now you’ve made the shell of the turtle. Pull the papers out and press carefully. Next, it’s time to sew the limbs, tail, and head. Cut 2 tail pieces, 8 leg pieces, and 2 head pieces. Pair up the tail pieces and sew around, leaving the opening as marked. Do the same for the four legs. Clip the curves and turn the tail and legs right side out. Stuff firmly and set aside.
-
Place the head pieces right side up on your work surface so that they are a mirror image of one another. Attach a safety eye to each of the head pieces as marked (here’s how to use safety eyes). Optional: Apply a small amount of blush right underneath the eyes to suggest cheeks.
-
Place the head pieces right sides together and stitch around, leaving the opening as marked. Clip the curves and turn the head right side out. Fold the raw edges in 1/4″ and press. Stuff firmly.

Read NextBarbie Ball Gown
Your Recently Viewed Projects
Thanks for your comment. Don't forget to share!
Marilyn B
May 25, 2017
Love this darling little turtle and would love to try it! If making it for a newborn and toddler, you could opt to embroider the eyes on instead of using the safety eyes, especially when these toys go into their mouths! For further embellishment, you could use some fabric markers to make some lines on the legs for the claws. This is such an adorable fella with his blushed cheeks!
Cheryl E
Apr 06, 2017
This little turtle is adorable. Love sewing childrens stuffed toys as they are so whimsical in nature. Easy scrap fabric project too. The paper piecing directions are clear and easy to follow. I would consider altering the pattern just a bit so the turtles neck is somewhat shorter than what is shown in picture.
Weberme
May 17, 2017
Thanks Cheryl for the advice on shortening the neck. I agree with you it is a little long. That should be easy to do. This turtle is so cute and I also like projects that use up scraps. This looks to be a good tutorial too. Have you made one yet?
LynM
Mar 28, 2017
What a cute little Turtle. I checked out the pattern and learned about something quite new to me, English Paper Piercing, which is going to very useful when I get around to learning how to do quilting. This little softie would be a great addition to the emergency toy box for when relatives with small children visit.
Report Inappropriate Comment
Are you sure you would like to report this comment? It will be flagged for our moderators to take action.
Thank you for taking the time to improve the content on our site.