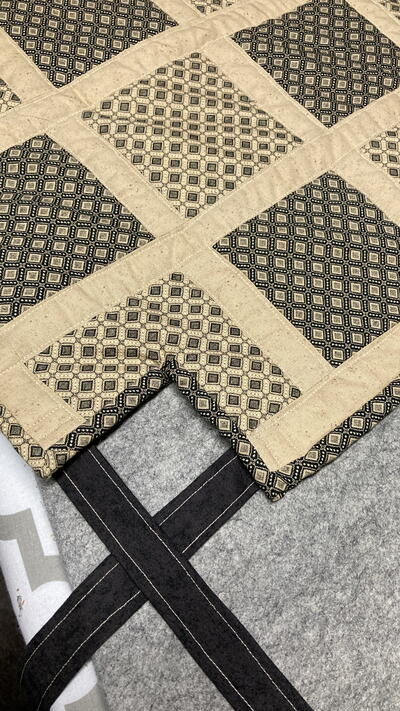
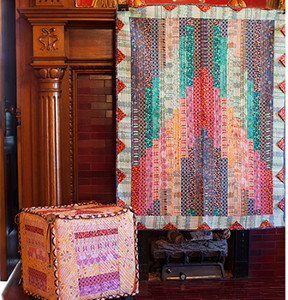
Quilted Throw and Cube Ottoman
 This strip-pieced quilted throw features Ty Pennington Impressions latest fabric collection and was inspired by Native American hand-woven blankets. The finished size is approximately 38” x 48” (96.5 x 122cm) and is embellished with dimensional prairie points around the border. This tutorial also shows you how to make an ottoman, which is sure to add a geometrically inspired, unique touch to any living space. The bright colors are perfect for a bedroom or living room and are sure to wow your guests.
Quilted Throw
Cube Ottoman
Quilted Throw
Materials
- 1/2 yard (45.7cm) of each of 21 prints in the Ty Pennington Impressions Fall 2013 collection for main quilt top and quilt back
- 1 twin size low loft quilt batting
- Coordinating Coats & Clark Dual Duty XP® all-purpose thread
Cutting
- Cut 2 pieces 2” x WOF (5.08cm x WOF) of each of 21 prints in the collection for quilt top assembly
- Cut 5 pieces 3-1/2” x WOF (8.9cm x WOF) of pale Jadeite print for Border
- Cut 5 pieces 2 1/2” x WOF (6.35cm x WOF) for binding
- Cut 24 pieces 4” x 4” (10.2 x 10.2cm) for prairie points
- Cut large rectangles from remaining fabrics to make quilt back
Instructions
Note: All Seam Allowances are ¼” (.64cm) unless otherwise noted
- Arrange 2” (5.08cm) strips of fabric into the three color groups from dark to light. Then, using the diagram as your cutting guide, select, cut and sew together the strips, creating 21 vertical strips.
- Arrange the 21 vertical strips as indicated below, pin and sew them together, to create an all over ombre effect. Press all seams toward the outside.
dark, dark, medium, medium, light, light, light,
medium, medium dark, dark,
dark, medium, medium, light, light, light, medium
medium dark, dark
- Sew the border strips to the left and right sides, then sew the remaining border strips to the top and bottom, piecing as required.
- Assemble print rectangles and stitch together to form a quilt back that is at least 5” (12.7cm) larger than the quilt top all the way around. Press seams to outside.
- Make the quilt sandwich by placing the quilt back face down on your work table, then arranging the quilt batting on top of the quilt back, then the quilt top centered over the batting. Hand baste the layers together, starting from the center and working out toward the edges. Machine quilt all layers together by stitching in the ditch between strips, then stitching vertical lines 1/2” (1.27cm) apart over the pieced designs. Stitch around the border 1/2” (1.27cm) from inner edge, then in concentric rectangles at 1/2” (1.27cm) increments all the way around to the outside edges of the border.
- Make the prairie points by folding the 4” (10.2cm) rectangles in half from top to bottom. Press, then fold down corners to meet in the center and press. Pin the prairie points in place, matching raw edges, evenly spaced with five across the top and bottom of the border, and seven on either long side. Stitch close to raw edges of prairie points to secure.
- Sew together the 5 pieces of 2-1/2” (6.35cm) wide dark slate print. Fold in half lengthwise and press. Pin in place around the entire quilt top with raw edges matching, starting between two prairie points along the bottom of the quilt. Fold binding carefully around corners, pinning carefully into place. Sew all the way around outside of quilt, bringing cut ends of binding together, and stitch across to secure. Trim seam allowance to 1/4”(.64cm), cutting away excess quilt batting and back.
- Carefully fold binding over seam allowance and pin in place on back of quilt. Press. Hand stitch invisibly around the folded edge of the quilt binding to secure.


Cube Ottoman
Materials
- Ty Pennington Impressions™ Fall 2013 Collection fabric:
PWTY051.TOPAZ
PWTY052.TOPAZ
PWTY053.TOPAZ
PWTY054.TOPAZ
PWTY055.TOPAZ
PWTY056.TOPAZ
PWTY057.TOPAZ
A – 1 yd (91.4cm)
E – 1/8 yd (11.4cm)
B – 1 yd (91.4cm)
F – 1/8 yd (11.4cm)
C – 1/3 yd (30.2cm)
G – 1/8 yd (11.4cm)
D – 1/8 yd (11.4cm)
H – 1/8 yd (11.4cm)
- Purchased cube ottoman 15” x 15” x 15” (38 x 38 x 38cm)
- Leather lacing – approx 18 yards x 1/4” (16.5m x .64cm) (or cut from 1/3 yard faux leather upholstery fabric)
- Four 1¾” (4.44cm) Coconut 2 hole buttons by JHB
- Brown waxed linen thread
- Twelve ½” x ¼” (1.27 x .64cm) turquoise beads
- Sixteen 3/8” x ¼” (.95 x .64cm) red coral beads
- 5 ½ yds x ½” (5m x 1.27cm) piping
- 1½ yds (1.4m) – fusible fleece
- 1½ yds (1.4m) – muslin
- Glue gun and glue sticks
- Air soluble marker
- Coordinating Coats & Clark Dual Duty XP® all-purpose thread
Instructions
Note: All Seam Allowances are ¼” (.64cm) unless otherwise noted.
Construction of 4 sides:
- Cut fabrics for each side into sizes shown in Fig. 1 using fabrics indicated by letters.

- Begin with the center section and sew together, using ¼” (.64cm) seams. Press seams to one side. Add the side pieces. Complete all 4 sides.
- Cut five 18” x 18” (45.7 x 45.7cm) squares of each of fusible fleece and muslin. Set aside one of each for the top of the cube.
- Assemble a fabric sandwich for each of the four sides with muslin on the bottom, fusible fleece in the middle and the pieced square on the top, right side up. Fuse together.
- To quilt, begin by stitching in all the ditches between fabrics. Stitch through the center of each square, from top to bottom.
- Mark center point of square and, using an air soluble marker, mark a stitch line from that point to the lower left and right corners. See Fig 2. Use marked lines as your guide for stitching lines, ¼” (.64cm) apart, below and above it, until the entire square is quilted. Repeat with other three sides.

- Trim all 4 pieces to 16½” x 16½” (42 x 42cm).
Top:
- Make 4 sets – each strip is 1-3/4” wide. See Fig.3

- Using ¼” (.64cm) seams, sew together the horizontal strips, then join the strips to form a solid piece of fabric. Repeat for remaining three sections.
- Mark pieced fabric so that upper edge measures 4½” (11.4cm) across and lower edge measures 16” (40.6cm). Trim edges to form trapezoid as shown in Fig. 4

- To make the center top square, cut fabrics as shown in Fig. 5.

- Sew together to form a 4½” x 4½” (11.4 x 11.4cm) square. See Fig. 6.

- Pin and sew all four sides of the top square to the top center square, matching all seams. Press all seams to outside.
- Make a fabric sandwich with muslin on the bottom, fusible fleece in the middle and the pieced square on the top, right side up. Fuse together.
- To quilt, stitch in the ditch around the center square. Stitch in concentric squares every ¼” (.64cm) inside the center square toward center.
- Continue quilting by stitching each of the four outer sections ¼” (.64cm) inside the seam. Repeat every ¼” (.64cm) until each section is complete. See Fig. 7.

Piping:
- Cut 4 strips of fabric B into 16” x 3” (40.6cm x 7.62cm) strips for the side piping pieces. Cut piping cord shorter than the fabric, so fabric can disappear into seam at top and bottom. Sew piping.
- Make 2 continuous pieces of piping for top and bottom, approximately 64” (163cm) long.
- To create the lacing, poke a small hole at 1½” (3.8cm) intervals behind the stitch line on the piping for each of the four side seams. Start at the bottom of the strip and center a 1½ yd (1.4m) strip of lacing in the bottom hole. Criss cross braid up to the top, lacing braid through the poked holes, ending at the top with the ends of the leather lacing extending for 12”.
- Braid the piping for the top and bottom in the same manner, but bury the ends behind the piping.
Assembling Cube:
Use ½” (1.27cm) seams
- Sew all 4 sides together, with piping sewn into each side seam.
- Sew top piping to outside edge of top of cube, matching raw edges. With right sides together, sew top to sides.
- Sew piping along bottom edge of cube.
- Pull cube cover onto cube. Hot glue raw edges of bottom piping to bottom of cube.
Finishing:
Thread two beads onto the ends of each of the lacing. Thread 3 small beads onto waxed linen. Thread through one of the large coconut buttons. Tie one button to each of lacing extensions on the upper corners.
Read NextChair Cover Sewing Pattern
Your Recently Viewed Projects
Thanks for your comment. Don't forget to share!
Linda
Jan 18, 2017
This is just what I need, quilted throw and ottoman cover, for my sofa. I would also make matching window dressing using sheets as my fabric for quilting.
Report Inappropriate Comment
Are you sure you would like to report this comment? It will be flagged for our moderators to take action.
Thank you for taking the time to improve the content on our site.