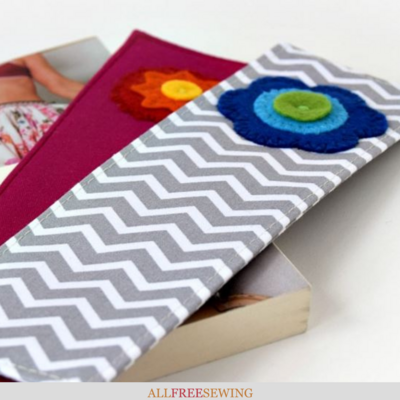
DIY Fabric Bookmarks With Felt Applique
Have you ever thought to sew your own handmade fabric bookmarks? This tutorial will show you how to make the prettiest ever!

Turn your scrap fabric into quick and simple bookmarks with this DIY Fabric Bookmarks (with felt applique) tutorial.
Guest blogger Damjana is here to show you how make bookmarks using your prettiest fabric scraps and how to add fun applique details.
If your fabric stash is overflowing, or if you've been searching for the perfect beginner project to start sewing, then you'll love these DIY bookmarks.
These quick and easy bookmarks are a great gift idea for book lovers, and they're an excellent beginner sewing project for teens and tweens.
Give the book lover in your family a charming gift that they'll cherish each time they open their favorite novel with this scrap sewing project.
Sign Up For More Free Patterns
Hello everyone! I'm Damjana and I blog at AppleGreen Cottage, and I'm so happy to take part in National Sewing Month hosted by AllFreeSewing! Here's a super easy tutorial for fabric bookmarks with felt applique, a clever and simple scrapbusting idea for this fall.

These DIY bookmarks with felt applique are a quick and easy beginner sewing project, and they make wonderful personalized DIY presents for your loved ones. Check out this easy tutorial!
DIY Fabric Bookmarks With Felt Applique
Supplies:
• BASE: a 9 by 6 inch (= 23cm x 15cm) large scrap of fabric
• A piece of fusible felt batting: 2 1/2 inch x 8 1/4 inch (= 6.5cm x 21cm) - i.e. in the finished bookmark size to avoid bulk on the stitching line)
• Optional: same dimension as felt batting: sturdy woven interfacing for additional stability
• A few felt scraps in your favorite colors
• Optional: a few cookie cutters (you'll see soon why)
DIY Fabric Bookmarks Tutorial:

1. First, cut the rectangular fabric piece for the base (dimensions above). You'll only need ONE piece per bookmark only. I made 4 bookmarks this time.

2. OPTIONAL, but good for stability and thickness: Apply fusible interfacing and batting to the base, one on each side as you see in the image above.

3. Fold under the seam allowance along both long edges of the fabric. Press.

4. Make sets for the felt applique combination for the flowers. The easiest way to get the form? I just traced a few cookie cutters and cut along the traced lines. For me, there's no easier way to do it! (So I might have made a few more than required, though they didn't make it into this photo...)

Depending on how many bookmarks you want to make, you'll probably only need 3 pieces per one. This is how I arranged my pieces.

5. Now, pin your felt applique-to-be on one half of the fabric. You'll remove the pins as you sew.

6. Select matching or contrasting threads (your choice!). Start sewing the lowest layer, and then add the smaller ones. Plain straight stitch, wide zigzag or decorative stitches - your choice!
Now, stitching. Follow along:

7. Seam allowance along the long edge of the fabric stays FOLDED (I pinned it, see?)
Then, unfold the center fold and re-fold it right-sides-together, so you see batting and stabilizer – see the image above.

8. Stitch over both short ends, using the 3/8" (= 1 cm) seam allowance.

9. Turn right side out. You can use a chopstick to help you do that.

A detail. See, the raw ends are neatly tucked in. Now's the time to press the fabric for a nice and crisp finish.

10. One long side is still open: edge-stitch around the entire bookmark. This way, you'll stitch the opening closed. Done!
Your bookmark is ready, now you just need to choose which book you'll start reading now. These DIY bookmarks will also make wonderful personalized presents for your loved ones.

About the Author:
For more of Damjana's beginner-friendly sewing projects, check out her blog, AppleGreen Cottage! Plus, for more easy and fun sewing projects by Damjana, visit her Free Patterns page.
Want More?
19+ Backpack Sewing Patterns >>
What project do you recommend for beginner sewists?
Let us know below in the comments!
Your Recently Viewed Projects
Thanks for your comment. Don't forget to share!
Marilyn B
Sep 29, 2017
Great idea and thanks for these super easy and clear instructions! These bookmarks would be a great favor for parties, or for a keepsake for a family reunion, a wedding party, or business gathering or reunion. If you are really ambitious you could add a name or date to commemorate a special occasion to give these out as momentos. Super idea!
Report Inappropriate Comment
Are you sure you would like to report this comment? It will be flagged for our moderators to take action.
Thank you for taking the time to improve the content on our site.