How to Sew a Blind Hem
 Learn How to Sew a Blind Hem from this fabulous video tutorial. Thanks to BERNINA, you'll find step-by-step instructions on how to include this subtle stitch into your sewing projects.
Sewing videos like this one are absolutely vital for one who wants to advance their sewing repertoire.
Because of this quality video, you'll feel like you're working alongside a sewing companion throughout the process. Break out your machine and test this blind hem stitch on any article you're making.
1. To do a blind hem you will first need to prepare your fabric and to do that you will start by overcastting the top edge of your hem.
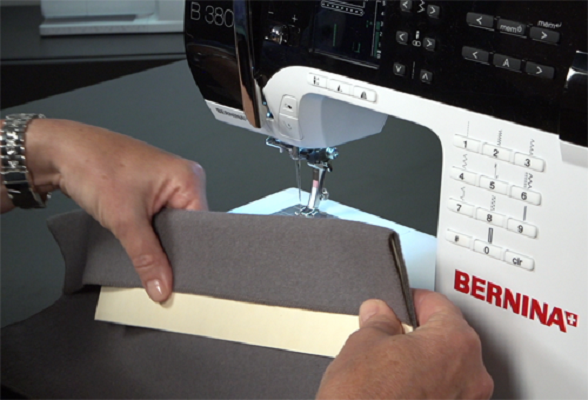
2. Next fold in your hem allowance. A quick and easy way to do that is to simply use a manila folder and cut a three inch strip. Then you’ll want to draw a line on your manila folder two inches from the top.
3. Go to your iron, slipping this manila folder in your fabric, and you will fold up to that line and press. Having this folder behind your hem allowance will eliminate the crease on the right side of your fabric.
4. After your hem is pressed you are ready to sew the blind hem in. In order to fold your fabric to make a blind hem, do a basting stitch ¼ of an inch away from the top of your hem. Put your stitch length on 5 and just using the edge of your foot as a guide on the top edge of your fabric sew down the entire length of your hem. By putting that row of basting in there it makes it very easy to know how to fold your fabric because you're going to fold back on that stitching that you have just made.
5. Sew your hem in using the BERNINA presser foot #5. This is the blind hem foot and it has a guide in the front of it and that guide is what you're going to use to put along that fold that you just made along that basting stitch.
6.Select the blind hem stitch which is a stitch built into the machine and this is going to take one stitch or one bite into the fabric into the fold and take several stitches into the top edge of the hem. Now depending upon on the weight of fabric your are hemming you can adjust the bite or the zigzag that it takes into your fabric. So if you wanted to take a deeper bite you're going to make your stitch width wider and now it will take more of a bite into that fold.
7. All you'll see is the basting stitch, you won't see the stitches of the blind hem. Just remove that basting stitch and your hem is complete.

Read NextHow to Make a Travel High Chair
Your Recently Viewed Projects

Thanks for your comment. Don't forget to share!
Marilyn B
Mar 17, 2017
Thanks for the great tutorial! I have a blind hem stitch on my machine but many times I got a but too much on the pick up stitch and you could sometimes 'see' it. This is very helpful and it looks so nice on the finished garment or home decor projects like lacy curtains where you don't want to see the stitching. Thanks so much for the help!
Weberme
Apr 05, 2016
I am so glad I found this video.I have tried to put in a blind hem with my machine which is a Bernina with no success. I have been to frustrated to try to put one in again until I seen your video. I love your idea of the basting stitch. I think it will help.Thanks Connie. I hope it works this time. Anyone else have trouble with blind hemming?
gloriajunesp2 0617 241
Nov 17, 2013
I want to thank you for bringing this hemming knowledge to all that can sew and those who want to sew but don't have a chance..... maybe this get those started. I agree with every step you outlined , as I have done this soooo many times----on pants legs tops hems in skirts jackets coats !!!!!! Thank you again. Gloria J. Parker Pensacola,Fl.
Report Inappropriate Comment
Are you sure you would like to report this comment? It will be flagged for our moderators to take action.
Thank you for taking the time to improve the content on our site.