This project was submitted by one of our readers, just like you.
10 Min Seamless Panty Sewing Pattern

10 Min Seamless Panty Sewing Pattern
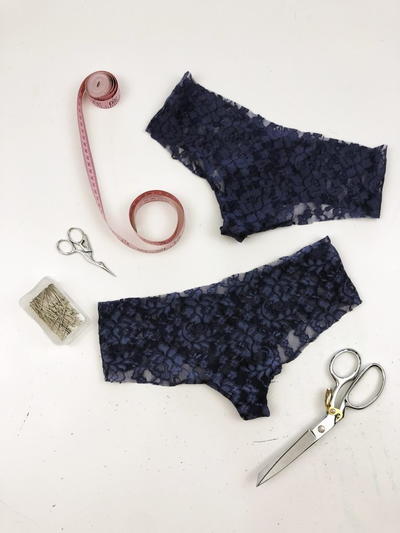
"This simple panty pattern will be your go-to panty since it disappears under your clothing. It’s simple design and simple construction make it perfect if you are just getting started in lingerie making. For this tutorial, we’ll be using this multi-page, printable panties pattern from my sister-site, Modern Sewing Patterns. You can print this underwear pattern out from any at-home printer and align the pattern using the notches and the numbered pages. Use tape to put the sewing pattern pieces. You can also see my complete guide on how to print, store, and use printable sewing patterns HERE. You’ll also need some 4-way stretch fabric for this tutorial. I got mine from Minerva. You can tell your fabric is a 4-way stretch if it comes equally in every direction. This will make your seamless panties more comfortable when they are on."
Project TypeMake a Project
Time to CompleteUnder an hour
Sewn byMachine

Instructions
-
To begin, fold your fabric in half and place the center front of your sewing pattern on the fold line. Use sharp pins to hold it in place before cutting it out.
-
Since we will be leaving the seams raw around the top and bottom of the panty (this helps to make them invisible under clothing since they won’t have bulky seams) I recommend using a rotary cutter to cut your pattern pieces out.
-
Quick Tip: Lace fabric can tend to get a bit slippery while you are cutting it, you may want to lay your fabric on a piece of tissue paper to prevent it from sliding around. You can also use more pins than usual to hold it in place for cutting.
-
This simple pattern only has two pieces to cut out so it’s great for using scrap pieces of fabric. Once your pattern pieces are cut out, your crotch lining piece should line up perfectly with the center front of your panties.
-
Now we get to sew it together! Fold your panties back together with the right sides facing each other and pin along the center back edge. Use either a narrow zig-zag stitch on a standard sewing machine or a serger to sew along the back edge at 1/4″ seam allowance.
-
For knit fabrics, use a ballpoint or stretch needle to prevent damage to your knits and prolong the life of your finished project.

Read NextCute and Easy Potholders to Sew