Grogu Double Zipper Coin Purse Tutorial
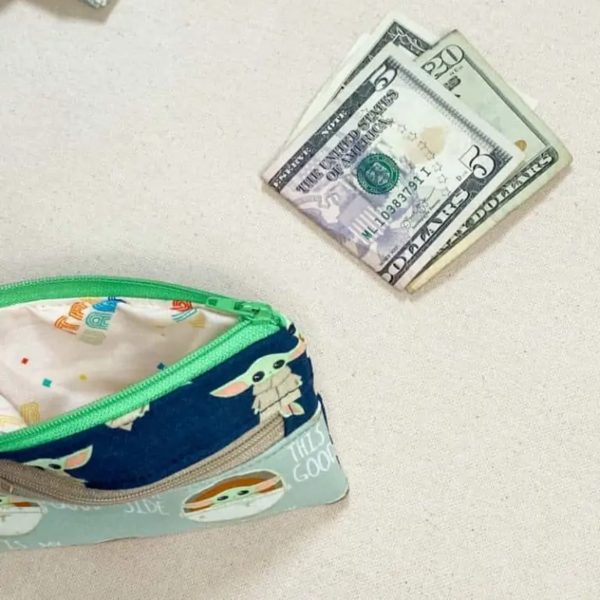
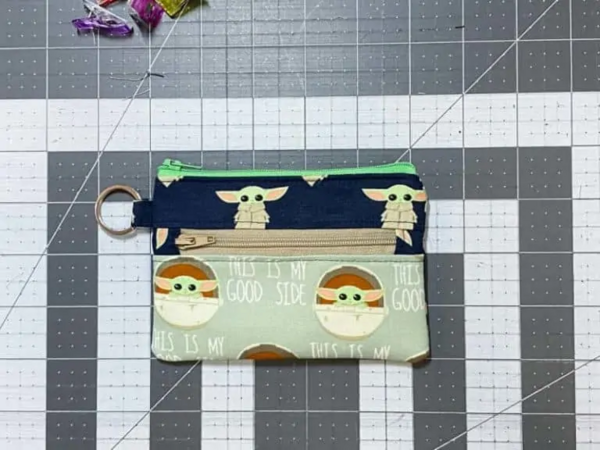
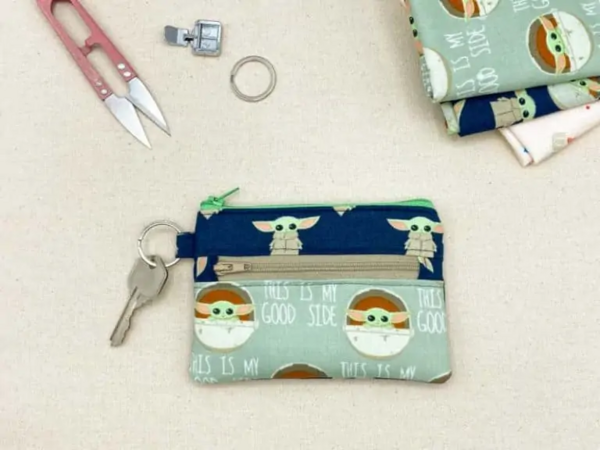
This fun zippered coin purse tutorial features two pockets and a keychain holder. Plus, Baby Yoda (aka Grogu) fabric makes this the cutest DIY coin purse we've seen!

Learn how to make a DIY coin purse with zipper pockets and featuring adorable "Baby Yoda" fabric. This Grogu Double Zipper Coin Purse Tutorial is a creative project that can be made by most sewists.
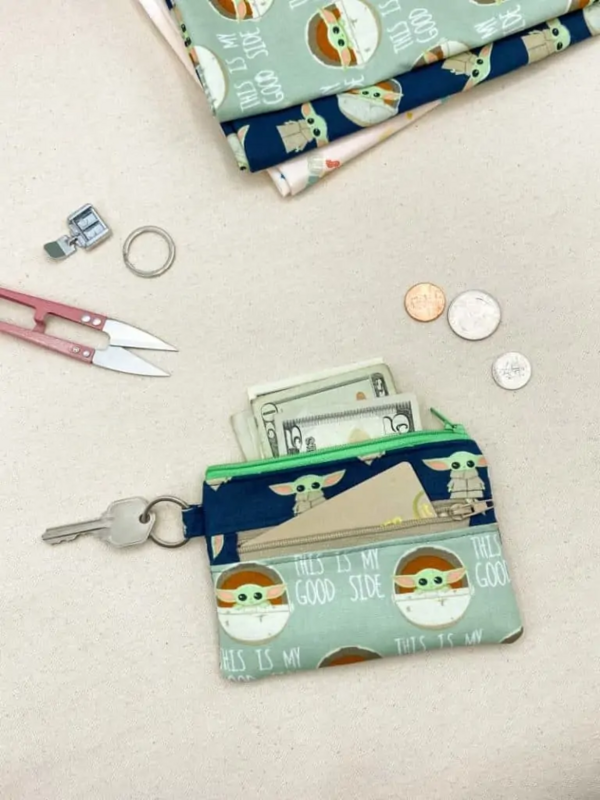
The design is much more exciting than a standard coin purse, too. This one is multi-layered with a top zipper pocket and a lower zippered side pocket to hold the cards or cash you need on hand. Jump to the tutorial now!
There is also a loop for a key ring, which means you can keep your keys and money together. No more digging through your purse for either!
Ellen from The Socialite's Closet will walk you through this project:
If you enjoy sewing, this coin pouch is a simple DIY sewing project you can tackle. And, you can change up the fabric you use to personalize it for different outfits or occasions.
This fun Baby Yoda fabric would work for everyday wear or as a fun gift for a tween or teen in your life.
This simple pouch pattern can be used to hold coins, bills, credit cards, lip balm, or other personal care items.
Join Sewing It Up For More Free Patterns, Tutorials, & Guides >>
Double Zipper Coin Purse Tutorial
Skill Level: Intermediate
Project Type: Make a Project
Time to Complete: In an Evening
Sewn By: Machine
Note About the Skill Level: This DIY coin purse is intended for someone who has at least beginner-advanced sewing skills. You should understand sewing terminology and be comfortable with zippers.
You don’t need to be an advanced seamstress but it will help if you know your way around a sewing machine and simple sewing techniques.
Materials List:
• Main Fabric (100% Cotton Blue Baby Yoda fabric is used in this tutorial):
• 1 piece 6-1/4"w x 1-3/4"t for front pocket panel top (INTERFACE THIS PIECE)
• 1 piece 6"w x 4-1/4"t for the back panel (INTERFACE THIS PIECE)
• 1 piece 2" x 2" for ring tab
• 2 pieces 2-1/2" x 2" front zip tabs
Accent Fabric (100% Cotton Green Baby Yoda fabric is used in this tutorial):
• 1 piece 6-1/4"w x 2-3/4"t for front pocket panel bottom (INTERFACE THIS PIECE)
Lining Fabric (100% Cotton Star Wars 1977 fabric is used in this tutorial):
• 1 piece 6-1/4"w x 1-3/4"t for front pocket panel top
• 1 piece 6-1/4"w x 2-3/4"t for front pocket panel bottom
• 1 piece 6"w x 4-1/4"t for front pocket back panel
• 1 piece 6"w x 4"t main pouch lining
Pellon SF101 Interfacing:
• 1 piece 6"w x 1-1/2"t for front pocket panel top
• 1 piece 6"w x 2-1/2"t for front pocket panel bottom
• 1 piece 6"w x 4"t for back panel
Hardware:
• 1 Olive 7" + nylon zipper for main top opening (#3 Black Olive is used in this tutorial)
• 1 Khaki 5" + nylon zipper for front pocket (#3 Greyish Olive is used in this tutorial)
• 1" split ring (such as these)
How to Make a Zippered Coin Purse:
See images below.
- Cut all pieces needed as listed above. Iron on SF101 Interfacing onto the 3 pieces as noted.
- Take your 2" x 2" ring tab piece and place it wrong side up. Fold it in half and press it so that you have a crease down the middle. Now open and fold each side into the middle crease so it looks like this.
- Now fold on the center crease so that the top and bottom edges meet. You will end up with a piece that is 1/2" wide and 2" long. Topstitch along both long edges about 1/8" in from the edge. Set aside. You won’t need this piece until the end.
- Trim both metals stops off the 5" zipper and add tabs to each side using your preferred method so that you end up with a tabbed zipper that is at least 6-1/4" long. Trim excess from the top and bottom of tabs so that the entire strip matches the width of the zipper.

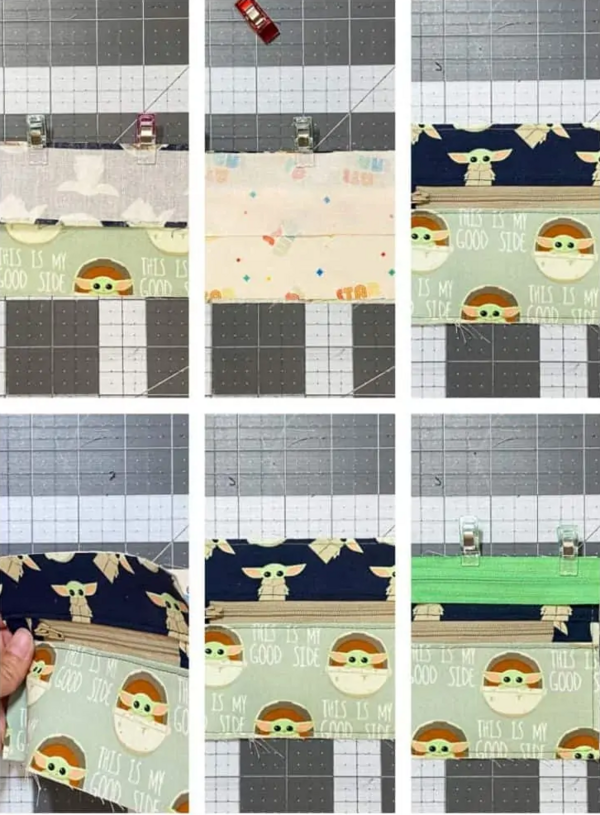
Make the Pocket Panel
See images below.
- Place the front pocket panel bottom piece right side up. Align the 6-1/4" tabbed zipper you just made with the top of the front pocket panel bottom piece with the zipper face down.
- Place the front pocket panel bottom lining piece on top of the zipper, also right side facedown. Use a zipper foot to sew all three (3) pieces together using a 1/4" seam allowance.
- Press both sides open with right sides facing out and topstitch using 1/8" seam allowance.
- Align the bottom of the front pocket panel top piece (right side face down) with the zipper tape edge of the panel you just made (right side facing up). Clip-in place.
- Flip this over so that the lining side is now face up. Do the same as above with the front pocket panel top lining piece. Place it face down, aligning with the open edge of the zipper tape. Clip in place and sew all three (3) pieces together using a 1/4" seam allowance.
- Press both top sides open like before with the right sides facing out and topstitch using 1/8" seam allowance.
- Trim this front panel piece you just made so that it measures 6" wide by 4-1/4" tall. Place this on top of the front pocket back panel lining piece, both face up.
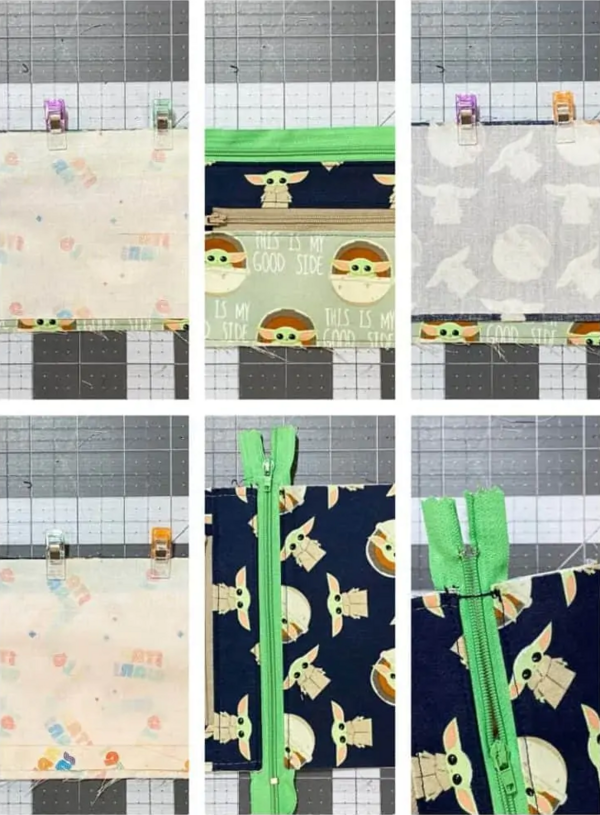
Baste Together
See images below.
- Baste together around all 4 edges using 1/8" seam allowance. You now have a complete front panel piece with a functioning zippered pocket.
- Place the main zipper face down along the top edge of the panel you just made.
- Place one main pouch lining piece face down on top of that.
- Sew all three pieces together using 1/4" seam allowance and zipper foot. Just like before, press open and topstitch with 1/8" seam allowance.
- Place the back panel main fabric piece on top, face down aligning the top edge with the open edge of the zipper tape below. Clip it in place.
- Flip this over so that the lining side is now face up. Place the second main lining piece face down also aligning with the open edge of the zipper tape. Clip it in place.
Sew All Pieces Together
See images below.
- Sew all 3 pieces together using a 1/4" seam allowance. Open both sides, press, and topstitch like before so that now you have a front panel with lining along with a back panel with lining on either side of the main zipper.
- Move the zipper pull into the center and then stitch the zipper tape together at that end.
- Trim the zipper tape on both sides so that it is even with the fabric. Match the lining pieces together (right sides together) and match the outer pieces together (the back panel and the front pocket panel piece you made) and also right sides together. Mark for a 2" opening on the lining pieces. Clip all the way around.
- Fold the ring tab piece you made earlier in half and place it between the outer pieces close to the zipper tab. The raw edges should be out with the top part being inside the sandwich.
- Sew all the way around (except for the 2" space for turning) using a 1/4" seam allowance. Clip the corners. Put your fingers inside the hole and pull the outside piece through. Keep going until your piece is now right side out.
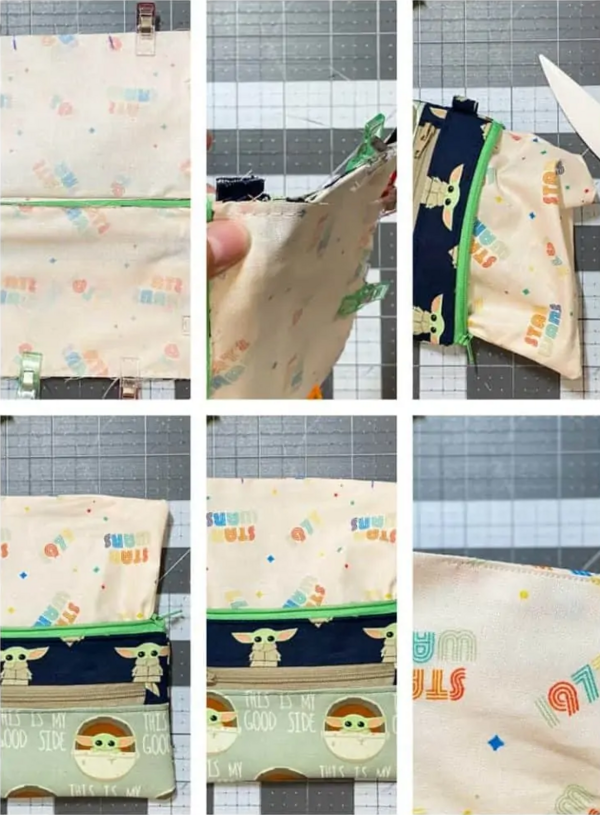
Press Out the Corners
- Use a tool to gently press out all 4 corners. Press the exterior pieces.
- Align the lining hole pieces that are folded in and press so they match as best as you can. Mark just past the opening on each side so that you will be able to easily see where to start and stop sewing the hole shut.
- Sew the turn hole shut as close to the edge as possible. Push the lining into the exterior pieces and push in the corners with your fingers.
- Close the zipper and attach the 1" split ring to the tab. You’re all done!
Want More?
12+ Star Wars Sewing Patterns >>
Do you still use coin purses for coins or something else?
Let us know in the comments!
Read NextHow to Make a Bag in One Hour