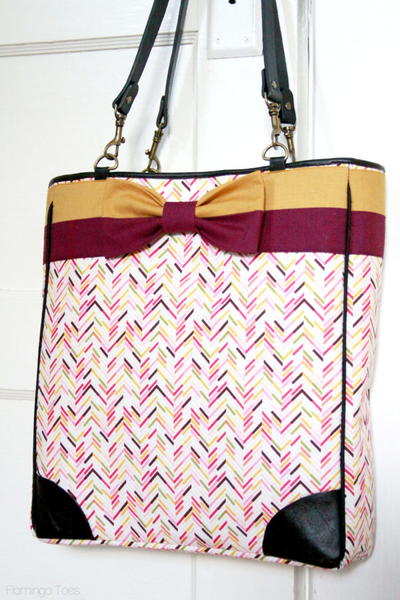
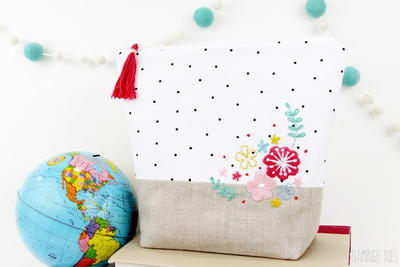
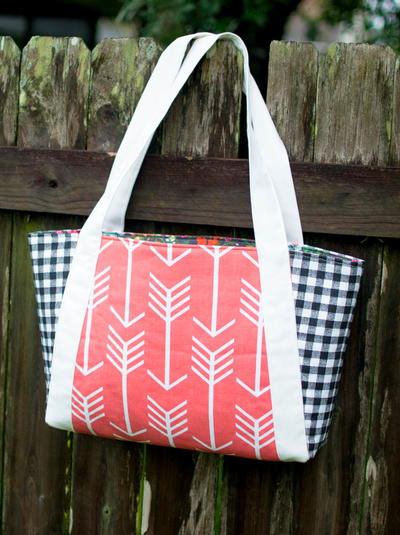
Nana's Perfect Picnic Tote Pattern

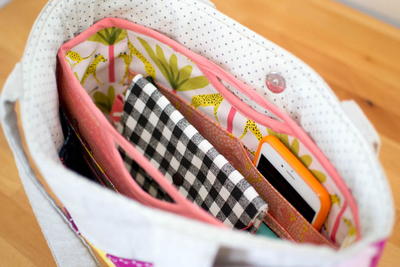
Create a purse that you can carry for any occasion or during any season with this Nana's Perfect Picnic Tote Pattern. This free purse pattern is absolutely perfect in every way and is great for moms and grandmas on the go. The best part about this easy bag pattern is that it's super roomy and has comfortable straps, so your shoulders won't be under any strain.
Simply choose a few yards of your favorite fabrics and get to sewing! This DIY bag is great as a carry-on bag if you're a frequent flyer and is even big enough to work as a library bag alternative. Instantly update your wardrobe with this grandma-approved sewing pattern.
Project TypeMake a Project
Time to CompleteIn an evening
Sewn byMachine

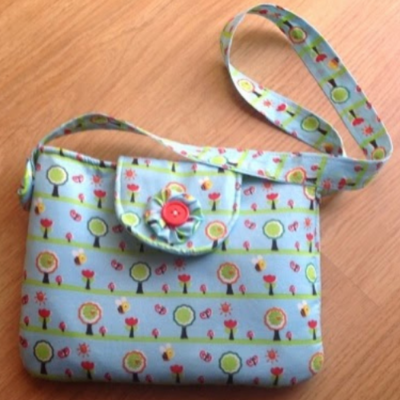
Read NextLittle Girl Purse with Flap
Your Recently Viewed Projects
Thanks for your comment. Don't forget to share!
Seth
Nov 29, 2018
The contrasting prints on this bag are very eye catching and I like the sensible size. The instructions for making the bag are really clear and detailed which is always a great help. I agree with Sigo, below, that with 3 different fabrics on 1 bag you can raid your stash to find off cuts and left over pieces that will work just fine.
flowergirl
Jun 02, 2018
I can see why so many people love this tote. The sewing tutorial is so intricate and beautifully written that it's easy to follow besides, every step is photographed so you won't get lost along the way. If you haven't made this yet then gather your prints and start. I know I'm going to have to make more than one of these so thanks for sharing.
Sigo
Mar 16, 2018
I made this tote again. Something else I like about it, is that it is sewn with several pieces of fabric, meaning that I can go through my fabric stash and find some that work well together. Though I needed to buy more batting and interfacing to make the tote, the rest was made with fabric I already had. Again I loved the way it turned out. The tote took me about 5-6 hours to make. I prepped all of the pieces (cutting fabric and lining and then cutting and ironing the interfacing and batting pieces onto the outer fabric and lining) in the evening and then I sewed everything together the next morning. I also added a magnetic snap to the lining of this bag as well, so the bag will close.
Sigo
Mar 09, 2018
When I saw this bag in one of the recent "Sewing It Up" newsletters from this month, I knew I wanted to give it a try. Each step of the procedure to make the bag is illustrated and really well explained on her website. I like the design of the bag because it is a great all purpose bag for all sorts of activities. I recently wrote that I want to make it and give it to a friend... but now that I have finished it, I would like to keep it for myself. I will just have to make another one for her. It was so easy that I think I will be making more of these in several colors to give as gifts for birthdays and such. One can never have too many bags.
Sigo
Mar 06, 2018
This is a little different than bags I have made in the past and I enjoy trying out new patterns because I like learning new techniques. I read the instructions and downloaded the pattern and would like to try it out as I think it would make a great gift for a friend.
tammywhittemore 93 35904
Jan 22, 2018
Little hard to under stand for a first time back a tote but I'm very happy with how it came out.
Weberme
Feb 21, 2018
tammywhittemore 93 35904 how did you get your bottoms to match. This tutorial is a little hard to understand because it looks like when you sew the sides you have leftover on bottom middle piece. Does it straighten out. I think this would bebetter if it was a video. Yours looks good. Would you make one again?
Sigo
Mar 10, 2018
Hello Weberme! I just made the bag yesterday and can answer your question, if that is ok. At first it looks like the sides of the bag are shorter than the bottom but then you will be matching the side seams with the bottom seam and that pulls it all together and creates a sort of floor to the bag. I posted an image of the bag I made but it is not being shown just yet but it does turn out fine. I definitely would make this bag again. It did take take some time to cut all the pieces and and sew the different steps, but it was not difficult to make. I think the instructions are well written and the images help a lot, too.
kikin68 0951557
Jul 06, 2017
It would be much better if pictures can be added with all instructions. I am trying to make this bag and I am extremely frustrated. The side panels don't match the center panel and some instructions don't make sense to me. I guess I will have to put this project aside until there are pictures.
mmrb3618686
Jun 30, 2017
This is definitely an all purpose bag. I see it being used from everything from a mini baby bag to a overnight tote for the an teenagers first sleepover.
Report Inappropriate Comment
Are you sure you would like to report this comment? It will be flagged for our moderators to take action.
Thank you for taking the time to improve the content on our site.