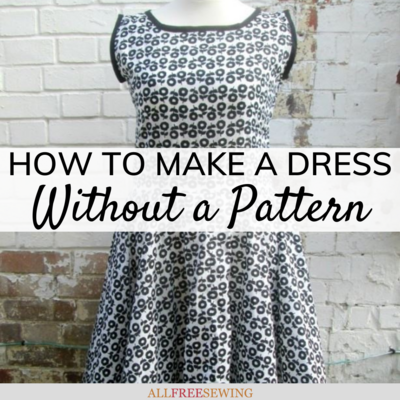
How to Make a Dress Without a Pattern
Learn how to make a simple dress without a pattern with this beginner-friendly guide!

If you've always wanted to design your dream dress, but are intimidated by sewing without a pattern, never fear! Guest blogger Anna Wilson is here to show you how to make a dress without a pattern. Anna's designed a classic vintage-inspired dress that's essential for every woman's wardrobe, and she's here to show you how to make your own dress without a pattern.
From where and how to take your measurements, to cutting out your bodice and skirt, this step-by-step dressmaking tutorial covers everything you need to know for sewing without a pattern. Learn how to design a dress that's custom-made to fit your body with this sewing tutorial for beginners.
So, if you're looking to create a gorgeous jaw-dropping dress but don't have a pattern handy, then no worries! This easy sewing tutorial teaches you this sewing hack so that you can create a flirty and feminine dress without stressing about expensive patterns.
This free sewing tutorial features a sweet a-line dress that's the perfect combination of vintage and modern and is flattering on all figures, though you can certainly experiment with your favorite dress style.
This simple and classic dress tutorial is your best choice for a wedding, night out, or a fun day date. Stop spending money on expensive patterns and create your own custom creation with this easy sewing tutorial.
Sign Up For More Free Patterns >>>
You can find more of Anna's sewing tutorials on her blog, Tea and a Sewing Machine!
How to Make a Dress Without a Pattern
Making clothes without a pattern is perfectly possible providing you keep things simple!
There’s nothing wrong with using a pattern, and if I was going to make something complicated, I would definitely use a pattern.
But things don’t have to be complicated!
If you make clothes for yourself using your own measurements, you’re more likely to get something that actually fits and when it comes to style, you’re limited only by your imagination.
If you’ve not tried making clothes without a pattern before, it can seem daunting, but all you need is a plan that breaks everything down into manageable chunks.
So here’s a plan for a vintage style dress:

The Plan for Making the Dress
The dress is simple in its construction. The skirt is a circle, joined to a bodice made from 2 pieces of fabric. The bodice front has darts to give it some shape and there’s a zip in the side seam. All the raw edges are finished with bias binding, so there are no fiddly facings or issues with hemming a curve.
Here’s the flight plan for making a dress without a pattern:
- Take your measurements
- Draft the bodice sections
- Work out the dimensions of the skirt
- Cut out the bodice and skirt
- Sew the dress up
Materials
To make this dress, you will need:
- Large pieces of paper (pattern paper is perfect)
- Pencil
- Ruler
- Tape measure
- A French curve is also useful
- Cotton fabric (I used 4 m of fabric 140 cm or 56 inches wide)
- 10 m bias binding
- 1 invisible zipper
- Usual sewing supplies
Taking Measurements
These are the measurements you will need:
- Nape of neck to waist
- Distance between shoulders
- Distance across collarbone
- Chest under armpits
- Bust
- Waist
- Shoulder to armpit
- Shoulder to bust line
- Waist to just below your knee
To take your measurements, wear something close-fitting like a tank top or vest top and a pair of leggings.
Hold the tape loosely. Lots of us wish we were thinner, but being able to breathe needs to take priority!
Getting a friend to help will make things easier, otherwise, you could use a mirror to check that the tape is straight.
Drafting the Pattern Pieces
You’ll be drafting pattern pieces for the bodice. For the skirt, once you’ve worked out how big the pieces need to be, you can cut those straight from the fabric.
Drafting the Bodice Front
1. Take a large sheet of paper. Pattern paper is ideal but newspaper or greaseproof paper will do. Draw a vertical line the same length as the distance from the nape of your neck to your waist.
2. Divide your shoulder measurement by 2, and draw a line this length out from the top of the vertical line.
3. Take your collarbone measurement and divide it by 2. Mark this on the shoulder line.

4. Now on the vertical line, mark off your shoulder to armpit measurement and your shoulder to bust line measurement.

5. Divide your chest measurement by 4, add a cm (1/4-inch) for ease. Draw a horizontal line this length from where you marked your shoulder to armpit measurement.
6. Now do the same with your bust measurement. Divide it by 4 and add 1 cm (1/4-inch) for ease. Find where you marked your shoulder to bust measurement and draw a horizontal line this length there.
7. Take your waist measurement, divide it by 4 and add 2 cm (1/4-inch). Draw a line this length at the bottom of the vertical line.

8. Now you can join the lines up! Join the end of the chest line to the end of the bust line and the end of the bust line to the end of the waistline.
The end of the shoulder to the chest line needs to be curved. You can use a French curve for this, or a dinner plate if you don’t have one.
You might find it helpful to draw a vertical line from shoulder to the chest before drawing the curved line.
9. To draw the neckline, work out how far down you would like it to be from your shoulder. For me, it was 14 cm (5-1/2 inches). Mark this on the vertical line, then join it to where you marked your collarbone. This line needs to be curved too. The line I drew flattened out a bit at the bottom.

10. To draw the darts on the bust line, measure along 7 cm (2-3/4 inches). This is the right size for me as a UK size 16. You might need the darts to be longer or shorter, but you can check this in a minute. Mark 0.5 cm on either side of the bust line, then join this to where you marked. For those of you who prefer inches, the width of the dart at the wide end needs to be about 1/4-inch.
11. For the front darts, draw down from the collarbone mark to the waistline. Mark on this line about 8 cm (3 inches) up from the bottom. At the bottom, mark 0.5 cm on either side of the line. Again for you inch users, the dart needs to be about 1/4-inch wide here. Join these to a point.

Drafting the Bodice Back
The good news is you can use your bodice front piece to draw most of this! So to start with, draw round the bodice front.
The bits that need to change are the armpit area and the neckline. There are no darts in the back section.
1. Find the line between the chest line and the bust line. Starting at the bust line, extend this line up to the armpit line so that you have one straight line from waist to armpit, instead of 2 that meet at a point. This is to allow a bit extra so that the dress isn't too tight in the armpit area.
2. The neckline needs to be shallower, so on the vertical line, mark 8 cm down from the top, then redraw the neckline.
Finishing Your Pattern Pieces
The tricky bit’s done now, so all you need to do is add a seam allowance.
With this kind of project, I like a 2 cm (3/4-inch) seam allowance so there’s enough to let them out a bit if things are a bit snug.
So add 2 cm to the waistline and the sides.
The neckline and the armholes don’t need a seam allowance as they’ll be finished with bias binding.
Working Out the Skirt Dimensions
For this, you will need your waist measurement and your measurement waist to knee.
The skirt is made up of 4 quarter circles with the middle cut out, like a doughnut.
To work out the size of square you need, you will need the length of the skirt, plus the distance from the edge of the doughnut hole to center.
To do this, you will need pi. If maths isn’t your thing, don’t panic!
Pi is the relationship between the distance around the edge of a circle and the distance across it, passing through the center. The distance around the edge is roughly 3 times the distance around the middle. We only need to know from the edge to the center, not right the way across, but this is easy to work out as we can just halve it.
It’s easiest to do this on a calculator. There’s probably one on your phone.
To calculate the dimensions of the skirt and how much fabric you need, take your waist measurement and add 10 cm (4 inches) for seams and ease (I use a 1 cm or 1/4-inch seam allowance for this). Divide it by pi, then divide this answer by 2. Jot this down somewhere as you will need it in a minute. Now add this number to your desired skirt length.
This new number tells you how long the sides of the squares of fabric need to be. We’ll cover cutting the skirt pieces out in a minute.
Cutting Out the Bodice Pieces
Cut one of each on the fold. Transfer the dart markings to the bodice front.
Cutting Out the Skirt
You will need 4 squares of fabric long enough for the total quarter circle, plus a bit extra.
The fabric I used was very light so I was able to cut all 4 sections out at the same time. You might need to cut 2 at a time or each piece individually if you’re using something heavier.
1. Cut your 4 squares of fabric. Decide where the top is on each piece. If you’re cutting out more than one at a time, make sure that the pieces are all the same way up.
2. Find the number you added to your desired skirt length. This number is the distance from the edge of the inside of the doughnut to the center.
Measure this amount from the top corner down the side, then repeat for the other side.
Now take your tape measure. By holding one end of the tape measure to the top corner and moving the other end across the fabric, measure this amount across from one side to the other, marking as you go. I used pins, but you could use tailors’ chalk or a fabric pen.

3. Now take the total of this number plus your desired skirt length. From the same corner, measure down this amount on either side. Mark off this same distance all the way across as you did in the previous step.


4. Now cut where you have pinned. I used a rotary cutter for this. You should have 4 quarter circles with another smaller quarter circle cut out of the top.


Sewing Up the Dress
The order for sewing the dress together is:
- Darts
- Shoulder seams
- Join skirt front pieces together, then skirt back pieces (with the center seam on the grain)
- Sew skirt front to bodice front and skirt back to the bodice back
- Sew the side seams
- Sew in the zip
- Finish the neckline, armhole, and hem with bias binding.
1. Pin the bust darts and the front darts. Check it on yourself to make sure that they are in the correct place. You might find it helpful to pin the bodice piece to yourself, then adjust the darts if necessary. Sew the darts and press.


2. Pin the shoulder seams and sew.

3. Take 2 of the skirt pieces and sew them together along one of the long edges. This will be the center seam, so make sure that the edges you are joining have the grain running up and down. Repeat with the other 2 skirt pieces.
4. Take one of the skirt sections from the previous step and pin to the bodice front. Sew the other skirt section to the bodice back.

5. Pop the dress on. Check that the waistline matches the front and back and pin the side seams of the bodice. If you find yourself getting poked with pins, you could use safety pins instead.
You might find here that adjustments need to be made. I had to adjust the shoulder seams a little bit and the waist was too low, so I just sewed these seams again.
6. Unpin the dress on one side. Pop the pins back in straight away, or you could mark with a disappearing ink fabric pen before you remove the pins. Take the dress off, then repin the side seam. Sew both the sides seams, sewing waist to armpit, then waist to bottom of the skirt.

7. Decide which side you would like the zip to be on. For right-handed people, this will probably be the left side. If you are left-handed, you might prefer the zip on the right.
Pin the zip to the open seam between the armpit and the waist, then tack in place. It’s important to keep checking that the teeth of the zip are over the seam. Sew in the zip.

With a seam ripper, unpick the seam to expose the zip.
8. Take the bias binding and cut a length long enough to go around the neckline, plus a bit extra. Fold it in half lengthways, then open it out. Fold the short end over and pin it to the neckline, at a seam, and on the wrong side. I wouldn’t bother pinning it all the way around, just the start will do.

Sew the bias binding to the neckline on the wrong side. When you get back to where you started, overlap the bias binding by a cm or 2 (1/4-1/2 inch).

Fold it over the raw edge and topstitch all the way around.

9. Finish the armholes and the hem with bias binding in the same way as the neckline.
10. Trim off any stray threads, run the iron on it and your dress is ready to go!

About the Author

Anna learnt to use a sewing machine at the age of 10 and hasn't looked back! She lives in rural Norfolk in the UK and can be found online at Tea and a Sewing Machine, where she shares her love of making things.
Want More?
38 Modern Sewing Patterns for Women >>
What's your favorite fashion decade?
Let us know below in the comments!
Read Next14+ Unconventional Sewing Tools


![Know Your Skirts Guide [Infographic]](http://irepo.primecp.com/2021/10/509029/Know-Your-Skirts-Infographic-square21-nw_Large400_ID-4536247.png?v=4536247)