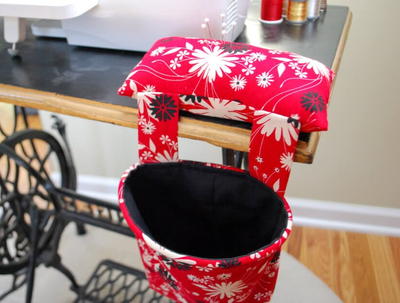
Cad-a-Log Firewood Carrier
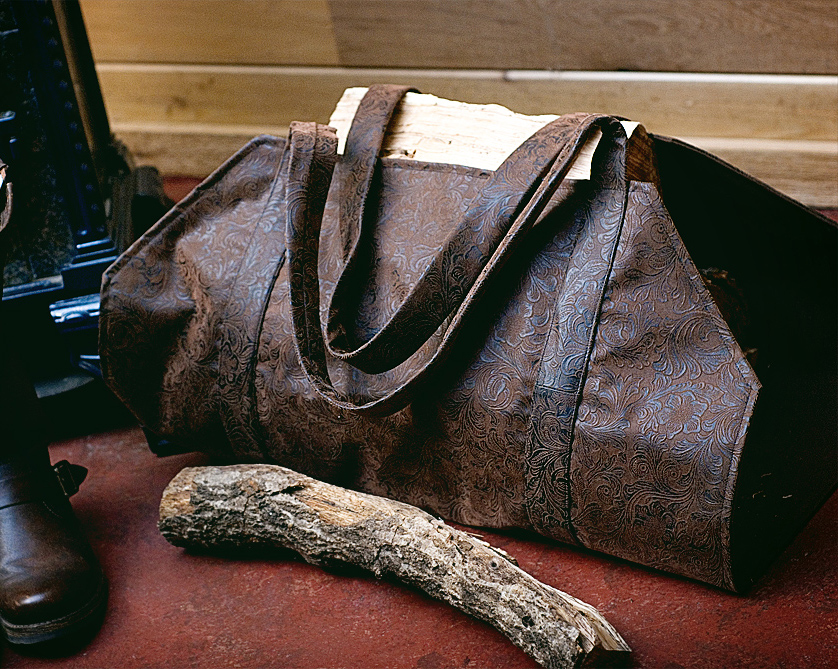
Learn how to sew a bag that holds more than just your cosmetic mirror and gloss. This Cad-a-Log Firewood Carrier from Kendra McCracken for Fiskars means business. Made from faux leather, canvas and thread, you can rely on strong support from this DIY caddy. Picture this strong firewood carrier next to your hearth, packed and ready to serve on a crisp day. You can easily learn how to make this caddy from this sewing bag tutorial. Break from traditional firewood accessories and try this caddy for a warm and innovative look to your home.
*Thanks to user elizacross2003 7631885 for helping us name this pattern!
Materials:
- 1 yard canvas
- 1 yard faux leather or other stain resistant material
- 3.5 yards 1 1/2 inch woven web strapping
- Thread
- Pins or Hem Clips
Instructions:
-
To make this log carrier, begin with 1 yard of 45 inch wide faux leather. Be sure to square up the fabric before starting by trimming if necessary.
-
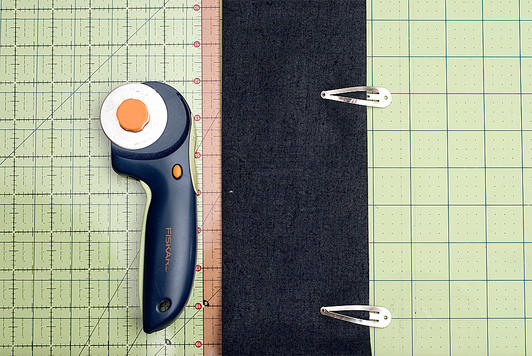
With the material folded so the selvages (the 45 inch sides) are together, measure 26 inches along the selvages and mark this point. Measure 26 inches along the fold and mark this point. Cut the material from mark to mark. This is a long length of material so if you are using a cutting mat and rotary cutter, to fit it on your mat, fold the material so the mark on the fold matches up with the mark on the selvage. After cutting you should end up with a 26 inch x 36 inch piece and a 19 inch x 36 inch piece.
-
Repeat these steps with the canvas.
-
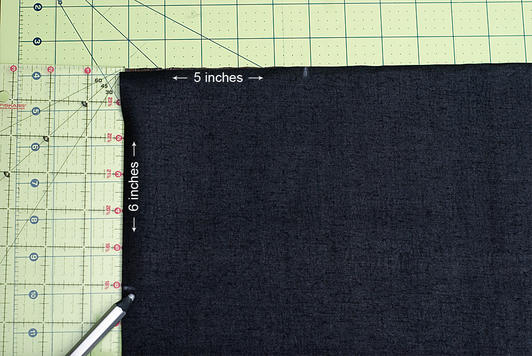
Keep the faux leather folded with the 26 inch sides matched up. Along the 26 inch side, measure in 5 inches from each end toward the center of the edge and make marks. Along the 36 inch side, measure down 6 inches toward the fold of the fabric on each side and make marks. Using a Fiskars acrylic ruler, cutting mat, and rotary cutter, cut from the 5 inch mark to the 6 inch mark. Basically, you'll cut off the corners of the fabric. You can scroll down to the photo of the handle placement to see the shape of the material after cutting.
-
Repeat these steps with the canvas.
-
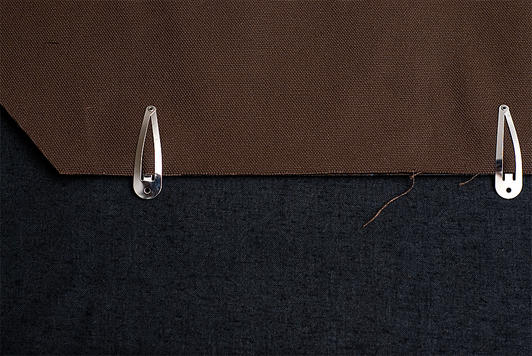
Lay the 2 materials, with right sides together, on a large table or the floor and pin them together. Faux leather is more difficult to pin than woven fabric so I like to use these hem clips instead.
-
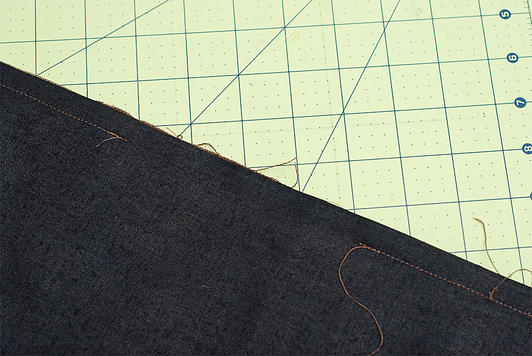
Beginning along one of the 36 inch sides, sew the layers together using a 1/2 inch seam allowance. Leave an opening for turning the materials right side out and make sure to back stitch when you start and finish the seam. Trim the points off the seam allowances to reduce bulk. Turn the carrier right sides out, push the corners out, and hand stitch the opening closed. Use an iron on the canvas side to press the edges down flat. Do not do this on the faux leather side as you will melt it!
-
Top stitch around the perimeter of the carrier 1/4 inch from the edge.
-
The structure of the strap is actually woven web strapping. Again, the faux leather would stretch under the weight of a load of wood so it's purely decorative.
-
If you don't want to spend the time covering the strap, you can just purchase a coordinating color of strapping and skip down to the placement of the strap.
-
If you've chosen to cover your straps, cut four 3 7/8 inch wide x 36 inch long strips from the 19 inch wide x 36 inch long remnant of faux leather. Stitch the 4 strips together, end to end, using a 1/4 inch seam allowance. Cut the finished strip to 127 inches and set the extra aside for another project.
-
Fold the strip in half lengthwise, right sides together, taking care to fold over all the seam allowances (where you stitched the ends together) in the same direction. Pin the edges together or use hem clips. Stitch the edges together with a 1/4 inch seam allowance. Taking this slowly and keeping your seam as straight and even as possible will make the next steps easier.
-
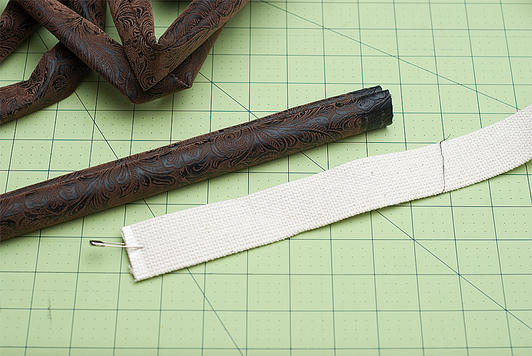
Turn the strap cover right side out. Since the strap cover is so long and the material stiff, this is time consuming and will be tiring on your hands.
-
Put a large safety pin through the end of the strap, and work the strap through the strap cover. Start it through the end of the cover that will allow you to push over the folds of the seams rather than against the edges of the 2 pieces of fabric that make up the seams. You should be able to feel this through the cover at the seams.
-
Hold the strap cover so the seam is centered over the center of the strap. Running the strap through the cover is where making sure you kept your seam straight and even makes your job easier! Run the strap through so that the cover extends about 1/4 inch over one end of the strap and 3/4 inch over the other end.
-
The strap is so long you will reach a point where your arms are not long enough and you will need someone to help you pull the strap through the cover.
-
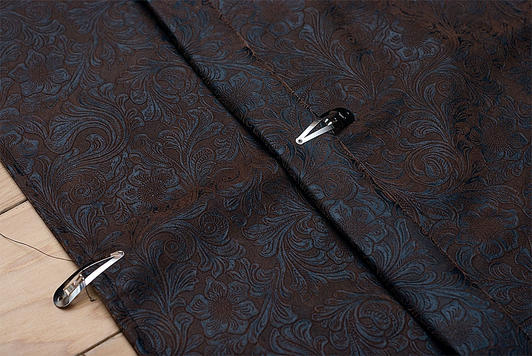
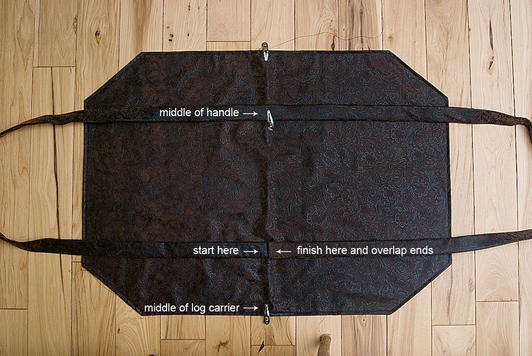
Fold the carrier in half (short ends together) to find the center and mark it on both sides. Fold the strap in half to find the center and mark it.
-
Beginning at the center point of the carrier, start pinning the strap to the carrier. It should be 5 1/2 inches in from the sides of the carrier. When you have a few pins in place, move to the opposite side of the carrier and, matching the center point of the strap to the center point of the carrier, pin the strap to the carrier. Continuing pinning the strap to the carrier. When you come back to the starting point with the end of the strap, fold the 3/4 inch excess strap cover fabric over the end of the strap. Butt this up to the other end of the strap. It should sit on top of the excess 1/4 inch of fabric on that end of the strap. Pin in place. Begin stitching the strap to the carrier stitching as close to the edge as is comfortably possible for you. When you come to the ends of the carrier, simply stitch across the strap to the other side of it.
- When finished, remove the pins and stitch a box with an X in it on the straps at the edges of the carrier to add reinforcement.
Read NextQuilt Squares Sewing Machine Cover
Your Recently Viewed Projects


Thanks for your comment. Don't forget to share!
shannabell6 435714 6
Apr 17, 2015
Love this. Might make it for my grandparents who stay in the mountains sometimes!
kmsews
Dec 12, 2013
I made this carrier following the instructions. However when I turned my piece right side out the edges of the faux leather (vinyl) cracked to reveal the white insides. I went over the cracks with a black marker so it is not so obvious, but the vinyl is still cracked and the edges are not smooth. I'll be bending any more vinyl before I purchase in the future. Thanks for the pattern!
minniesue 1034656
Aug 02, 2013
Looks like a very sturdy log hauler. My name suggestion... Log In Tote
Hannahsgirl85
Aug 02, 2013
This looks like a great project. I think it shoud be named loggage.
liseinstitches 621 9490
Aug 02, 2013
I think a Good Name for this project would be: Timber Tote
magicalthings4u
Jul 31, 2013
Fire bag/ Fire tote you could add a pocket on the out side to put water proof matches and a patch starter kit in it and take it camping with you! Its Great as you can haul twigs and tinder as well as logs every thing you need to start a fire and get it burning good.
gmasydney
Jul 30, 2013
proposed names: Paul Bunyon's Firewood Bag Paul Bunyon's Firewood Tote Woodsmen's Tote Woodsmen's Bag Bag O'Wood Tote Hot Stuff Tote
Katie Marie
Jul 29, 2013
This should be called "Luka" or "Luca" meaning Log U Can Access! What do you think??? Katie Marie Katiepauldeer@yahoo.com
Report Inappropriate Comment
Are you sure you would like to report this comment? It will be flagged for our moderators to take action.
Thank you for taking the time to improve the content on our site.