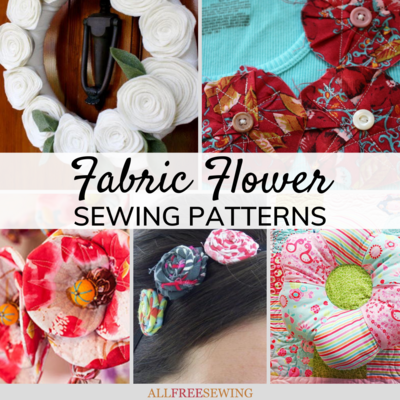
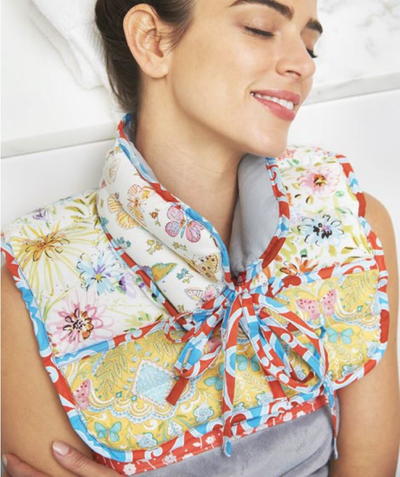
Spa Day Comfort Pack

Take a little vacation after a long day of work with the Spa Day Comfort Pack. This sewing tutorial will show you how to make a DIY ice pack or DIY hot pack - it can be either one depending on your need!
You can heat this comfort pack in the microwave for soothing a stiff neck and shoulders or you can put it in the freezer to take the edge off sore muscles.
After you finish the fabric construction, you will fill the sewing pattern with rice in order to make it retain heat or cold. You can always add a dash of lavender essential oil to the rice for an even more relaxing effect.
Project TypeMake a Project
Time to CompleteWeekend project
Sewn byMachine

Materials List
- Fat Quarters from FreeSpirit Butterfly Garden by Dena Designs – 3 contrasting fabrics - FreeSpirit Butterfly Garden by Dena Designs: PWDF231.REDXX 1 1/2 yds. (1.37 m); Gray solid fabric (lining) 2/3 yd. (.61 m); Cotton or bamboo batting 1 yd. (.91 m) (DO NOT use any synthetic batting as it will melt in the microwave.)
- Coats Cotton All Purpose Thread
- Yard stick or long straight edge
- Narrow funnel
- Rice, approximately 3 lbs, (1 kg)
- Basic sewing supplies
Spa Day Comfort Pack
Preparation and Cutting
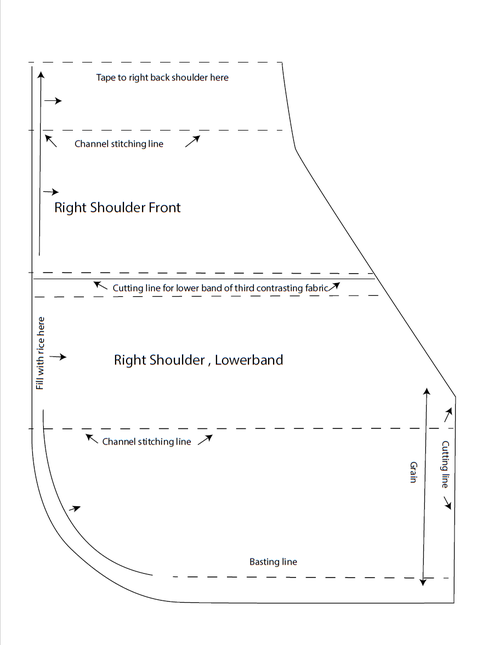
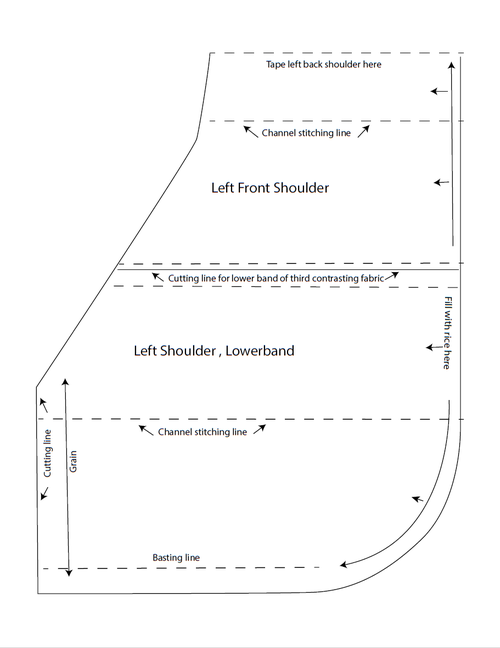
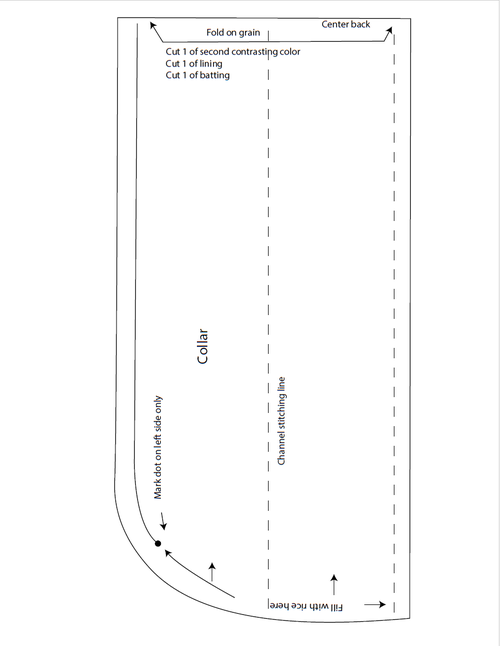
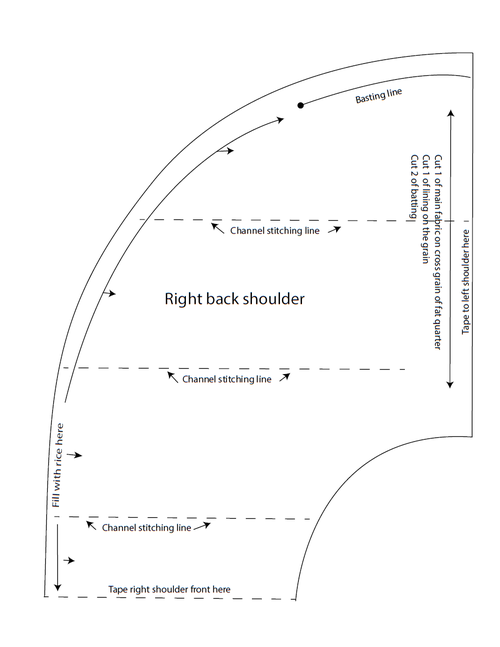
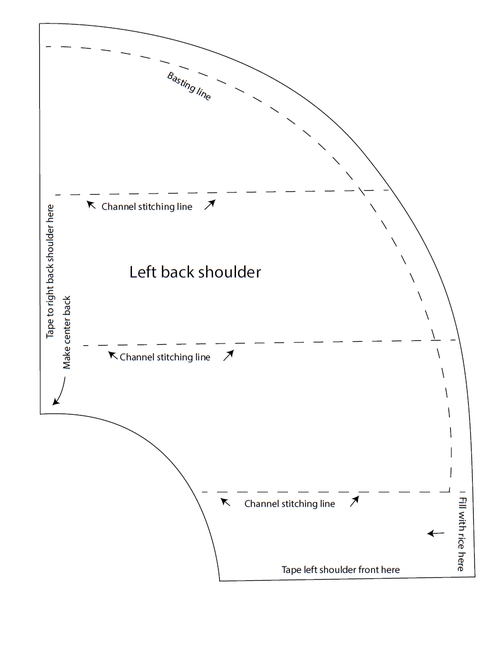
Print and assemble pattern by taping adjacent pieces together to form one large piece for the Shoulder section. The Collar section will be cut on the fabric fold.
-
From one fat quarter, cut: 1 Shoulder
-
From second fat quarter, cut: 1 Collar
-
From third fat quarter, cut: 1 Lower Band each for both left and right Shoulder using pattern cutting lines
-
From REDXX, cut:
4 bias strips, each 1 1/2" x 60" (3.81 cm x 52.4 cm)
3 straight-grain strips, each 1 1/2" x 17" (3.81 cm x 43.18 cm) -
From lining fabric, cut:
1 Shoulder
1 Collar -
From batting, cut:
4 Shoulder
2 Collar
Sewing Instructions
-
Baste lower band of left and right shoulder pieces onto main fabric shoulder pieces close to the edges. Cut (2) 6” (15.24 cm) bias strips and press in half lengthwise with wrong sides together. Match cut edges of bias tape to edges of top of the lower band with the fold of bias tape down toward bottom edge. Stitch 1/4” (.64 cm) away from cut edge and press up.
-
Baste batting layer to wrong side of all corresponding fabric pieces 1/4” (.64 cm) from the edge. Pin upper and lining shoulder pieces together matching batting wrong sides. Baste neck 1/4” (.64 cm) away from edge. Clip curve of neck edge to basting every inch.
Edgestitch the bias binding between shoulder piece and bottom band through all thicknesses. Straight stitch the rest of the stitching lines for horizontal channels. Baste edges from dots on upper edge around to left side of shoulder piece 1/4” (.64 cm) away from edge and on bottom edges of left and right lower band. -
Cut (2) 4 3/4” (12.07 cm) bias strips and press in half lengthwise with wrong sides together. Fold one side to the center and press. Fold the other side in not quite to center, then press center again. Wrap bias binding strips around center front edges and edgestitch in place catching the wider side of the binding on the underside.
-
Baste collar and lining together matching batting wrong sides and stitch 1/4” (.64 cm) away from top edge, around right side at center front, and around the bottom edge leaving the left side center front open. Topstitch the collar center lengthwise as marked. Cut 31 3/4” (80.65 cm) of bias binding and press in half lengthwise with wrong sides together. Fold one side over to meet the center and press.
Fold the other side over not quite to the center. Leave enough bias binding loose to cover the left side center front and topstitch to the collar starting at dot of upper left edge of center front around the curve of the right side center front stopping at the bottom edge of right center front. The left center front edge is left open for now for the rice insertion into the collar channels. -
Mark the center of the lower collar and the center of the shoulder neck edge. Matching centers, pin the collar onto the shoulder neck edge with shoulder piece lining facing the collar lining; baste 1/4” (.64 cm) away from the edge.
-
Cut a 39” (99.06 cm) bias strip and press in half lengthwise with wrong sides together. Fold one side to meet the center and press. The other side should be 3/4” (1.91 cm) wide. Place this side of bias tape right sides together and cut edges matching with the collar at neck seam. Extend bias binding 17” (43.18 cm) off the right side of the neck edge for the tie.
On this 17” (43.18 cm) section fold the other side of the bias to meet the center and fold down center lengthwise folding the tie end in 3/8” (.95 cm) to enclose; pin. The bias binding left end should extend 3/4” (1.91 cm) off the center front neck edge. Starting on the left side of center front, stitch binding onto neck edge using a 1/4" (.64 cm) seam, stopping where the tie starts.
Trim seam close to stitching. Press the bias tape up toward the collar. Fold the binding left center front end around to the back side and enclose to make a clean finish while wrapping bias binding around neck seam so that 5/16” (.80 cm) of the binding shows. Edgestitch binding through all thicknesses of neck seam continuing off neck edge onto the tie. -
Fill shoulder piece channels loosely with rice leaving a 3/4” (1.91 cm) wide space when top and lining are pinched together. Once each channel is filled, pin together 3/4” (1.91 cm) away from the edge. This will allow enough room for the presser foot to pass unobstructed and more surface area to touch the skin if the channels are not stuffed too tightly. Baste 1/4” (.64 cm) away from the outer edge of the shoulder piece.
-
Press a 60” (152.4 cm) bias binding strip in half lengthwise with wrong sides together. Fold in one side to meet the center and press. Using the other bias 3/4“ (1.91 cm) side, match the cut edge with the shoulder outside edge, right side of binding to shoulder piece lining, extending each end 3/8” (34.30 cm). Trim off any extra bias length. Stitch binding onto outer edge of shoulder.
Turn in ends 3/8” (34.30 cm) and wrap bias binding around outer edge onto the top. Edgestitch binding on top side so that the binding shows 5/16” (.80 cm) around the edge. -
Fill the collar channels loosely with rice pinning 3/4” (1.91 cm) from edge of left center front. Stitch the extended bias tape on the left side of the collar in place, folding the end under 3/8” (34.30 cm) to meet the neck edge. Edgestitch the end.
-
Fold the 17” (43.18 cm) straight-grain strips in half lengthwise with wrong sides together and press. Fold in the sides to meet in the center and press. Fold in the tie ends 3/8” (34.30 cm) to enclose. Stitch tie in place at shoulder piece center front mark. Stitch the other 2 ties in place at the collar center front marks.
Want More?
25 Sewing Patterns for Retirees >>
How do you relax?
Let us know in the comments!
Read NextQuilt Squares Sewing Machine Cover
Your Recently Viewed Projects
Thanks for your comment. Don't forget to share!
lawless 1892706
Aug 18, 2021
This pattern was a failure for me. I found instructions unclear and I made mistake, after mistake. I know where I went wrong but its not worth my time to repeat. Reminded me how much I dislike binding edges.
sehendri 3889958
Mar 25, 2020
It's a lovely project, BUT it sure is difficult to get the pattern to print. Isn't there a way you can make it easier? I am stuck at home due to the COVID 19 quarantine and thought I'd get started on some Christmas gifts and this is the first one I'm going to try! Thanks for the pattern!
jcrgrant321
Oct 19, 2019
boy, really nice project but you can't print the pattern. If you would kindly explain how to get the pattern pieces that would be great. thanks
Bianka
Mar 24, 2019
I left clicked and saved the patterns to my desktop and then printed them.
skckagret
Jan 14, 2019
Hello, Could you show a picture of how the pattern should look when assembled? I am having a hard time picturing it from the pattern pieces. I have sewn for years but sometimes I need to see a picture in order to understand what is required.
Lynn K
Nov 28, 2018
This Spa Day Comfort Pack is going to be my Xmas gift to myself, lol! I can already feel the soothing benefits of a hot pack in winter and a cool one in summer at the end of a long working day. All I now have to do is find a few hours to spend on making it.
KNA Accessories
Nov 26, 2018
I am about to work on this Project, and always read the comments first. For anyone else coming along with the problems that others seem to have had, I had no problem right-clicking on each image, saving it, opening it in Paint (any other image program will work, as well) and printing them. Each image is absolutely to scale without needing to do anything to them. Also, if working on a project labeled "Intermediate," pictures with each step should not be necessary. I have never purchased a pattern from McCalls or Butterick with pictures included. Thank you for offering this Project free! I need it, and, it will make for great gifts!
4denise 9268650
Jan 29, 2019
That is not the way that patterns are downloaded. There are no scale markings or indications of the actual measurements. The standard method is to make a PDF with a square measuring a specified size so that the scale can be checked. At the very least, some indication of the size must be noted on the pattern.
achancy 3031658
Oct 16, 2018
Same comment as every one else. Cannot copy and paste and enlarge pattern. What are the final measurements of the pattern?
Onyxwar
Mar 30, 2018
Thanks for sharing this pattern. I adapted so that it would cover my whole back. Im going through pt and need five large ice packs to cover the sore areas. I didnt bother making it nice and pretty, I just made it with seams showing and covered it with bias tape for a little more finished look. It works great! Now I dont need all those small ones! If I were to use the above directions I would get lost because there is no photo associated with each step, even if there was a pic of the inside and then the outside laid open it wouldnt help, otherwise I would give 5 stars.
kt53sews
Nov 10, 2017
This would be better in a PDF, most people are used to that. I know I am.
Cheryl E
Apr 28, 2017
A rice filled comfort pack to warm and drape around an aching neck and shoulders is a welcome home remedy to have on hand. I like the fact that there are ties to keep the rice pack in place. Often a squared or rectangle filled pack slips off whereas this one can keep any soothing warmth in place. Copying the pattern to transfer to a Word doc, enlarge and print is somewhat challenging. Nice idea though.
Gracie
Mar 16, 2017
What a lovely gift this would make. Mother's Day is coming up and I think I now have a gift idea. Does it matter what type of rice I use? I am inclined to use the cheapest rice I find, but I want my finished project to last. The tips below on printing the patterns are really helpful and I am going to save them for future use as well.
Onyxwar
Mar 30, 2018
For anyones else who has this question, this is old so I might sure Gracie has figured it out...mixing a cheap rice with flax seed works best. The flax seed slowly releases heat, full flax wouldnt be too costly and would also feel uncomfortable. I mix about 5 parts rice to 1 part flax seed. Make sure its whole flax, not ground. Hope that helps.
brendalb3195 30869 18
Nov 15, 2016
Where is the pattern?
SiteEditorAshley
Nov 18, 2016
Hi Brenda, the pattern is located within the steps of this tutorial. Try copying and pasting the images into a Microsoft Word document and enlarge as needed before printing. Thanks!
paths2345 4178717
Nov 17, 2018
I cannot even access the tutorial. When I click the link it takes me to a 20 page list of tutorials that does not include this pattern
dingaling 1590688
Oct 23, 2016
Wasted a lot of time trying to get the pattern printed. Really should not be this complicated -/
Glenyth
Oct 07, 2016
The pattern says to cut 4 pieces of batting for the shoulders....so does this mean the batting is actually 4 layers thick when put together or is this a misprint and it should be 2 like the collar?
sunnyfield 6172413
Sep 21, 2016
This looks amazing and I am going to do this next. To the person asking how to print the patterns, here is what I did first click on the image and it will appear in a full page format size, next high light it and copy/paste to your new blank page in Word . I do this a lot with tutorials on line and it works better for me than the PDF often provided.
svandyke 8109712
Jun 21, 2016
I clicked on each pattern, saved them to my desktop then printed each. They look beautiful. Can't wait to make one.
dun13 dungasau
Jun 17, 2016
I would also like to be able to print a pattern. Can someone please help?
Report Inappropriate Comment
Are you sure you would like to report this comment? It will be flagged for our moderators to take action.
Thank you for taking the time to improve the content on our site.