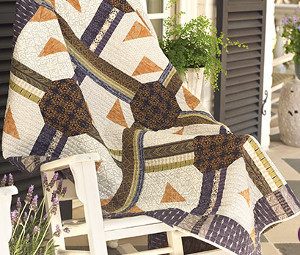
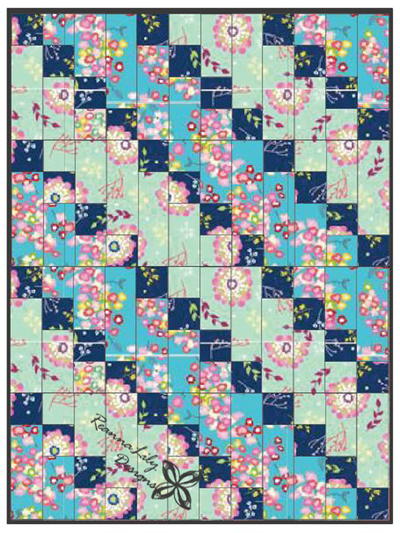
Magic Carpet Quilt
Piece this bold quilt using the earthy prints in FreeSpirit’s Empire Cotton Collection by Parson Gray. The geometric blocks make an eye-catching statement admirers will appreciate.

Materials
- 1 yd (.91m) of the following FreeSpirit Empire fabrics by Parson Gray:
- PWPG030.CLERI
- PWPG036.SANDS
- PWPG031.SANDS
- 3⁄4 yd (.69m) of the following FreeSpirit Empire fabric by Parson Gray:
- PWPG035.GRAIN
- 1⁄3yd (.31m) of the following FreeSpirit Empire fabrics by Parson Gray:
- PWPG037.CAULD
- PWPG032.SAPPH
- PWPG035.ROYAL
- PWPG035.DUSTX
- PWPG030.CHARM
- PWPG032.SILKX
- PWPG033.QUARRY
- 1⁄4 yd (.23m) of the following FreeSpirit Empire fabrics by Parson Gray:
- PWPG037.LONDO
- PWPG034.SWORD
- PWPG033.ANCHO
- PWPG032.VELVE
- PWPG034.DEEPX
- 2⁄3 yd (.61m) of the following FreeSpirit Empire fabric by Parson Gray:
- PWPG036.CINNA
- 4 yds (3.66m) backing fabric
- Coats® Cotton Covered Quilting & Piecing Thread to coordinate with prints for piecing
- Coats® Cotton Machine Quilting Thread to coordinate with prints for quilting
- 68” (172.72cm) square quilt batting
Additonal Requirements
- Sewing Maching
- Rottary Cutter and Mat
- Plastic Ruler
- Iron and Pressing Board
Cutting Instructions
- Cut two 4 7/8 ” (12.4cm) squares each from Fabrics A and D. Cut squares in half once diagonally to make four of Triangle A.
- Cut eight 4 7⁄8” (12.4cm) squares each from Fabrics B and C. Cut squares in half once diagonally to make sixteen of Triangle A.
- Cut sixteen 4 7⁄8” (12.4cm) squares from Fabric E. Cut squares in half once diagonally to make thirty-two of Triangle A.
- Cut sixteen 4 1⁄2” x 10 1⁄2” (11.4cm x 26.7cm) rectangles each from Fabric A for Rectangle K.
- Cut sixteen 4 1⁄2” (11.4cm) squares each from Fabrics B and C for Square B.
- Cut sixteen 2 1⁄2” x 8 1⁄2” (6.4cm x 21.6cm) rectangles each from Fabrics B and C for Rectangle C.
- Cut four 2 7⁄8” (7.3cm) squares each from Fabrics B and C. Cut squares in half once diagonally to make eight of Triangle D.
- Cut eight 2 1⁄2” (6.4cm) squares each from Fabrics B, C, and D for Square N.
- Cut one 4 1⁄2” x 8 1⁄2” (11.4cm x 21.6cm) rectangle from Fabric D for Rectangle H.
- Cut two 2 1⁄2” x 4 1⁄2” (6.4cm x 11.4cm) rectangles from Fabric D for Rectangle E.
- Cut four 8 1⁄2” (21.6cm) squares from Fabric D for Square D.
- Cut eight 1 1⁄2” x 8 1⁄2” (3.8cm x 21.6cm) rectangles each from Fabrics F, H, I, and J for Rectangle G.
- Cut eight 2 1⁄2” x 8 1⁄2” (6.4cm x 21.6cm) rectangles each from Fabrics G and K for Rectangle F.
- Cut twelve 1 1⁄2” x 4 1⁄2” (3.8cm x 11.4cm) rectangles each from Fabrics L and M for Rectangle M.
- Cut twelve 2 1⁄2” x 4 1⁄2” (6.4cm x 11.4cm) rectangles from Fabric N for Rectangle L.
- Cut four 1 1⁄2” x 22 1⁄2” (3.8cm x 57.15cm) rectangles each from Fabrics O, P, and Q for Rectangle J.
- Cut seven 2 1⁄2” (6.4cm) wide strips from leftover scraps from quilt to use for binding.
Piecing Instructions
Note: All seams are 1⁄4” (.64cm) unless noted.
- Follow Steps 18 and 19 to make eight of Block A1. Sew four Fabric E Triangle A’s to four Fabric B Triangle A’s as shown.

- Join these AA units (Step 18) with four Fabric B Square B’s as shown.

- Follow Steps 20 through 23 to make four of Block A2. Sew four Fabric E Triangle A’s to four Fabric C Triangle A’s as shown.

- Join these AA units (Step 20) with four Fabric C Square B’s as shown.

- Place four Fabric D Square N’s on four of these AB units (Step 21), right sides together, onto corner of unit and sew across Square N as shown.

- Trim off excess fabric and press out to corner as shown. These will be the center A1 blocks.

- Follow Steps 24 and 25 to make four of Block B1. Refer to quilt photo and diagram below to sew one Fabric K Rectangle F to one Fabric J Rectangle G and one Fabric F Rectangle G.

- Add one Fabric B Rectangle C next to Rectangle F (Step 24) and one Fabric C Rectangle C next to Rectangle G (Step 24) on each side of this unit as shown.

- Follow Steps 26 and 27 to make four of Block B2. Refer to quilt photo and diagram below to sew one Fabric K Rectangle F to one Fabric J Rectangle G and one Fabric I Rectangle G.

- Add one Fabric B Rectangle C next to Rectangle G (Step 26) and one Fabric C Rectangle C next to Rectangle F (Step 26) on each side of this unit as shown.

- Follow Steps 28 and 29 to make four of Block C1. Refer to quilt photo and diagram below to sew one Fabric G Rectangle F to one Fabric H Rectangle G and one Fabric F Rectangle G.

- Add one Fabric B Rectangle C next to Rectangle G (Step 28) and one Fabric C Rectangle C next to Rectangle F (Step 28) on each side of this unit as shown.

- Follow Steps 30 and 31 to make four of Block C2. Refer to quilt photo and diagram below to sew one Fabric G Rectangle F to one Fabric H Rectangle G and one Fabric F Rectangle G as shown.

- Add one Fabric B Rectangle C next to one Rectangle F (Step 30) and one Fabric C Rectangle C next to Rectangle G (Step 30) on each side of this unit as shown.

- Follow Steps 32 through 34 to make four of Block D. Sew two Fabric B Square N’s to opposite corners of Fabric D Square D, right sides together, as shown by dotted line in diagram below.

- Trim off excess fabric and press out triangles to the corner as shown.

- Repeat Steps 32 and 33 on remaining corners with two Fabric C Square N’s as shown.

- Follow Steps 35 and 36 to make bigger blocks. Join A1, A2, B1, C1, and D blocks together, placing A1 center block as shown below.

Tip: Make certain corners of Block D are matched to neighboring blocks to make two larger units.
- Join A1, A2, B2, C2, and D blocks together, placing A1 center block as shown below.

Tip: Make certain corners of Block D are matched to neighboring blocks to make two larger units.
- Follow Steps 37 and 38 to make four sashing blocks. Sew Fabric Q Rectangle I and Fabric P Rectangle J and Fabric O Rectangle J as shown.

- Sew Fabric D Rectangle E to end of IJJ (Step 37) as shown.

- To make the borders, sew Fabric N Rectangle L to Fabric M Rectangle M and Fabric L Rectangle M as shown.

- Repeat Step 39 to make twelve units.
- Sew three LMM units (Steps 39, 40) to make four Fabric A Rectangle K’s as shown.

- Repeat Step 41 to make four units.
- Sew four Fabric A Triangle A’s to four Fabric D Triangle A’s as shown.

- Sew these corner AA units (Step 43) to each end of two of the border units as shown.

- To assemble the whole quilt top, refer to the quilt photo and diagrams and piece the above units together with Rectangle H as shown.

- Baste edges of quilt to prevent stretching edges of quilt top.
- Sew two lengths of backing together along selvage edges to create a two-panel wide backing.
- Layer backing, batting, and quilt top. Quilt or tie as desired.
- Create binding from assorted scraps left over from project (Step 17).
- Sew strips together into one long binding strip.
- Press strip in half lengthwise.
- Carefully trim backing and batting to be even with quilt top.
- Leaving an 8” (20.32cm) tail of binding, sew binding to top of quilt through all layers, matching all raw edges. Tip: Miter corners.
- Stop approximately 12” (30.48cm) from beginning of binding.
- Lay both loose sends of binding flat along quilt edge.
- Fold the two loose ends of binding back on themselves where they meet. Press to form a crease. Tip: Crease will be the stitching line.
- Sew two open ends of binding together, right sides together.
- Trim seam to 1⁄4” (.64cm). Press open.
- Finish sewing binding to quilt.
- Fold binding to back of quilt and press.
- Blind stitch binding in place.
- Press completed quilt.
Read NextStrip-Pieced Diagonal Beginner Quilt