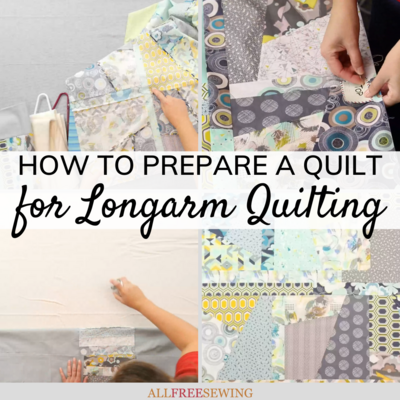
Preparing a Quilt for Longarm Quilting (Video Tutorial)
If you're planning on sending a quilt to be quilted or wanting to finish it up by yourself, these quilting prep tips will help!

Wondering how to prepare a quilt for quilting? This video, written, and step-out photo tutorial will show you the steps for Preparing a Quilt for Longarm Quilting/Home Quilting.
When it comes to sewing quilts there are a lot of different preparation steps that need to happen that can get confusing at times. Thankfully, this video is super helpful in showing you how to prepare a quilt for quilting.
This how-to video is particularly useful and helpful because it shows you the proper steps to take if you are going to quilt it yourself, or if you are going to take it somewhere to get quilted.
This is a great technique to know for any DIY quilt you choose to make! And if you're not a visual learner, we have the stepped out written instructions below, too.
Get the latest free sewing patterns and tutorials by signing up for our Sewing It Up newsletter!
Quilt Prep Video Tutorial:
If you are a visual learner, you will love this part! Click the play button to watch the video right below. Then scroll for the materials and the full written tutorial.
Preparing a Quilt for Longarm Quilting:
Project Type: Learn a technique
Skill Level: Beginner
Time to Complete: Under an Hour
Sewn By: N/A / Machine
Materials List:
- Finished quilt top
- Finished quilt back
- Batting
- Coat Hanger
- Basting spray/alternative basting supplies (learn more about basting here)
- Ironing board
- Iron
- Labeled paper (optional)
- pins (optional)
Preparing a Quilt Instructions:
Steps 1–4 are the steps for both home quilting and when using longarm quilting services. However, Steps 5–6 are only for those who are sending their quilt to be finished. Steps 7–13 are for home quilting.
- Open the quilt top on a large table and/or ironing board with seams facing up.

- Check the entire quilt top to make sure all the seams are flat.
- Iron out any significant creases in the quilt. It doesn't need to be perfect but should be as flat as possible.
Note: Make sure you are not adjusting the seams as you press.

- Repeat the pressing process with the quilt back. You are ready to quilt at home and can skip to Step 7. If sending it out, follow the next steps, 5 and 6.

How to Finish Prepping for Longarm Quilting:
- If the quilt is directional, mark the top and bottom of both the top quilt and backing by labeling and pinning a piece of paper to the appropriate places.

- Fold both top and back as little as possible and put on one or multiple hangers as needed.
Your homemade quilt is ready to be taken to the longarm quilter. Many longarm quilters supply it but if you need to supply batting, bring that along.

How to Finish Prepping for Home Quilting:
- Lay out the batting on a large table or clean floor. Smooth it out as much as possible.
Tip: If the batting is very wrinkled, pop it in the dryer with a damp washcloth for 10-15 minutes to remove the wrinkles.

- Lay the quilt back over the batting and smooth out the backing (and batting) as much as possible.

- Lift the quilt back up about halfway and spray the batting with basting spray.
Notes: It is easier to do this in sections. This tutorial uses basting spray because it is easiest. However, you can pin or thread baste if desired.

- Place the backing back on top of the sprayed section and smooth it out. Smooth out any wrinkles so it doesn't appear in the finished quilt.
- Slowly pull the remaining backing down again until you feel it tug and repeat the process for the other end.

- Flip the quilt over. Repeat the basting process with the front of the quilt.
Note: If there is anything you want to align with the front and back of your quilt, mark it with pins.

- Make any additional adjustments. You are ready to quilt.

Want More?
Easy Quilt Patterns for Beginners >>>
Do you finish your own quilts or send them out to be finished?
Let us know!
Read NextBirds In The Air Quilt Block