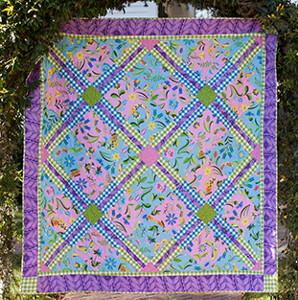
Sweet Lady Jane Quilt
Light-hearted and achingly optimistic, Sweet Lady Jane is a refreshingly romantic bouquet of feminine floral patterns in lively pastel colors. Jane applies a delicate hand to her characteristic graphic style, including delicious jewel toned patterns that will play beautifully in a crisp and clean modern quilt.

Materials
- FreeSpirit Sweet Lady Jane by Jane Sassaman fabric:
l-l /3 yard (121.6) Party Frock PWJS055 Periwinkle
l-l/4 (114.3cm) yard Party Frock PWJS055 Teal
l yard (91.4cm) Garden Gingham PWJS054 Green
l/2 yard (45.7cm) Garden Gingham PWJS054 Teal
l/4 yard (22.8cm) Circle Dance PWJS050 Green
l/4 yard (22.8cm) Circle Dance PWJS050 Rose
l-2/3 yard (151.8cm) Brocade PWJS053
- Coordinating Coats & Clark Dual Duty XP® all-purpose thread
Instructions
Note: All seam allowances are a ¼”(.64cm), unless otherwise noted.
- Cut four 8-1/2” (21.6cm) selvedge to selvedge strips of your pink Party Frock fabric. Cut these strips into 8-1/2” (21.6cm) squares. You will get four squares per strip, sixteen total.
- Cut two 8-1/2” (21.6cm) selvedge to selvedge strips of your blue Party Frock fabric, as before, and two 9” (22.9cm) strips. Cut the 8-1/2” (21.6cm) strips into 8-1/2” (21.6cm) squares. Cut the 9” (22.9cm) strips into sixteen 8” half square triangles. Remember to add 1/4” (.64cm) seam allowance to all sides of your template.

- Cut four 4-1/2” (11.4cm) squares of green Circle Dance and one 4-1/2” (11.4cm) square of pink Circle Dance. Cut four 4” (10.16cm) half square triangles and four 4” (10.16cm) quarter square triangles of pink Circle Dance. Just as before, be sure to add the extra quarter inch on each side of your template.
- Cut eight 2” (5.08cm) selvedge to selvedge strips of your green Garden Gingham fabric and repeat this with your blue Garden Gingham. Next cut eight 1-1/2” (3.8cm) strips of the purple Brocade. All of these will make the sashing strips between the pink and blue flowered squares.
- Assemble the sashing strips by sewing these strips together in two color combinations, both with purple brocade in the middle: green, purple, green and blue, purple, blue.

- Sew four sets of each. Press the seams toward the purple on the green set and toward the blue on the other set. This way they will nest nicely when pieced together.
- Cut these strips into 8-l/2” (21.6cm) lengths. You will need 16 units of each colorway.
- Next cut six l-l/2” (3.8cm) strips of green Garden Gingham for the skinny sashing around the body of the quilt. Cut four 4-l/2” (11.4cm) green gingham squares.
- Fussy cut eight identical 4-l/2” (11.4cm) selvedge to selvedge strips of purple Brocade for the borders. You will have about l/4” (.64cm) extra between each cut. Piece two strips end to end so the motifs match in the middle and radiate in opposite directions. These four strips will be very long. You will trim them later.

Assembling the Quilt Top
- Beginning at the upper left corner of the quilt body, sew diagonal rows together, as shown. Use your photograph for a guide. Press the seams toward the blue fabrics in each row. When all the rows are stitched, begin at the upper left corners, again, and sew each row to its neighbor. Press all these seams open.

- Piece the l-l/2” (3.8cm) green gingham strips end to end. Cut two 58” (147.3cm) lengths and two 60” (152.4cm) lengths. Sew the short strips to opposite sides of your quilt. You will have a little excess fabric to trim off. Press the seams toward the gingham strips. Sew the longer two strips to the other two sides, trim and press as before.

- Cut your four purple Brocade border strips into 60” (152.4cm) length...30” (7.62cm) either side of the center seam. On two opposite sides, line up the center of your quilt with the center of your border strip. pin place and attach them. You may have a bit of extra to trim away at both ends. Press seams toward the purple. Add a green gingham block to opposite ends of your remaining two purple strips, being sure they nest nicely in the corners. Again, you may have to trim the purple fabric a bit to make a snug fit in the corners and press the seam toward the purple.

- Baste and quilt, as desired. Use your extra purple brocade as binding.
Read NextCoffee Table Quilt