How to Letter With Your Free Motion Couching Foot

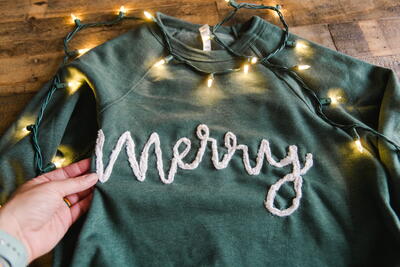
"OKKKAYYYYYYY! So the sky REALLY is the limit with this Janome free motion couching foot because LOOOOOOKKKK…..you can draw and write anything and everything you want with this foot - like this festive “MERRY” holiday sweatshirt that I made for our Christmas parties and general festivities this season! :) Honestly, if you have one of these foots, it’s *SO* stinking easy and I want to give you all of my tips and tricks (and a few “fails”) that I learned as I tested this out! :)"

Materials List
- Your Janome free motion couching foot
- Your fave Janome sewing machine of coursseeeeee (My absolute fave is the Janome 9450!!! :)
- Some of your fave acrylic yarn (I haven’t figured out how to use wool yet, wool will “felt” or get smaller and fuse together if washed or put in hot water…..so avoid will or fusible fibers when doing this technique on a garment that will be washed over and over)
- Coordinating thread to your yarn color
- Your garment of choice
- an erasable fabric marker or some sharpened chalk
- A piece of fusible interfacing (light to medium weight) - this is optional to give your garment more stability or “grab” when stitching
INSTRUCTIONS
-
Make sure your garment is washed and dried (especially if it’s a new garment….you want to get all of the “shrink” out before stitching”).
After you have washed and dried your garment, you can choose to iron on a piece of fusable interfacing to the wrong side (or inside) to give your fabric more stability - this is totally optional….I chose to do this with my sweatshirt so that my knit had more “grab” to it when stitching.
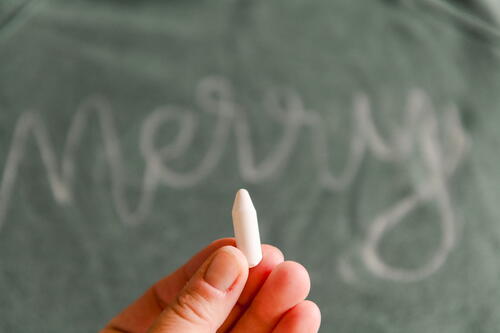
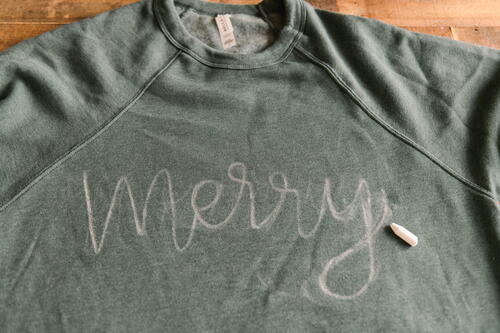
Then you will prep your lettering by drawing your lettering on with some chalk or an erasable fabric marker! -
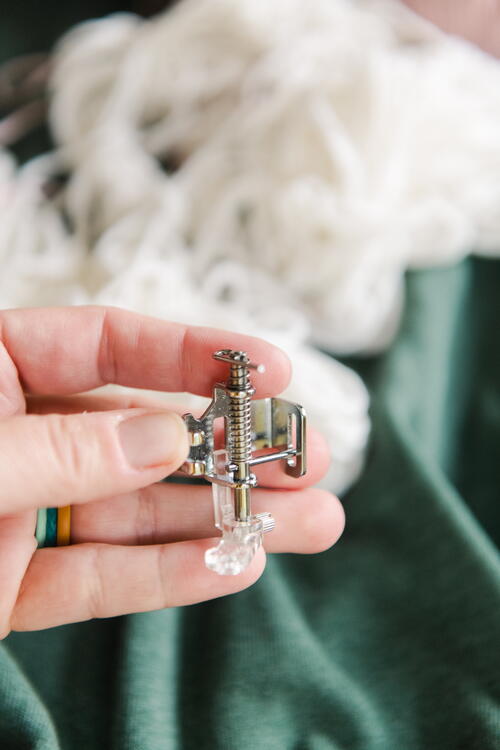
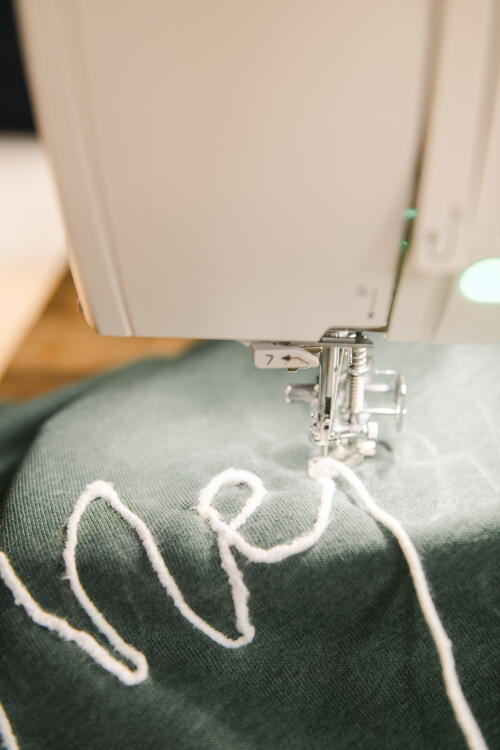
Prep your machine by removing the screw holding the regular foot and foot holder in place and attach the free motion couching foot - make sure that you have already attached the plastic #1 or #2 to the couching foot holder depending on the weight of your yarn.
Lower the feed dogs - you can consult your manual or google your exact Janome machine to get the manual. Thhas a bar on the right side of the machine by the on/off button that lowers and raises the feed dogs.
Turn your machine on :) -
Set your stitch to zig zag stitch (you may notice with your machine….it does with mine……that the “kind” of foot holder is already recognized since you’ve already installed it, so only a few options for stitching are available with the feed dogs lowered. Either way, choose your zig zag stitch on your machine.
TIP: Make sure that your zig zag stitch isn’t set to any wider than 1.5mm (this is in the display screen or by lowering/raising the numbers) :)
Run your yarn into the small hole of the couching foot to get started.
TIP: I choose to run my yarn through the back of the couching foot (kinda through the opening on the foot holder itself) to keep from getting tangled. This isn’t necessary, just a tip! :)
Give your couching a test on a test scrap of fabric to be sure it’s ready to go! :) -
Now it’s time to get stitching!!!!!
This is the fun part! Just give it a go and pay attention as you go so that you can see your design come to life! :)
-
Here are some tips that I find helpful when lettering on a garment!
*Remove any part of your machine that is necessary to fit just the front of the sweatshirt or garment under the needle (I removed the part of my machine under the arm so that it was skinnier to get the neck of my sweatshirt to fit)
*To begin, I just anchored my stitch with a anchor stitch a few times before I got going wth the zig zag (my machine has a button to push for this)! :)
*The pace of your stitching is KEYYYY! Meaning, how fast or slow that you move your fabric through the machine…..if you go to fast, the zig zag stitch won’t attach very well to the yarn and it seems to pull away more. If you go too slow, then the yarn seems to pile up and get jammed in the machine. Although I did find that if I error on the side of slower, that works better. But practice this to get your own rhythm! :)
*Do one pass first of the lettering first (this will look sooooo strange but trust the process) and then do 2-3 more passes to thicken up the letters and work out any errors that you had while stitching the first time through
*Be sure your yarn has slack to move - if it gets stuck or snagged, the zig zag stitch won’t be able to “pick up” the yarn because it will be too taught. I decided to loop my yarn over the back of my machine (or tucked “behind” the little bobbins holder for winding bobbins on top of the machine). Just be sure it can easily be pulled from the skein when stitching.
*If you feel like you are having trouble moving the garment, just go slow and use your hands on either side of the needle to give more stability to the fabric so that the stitching can move smoothly.
*When you are all done stitching with the yarn, I went over the lettering one last time WITHOUT the yarn in the couching foot and just did one final zig zag pass to stitch everything back down nice and securely! This gave a nice finish! :)
TAAA DAAAAA! :) -
Your project is finished! If you love this tutorial, be sure to check out Janome.com for even more inspiration.


Read NextKnow Your Skirts Guide [Infographic]


![Know Your Skirts Guide [Infographic]](http://irepo.primecp.com/2021/10/509029/Know-Your-Skirts-Infographic-square21-nw_Large400_ID-4536247.png?v=4536247)