Adding a Corded Ruffle
 Adding a Corded Ruffle to any existing or new project can be extremely aesthetically pleasing.
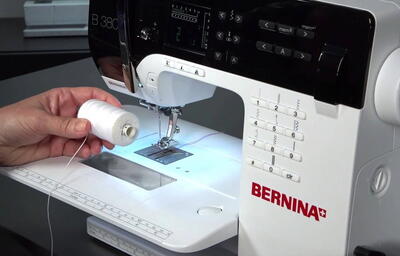
BERNINA shares this simple video tutorial on how to ruffle fabric with cording that will add strength and a lovely embellishment to any piece.
Watch and learn this simple sewing technique and try it out on scrap fabric, an existing piece around the house, or something entirely new.
From home decor to wearables, this sewing tip can be used in any corner of sewing.
1. To set your machine up to do a corded ruffle you will want to go left and use a zigzag stitch with a width to be 2 ½ and length of 2 ½.
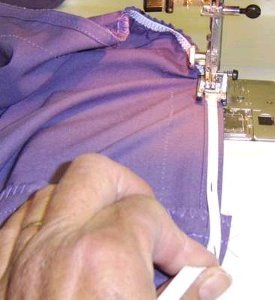
2. The foot that you will use to do a corded ruffle is a #6 foot for the BERNINA sewing machine. The #6 foot has a hole in the front of it that will allow you to guide the cording directly underneath the foot. You will also notice on the bottom of the foot that you have a nice tunnel there and that will easily ride over the zigszag stitching and the cording that you’re going to be inserting.
3. You can use a gimp cord, a pearl cotton type of a thread, or cord for these ruffles. The free hand system on the machine allows it to easily roll off the spool as you sewing. Insert the cord in the front of the foot until it comes out the back.
4. Place your fabric underneath the presser foot and tack it at the beginning. Simply sew right on top of the cording and you can see how easily it is guided right underneath the path of the needle. When you’re doing this you want to be sure not stitch over the cording.
5. When you have your cording stitched over, simply pull on the cording and it will draw up your ruffle.

Your Recently Viewed Projects

Thanks for your comment. Don't forget to share!
Weberme
May 05, 2017
I have never seen this technique done before. Wow this is a good way to make sure the gathering thread does not come out. It looks like it will make gathering the ruffles easier too. I have got to give this a try. The video makes this corded ruffle easy to understand and has some good tips too. I have got to give this a try. Thanks.
Marilyn B
Mar 17, 2017
Oh I had forgotten all about this corded technique! I had used it years ago, when I made a thicker felt skirt with gathers in it for my daughter. This really allows for a stronger method and it seems like you can control the gathering a bit easier if you are using heavier fabrics! Thanks for such great instructions...really appreciate these super tips!
Report Inappropriate Comment
Are you sure you would like to report this comment? It will be flagged for our moderators to take action.
Thank you for taking the time to improve the content on our site.