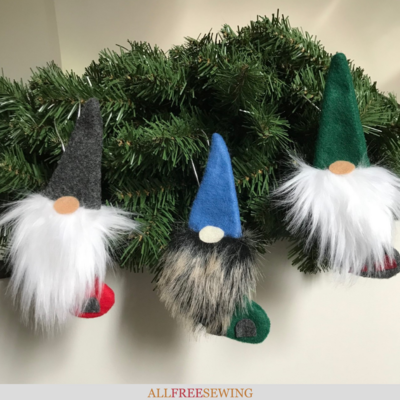
Mini Christmas Gnome Stocking Tutorial
Learn how to make Christmas gnomes in the form of mini stockings! These cute Scandinavian-inspired pieces can be used as stockings or ornaments.

The Christmas season will be here before we know it, so let’s begin creating holiday decor now! Stockings are a festive tradition that can be used for many years and personalized for the household.
When combined with a Scandinavian-style gnome design they are sure to delight your friends and family! Reminiscent of the folklore, you'll recognize these nordic gnomes as the nisse (Danish), tomte (Swedish), or tonttu (Finnish).
This Mini Christmas Gnome Stocking Tutorial covers the basics of making a miniature gnome stocking as well as tips for displaying and decorating with them.
Follow this step-by-step guide to create this charming hygge-style craft project. Not only will you learn how to make felt gnomes but they can be used in so many different ways throughout the holiday season.
As mini stockings hung up on the mantel, tree, or used as a garland or an advent calendar. They also make fun gift card or treat holders for loved ones. The options are endless, really. Plus, these little gnomes are easy to make.
Gnome Stocking Materials Needed
Craft felt sheets (2-3 sheets that are approximately letter-sized should work)
Other small pieces of felt (for the feet, etc.)
Faux fur fabric (small amount for the gnome’s beard)
Polyester fiberfill stuffing or similar (optional)
String or braided cord for the loop
Paper or card stock about 12” square or so
Pencil
Fabric or craft glue (optional)
Fabric scissors
Paper scissors
Measuring tape or ruler
Hand sewing needle
Thread in colors that match the fabrics
Sewing machine
Thimble (optional)
Skill Level: Easy
Project Type: Make a Project
Time to Complete: 2 hours
Sewn By: Both hand and machine


Mini Christmas Gnome Stocking Tutorial
1. First let’s start by designing our gnome stocking on paper! If you feel more comfortable free-styling this project that’s fine, though the proportions might be easier to figure out by making templates. This way might take a little longer initially but save time in the end.
We are creating five different shapes to use for this design:
- stocking shape (approx. 4” tall and 2 3/8” wide)
- hat (approx. 5” tall)
- beard (approx. 2 3/4” long and as wide as the hat)
- nose (approx. 3/4” wide)
- shoes (approx. 3/4” wide)
It helps to draw out the design with a pencil and then piece them together to check the proportions. Now is the time to make any changes to the overall design.

2. Cut out the paper shapes to create a template. If you plan to use this pattern a few times they can even be duplicated onto card-stock or thin cardboard for a more durable pattern.


3. Now it’s time to cut out the fabrics! Place the sheets of felt and the faux fur fabric on your work area.
Recycled bottle felt is usually double-sided so it doesn’t matter as much which way this faces, but the fur should be face-down for cutting (the long furs touching the table). Be sure to not cut across the fur strands when cutting this material.
Using the templates, cut out the five different shapes in fabric:
- stocking shape (2 pieces)
- hat (2)
- nose (1)
- beard (1)
- shoes (2)
The stocking and hat are made from two identical pieces sewn together, while the others are a single layer.


4. Once the fabrics are all cut out, set the pieces aside except for the stocking shape and the hat. The matching pieces should be placed together (right sides touching) and pinned.


5. Sew along the side edges of the stocking on the machine, with about 1/2 of the presser foot for the seam allowance.
Backstitch at the beginning and the end for security. The top edge should be left open and unsewn. If a sewing machine isn’t available or you’d prefer to hand-sew this step that works too (it just might take a bit longer).


6. Next, trim off a bit of the excess material around the sewn edges of the stocking shape. Don’t take off too much or the stitching will come loose. It should be just enough to reduce the bulk before turning it right side out.


7. Carefully turn the stocking shape right side out and trim off any excess threads. Press gently with an iron if needed.

8. Repeat steps 4–7 for the gnome’s hat shape. It can be slightly curvy as the Scandinavian-style mythical creatures have more floppy hats than other kinds of garden gnomes.
If you want the shape to hold in a particular way, bent wire can be inserted before the hat is attached. Polyester fiberfill can also be used for this purpose.


9. Now it’s time to connect the beard shape to the stocking. Using a matching thread color, hand-sew the top of the faux fur beard so it’s flush with the top of the stocking. The back of the stocking shape should remain open, so just stitch it onto the front portion.


10. Attaching the hat is next! Just like the beard, the hat should be sewn onto the front to keep the back pocket of the stocking open. Scandinavian gnomes have hats that sit low and cover their eyes.
The nose and beard will peek out from under the hat. Using a matching thread color will help blend in any small stitches that may show through on the front.


11. The nose can now be connected. This may be easier to glue on than to sew due to its small size and shape. It should go just along the beard right below the hat.


12. Attach the shoes towards the bottom of the stocking shape. Like the nose you may want to use fabric glue for this step.


13. Almost finished! Now the string loop can be added to the stocking. For this tutorial, it can be sewn onto the back of the stocking or the hat. This string is optional if you prefer to put the stocking up a different way.

14. Check for loose threads or pieces that might fall off. Trim if needed.

Putting Up Your DIY Gnome Stocking
Now your gnome stocking(s) can be placed on your mantel, Christmas tree, or anywhere you’d like in the home! If you don’t have a fireplace mantel (I don’t!), the string loop allows it to be displayed in many ways.
Removable sticky tabs and hooks made for walls will be an easy way to put it up, or if you have a nail already there that is perfect. Arrange a few gnome stockings together in a row for an even more festive look! They are perfect for holding small stocking stuffer gifts this Christmas season.

Be sure to never allow the stocking to come near open flame or hot lights. After the holiday season is over, store your stocking in a cool, dry place that is protected from dust.