This project was submitted by one of our readers, just like you.
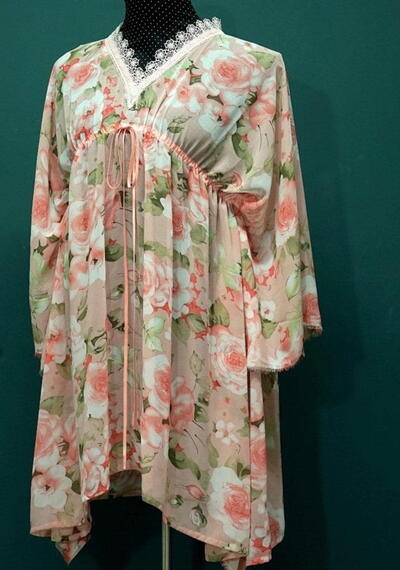
Beach Cover Up

"Here’s a stylish beach cover up that is so straight-forward to sew. Perfect project to experiment with sheer fabrics for the first time (but definitely can be made with the less intimidating cotton fabrics). Absolutely plus-size friendly and suitable for most sizes! This project can be finished in an afternoon. It consists of simple sewing methods. No pattern is needed for this beach cover up because it is just a large piece of rectangular fabric folded half, and sewn up using straight lines. Even the collar only require simple top-stitching skills."
Project TypeMake a Project
Time to CompleteIn an evening
Sewn byMachine

Materials List
- 2m of garment fabric (with selvedge to selvedge widths of at least 1.5m)
- Double fold bias binding tapes for the tie casing, the tie strap, and collar facing.
- (Optional) Some lace for collar details.
Instructions
-
Cut 2 m of sheer fabric that has an SSW of 1.5 m. Flip it over such that the wrong side is facing up.
-
Finish the two raw edges on both cut ends of the fabric with a double-fold or rolled hem.
-
On the wrong side of the fabric, draw vertical and horizontal centrelines. The horizontal centreline is the shoulder line of the garment. The top half will become the back of the garment, while the bottom half will become the front.
-
Draw 2 horizontal lines (red lines in the illustration below), each 32 cm away from and parallel to the shoulder line. These are your empire waistlines for the front and back of garment.
-
Make markings (red dots in the illustration below) on both the front and back empire waistlines, 45 cm away from and on both sides of the vertical centerline.
-
Make markings (red dots in the illustration below) on the bottom hemmed edge, each 5 cm away from the selvedge edges.
-
Still on the wrong side of the fabric, draw side seam lines (red lines in the illustration below) by connecting the 2 markings on the front empire waistline to the 2 markings on the bottom hemmed edge. Flip the fabric over and trace the side seam lines onto the right side of the fabric, because you will need these them visible on the right side for sewing later.
-
On the wrong side of the fabric, make markings (red dots in the illustration below) as follows: 2 dots on the shoulder line, 12 cm away from and on each side of the vertical centerline. 1 dot on the vertical centerline, 25 cm below the shoulder line.
-
Connect the Neckline Dots by drawing the following (red lines in the illustration below): A curved line to connect the 2 dots on the shoulder line. This is the back neckline. Straight lines to connect each of the 2 dots on the shoulder line to the dot on the vertical line. This is the front neckline.
-
Smooth out the 2 sharp joints on the neckline (red lines in the illustration below). You have just drawn a V-neckline.
-
On the wrong side of the fabric, sew (top-stitch) matching/coordinating bias binding tape (i.e. in its original out-of-packaging form, with both raw edges pre-folded to the centre) around the neckline. Repeat on the right side of the fabric with another strip of bias binding tape.
-
On the right side of the fabric only, sew lace around the neckline, over the bias tape. I sewed 2 runs of parallel stitches all around to hold the lace in place. This step is really optional but it hides all those flaws around the neckline AND makes the garment that much prettier. Two birds in a stone and all that.
-
Create a sturdy button hole on the front of the garment, centred just below the empire waistline. I did this by first fusing a small piece of intermediate interfacing on the wrong side of the garment, where the button hole should be, before sewing and cutting out the button hole. The button hole should be large enough for your choice of tie strap to feed through.
-
Cut two strips of bias binding tape (or cotton tape), about 89 cm long.
-
Finish both raw ends of the strips with double-fold hems or glue. Then, on the wrong side of the fabric, sew (top-stitch) one strip just below the front empire waistline, over the button hole. Sew very near the long edges of the bias tape in order to create a roomy tie casing. Both ends of the tape should fall about 0.5 mm short of the point where the side seam lines start (see illustration below).
-
Repeat for the other strip of bias tape along the back empire waistline. Remember, the top half of the fabric will be folded down to form the back of the garment, so in this unfolded state, the casing should be sewn ABOVE the back empire waistline.
-
Fold the fabric in half, into the wrong side, along the shoulder line.
-
Sew along the side seam lines
-
Cut out neck opening, very close to the bias tape around the neckline.
-
Fold one long strip of bias binding tape (from a fresh pack, about 2.7m long) into half (length-wise) and sewed it in place, concealing the raw edges, creating a long and narrow strap.
-
Insert the strap into the tie casings.
-
Complete!
Read Next74+ Free Printable Sewing Patterns


