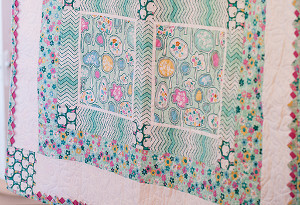
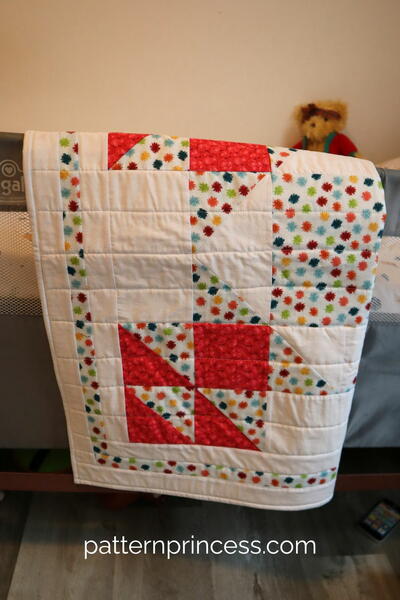
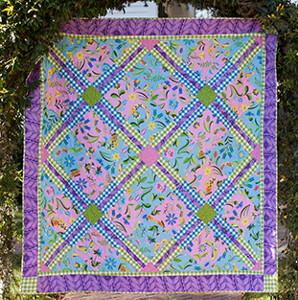
Forest Hill Quilt
 Forest Hill is a new collection reflecting a walk in the woods on a sunny summer day. With woodland scenes ripe with forest fruit and flowers, these prints mix elements of nature and abstract pattern. Terry's Forest Hill Quilt will bring the inspiration of the collection to life. There are many ways to make continuous prairie points. You can find free tutorials online. This ruler (1” Mini-Point Ruler) from www.QuickPointsRuler.com is quite helpful. Fabric requirements and cutting directions are based on the use of this ruler. If you choose a different method of making the continuous prairie points, please make certain that you have enough fabric and cut the strips to suit your method. Please read all the instructions thoroughly before you begin.
Materials
- 7/8 yard (80cm) FreeSpirit Forest Hill by Erin McMorris PWEM057.MINTX (Trees) for blocks
- 1 yard (91.5cm) FreeSpirit Forest Hill by Erin McMorris PWEM058.MINTX (Zig-zag) for sashing
- 2-1/4 yards (205.7cm) FreeSpirit Forest Hill by Erin McMorris PWEM059.MINTX (floral) for border, points & binding
- 3/8 yard (34.3cm) FreeSpirit Forest Hill by Erin McMorris PWEM060.MINTX (Apples) for cornerstones
- 2/3 yard (60.4cm) FreeSpirit Designer Essential Solids Fuschia (CSFSESS.FUCHS) for Prairie Points
- 1-5/8 yards (148.6cm) FreeSpirit Designer Essential Solids Artic White (CSFSESS.ARWHT) for Frames & Border
- 3-1/2 yards (320cm) FreeSpirit Forest Hill by Erin McMorris PWEM060.MINTX (Apples) for backing
- Coordinating Coats & Clark Dual Duty XP® all-purpose thread
Additional Requirements
Quick Points Ruler 1” Mini Point Ruler
Cutting
WOF = Width of Fabric
LOF = Length of Fabric (parallel to selvage edge)
Remove all selvages before cutting.
- Trees - Cut 2 strips 12½” (31.8cm) x WOF; from these, cut (6) 12½” (31.8cm) squares
- Small Floral - Cut 1 strip - 58” x WOF; from this, cut the following strips lengthwise:
Cut 4 strips - 4½” (11.4cm) x LOF for 1st border
Cut 4 strips 4” (10.2cm) x LOF for prairie points
Cut 6 strips - 2½” (6.35cm) x WOF for binding - Zig-Zag - Cut 2 strips 12½” (31.8cm) x WOF, centering darkest stripe; from these, cut 17 strips 3½” x 12½” (8.9 x 31.8cm) for sash
- Apples - Cut 1 strip 3½” (8.9cm) x WOF; cut into (12) 3½” (8.9cm) squares
Cut 1 strip 6½” (16.5cm) x WOF; cut into (4) 6½” (16.5cm) squares - White -Cut strips lengthwise (parallel to selvage)
Cut 4 strips 6½” (16.5cm) x LOF for 2nd border
Cut 6 strips 1¼” (3.18cm) x LOF for flat piping (block frames) - Dark Rose - Cut 5 strips 4” (10.2cm) x WOF for prairie points
Instructions
Note: All seam allowances are a ¼” (.64cm), unless otherwise noted.
Accurate 1/4” Seam
- Consistent seam allowances are very important to keep your finished quilt straight and square. This exercise will improve your results.

- Start with three 4” (10.2cm) long strips of fabric exactly 1½” (3.8cm) wide.
- Sew together as shown and press seams open. Finished “block” should measure exactly 3½” (8.9cm) wide;with individual strips measuring 1¼” (3.18cm), 1” (2.54cm) and 1¼” (3.18cm).
- Adjust your technique until you can get consistent results.
Framing the Blocks
- Press 1¼” (3.18cm) x WOF strips in half lengthwise, Wrong Sides Together. Cut into (24) 1¼” x 12½” (3.18 x 31.8cm) strips. Pin folded strips to sides of blocks with raw edges even. Stitch 1/8” (.318cm) from raw edges, through all layers. Add folded strips to top and bottom in the same manner. Press flat. Topstitch right next to the fold on all blocks.
- Blocks should still measure 12½” (31.8cm) square.
Assembling Rows
Referring to layout on page 4, arrange blocks into rows with sashing strips. Stitch into rows, pressing seams toward sashing. Arrange sashing rows with 3½” cornerstone squares. Stitch into rows, pressing seams toward sashing.
Assembling the Center
Pin and stitch rows together, matching seams and having raw edges even. Press seams away from sashing rows. Center should now measure 33½” x 48½”(85 x 123.2cm).

Tips for Borders
- It is very important that you measure properly, trim the borders to size and pin in place before stitching. This will keep the quilt square and flat as you go and avoid stretching, distorting or rippling in the border. When you sew the first border to the quilt, sew with quilt on top and border strip against the bed of the machine so that you can see and control the block seams.
- Measure from top to bottom through center of the quilt and both outside edges. Add these measurements together and divide by 3 to figure the average length for the side borders.
- In the same manner, measure from side to side through the center, top and bottom to find the average width.
Adding the First Border
- Referring to Border section above, measure length of quilt and trim 4½” side borders to size. Pin and stitch to quilt, pressing seams toward new border. In the same manner, measure width of quilt and trim 4½” top and bottom borders to size. Pin and stitch to quilt, pressing seams toward new border. Quilt should now measure 41½” x 56½” (105.4 x 143.5cm).
- Determine the average width and length of the quilt before adding cornerstone borders. Cut all border strips to size. Add side borders pressing seams toward borders. Add cornerstone blocks, one to each end of top and bottom borders. Press seams away from cornerstones. Pin top and bottom borders to quilt, matching cornerstone seams to side border seams, easing if necessary. Stitch and press toward border.

- Quilt should now measure 53½” x 68½”(135.9 x 174cm).

Assembling the Back
Cut backing fabric into 2 equal lengths, remove selvages and stitch together lengthwise, using a 1/2” (1.27cm) seam allowance. Press seam open to reduce bulk. The seam will run width-wise through the center of the quilt.
Quilting and Finishing
Layer, baste generously and quilt as desired. Trim away excess batting and backing, straightening sides and squaring corners of quilt as needed.
Prepare Binding
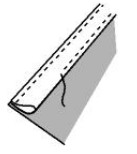
Sew binding strips together, end to end on the diagonal, as shown. Trim seam allowances to 1/4” (.64cm) and press open to reduce bulk. Press entire length of binding wrong sides together.
Making the Prairie Points
- Mark the center line and trace the ruler with a pencil, knowing that you will trim away the outside lines. The centerline will end up inside the binding. But you will need a nice finished end on the Prairie Point strips because they aren’t sewn into a seam line in this quilt. You will need to stitch and turn to have finished edges on the ends of the strip.
- Referring to the layout, measure the quilt sides from cornerstone to cornerstone. Measure the top and bottom of the quilt, also from cornerstone to cornerstone. These will be the final measurements for the length of your continuous prairie points. You will need to piece the pink fabric to obtain the necessary length. Sew three strips, end to end, having wrong sides together. Stitch and trim seam allowances to a scant 1/4”. Press seams open to reduce bulk.
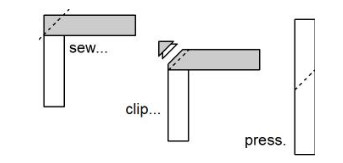
- Following the directions on the QuickPointsRuler, mark on the wrong side of the floral strips. Draw end lines at the proper length. Stitch points as directed, stitching both ends shut. Carefully trim seam allowance, trimming points as directed and clipping inside points. Cut the centerline as directed (leaving the last inch uncut at each end). Carefully turn strip right side out, gently poking points out as you press. Press strips in half lengthwise, with pink fabric to the inside.
- Pin prairie point strips to edges of quilt between cornerstones, easing quilt to fit as needed. Stitch points in place, using a longer stitch and a scant 1/8” seam allowance.
Finishing
- Pin and stitch raw edges of binding to quilt, with prairie point strips sandwiched between the quilt and binding. Miter corners as you go. Press binding only, away from quilt, leaving prairie points facing center of quilt. Bring binding around to the back of the quilt and hand stitch folded edge neatly in place, mitering corners as before.
- Hand stitch ends of prairie point strips to top of quilt.
- If desired, stitch in the ditch along the edge of the binding to keep prairie points from shifting.
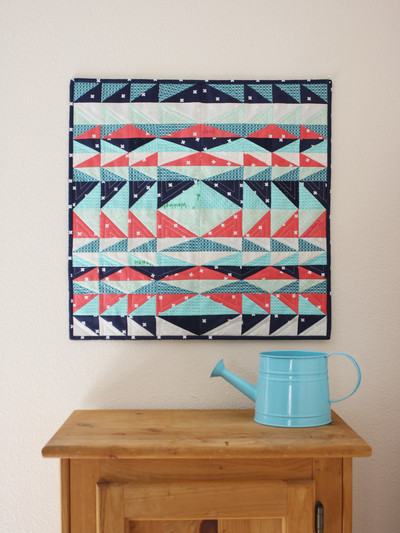
Read NextMesa Mini Quilt