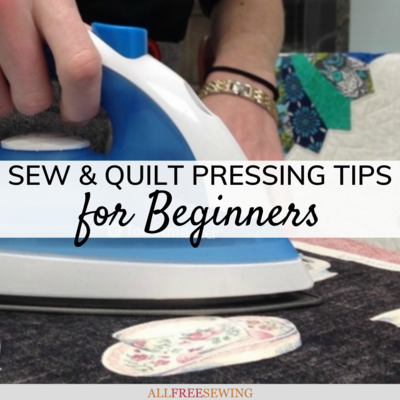
Sew and Quilt Pressing Tips for Beginners
Follow these ironing techniques and tips for pressing fabric and you won't have to worry about ruining your creations.

After you have learned how to wash your fabric before sewing, you need to learn how to press fabric. If you want to learn how to sew flawless projects then learning how to press your fabric is a big part of that.
Without properly prepared materials, projects that are otherwise sewn precisely can turn into a big mess. This page, Sew and Quilt Pressing Tips for Beginners, offers all the information you need.
There is a lot to keep in mind when preparing your fabric, but AllFreeSewing is here to ensure that you know everything you need to know before you get started. Give yourself a head start by using this free sewing tutorial to ensure that you give your fabric first-class treatment.
Happy fabric makes happy projects. Sewing for Beginners: How to Press Fabric will teach you the right skills to press your fabric like an expert. Don’t worry! It is actually pretty easy. Just take a look at the instructions, tips, and tricks below and you'll be set!
Sign Up For More Free Patterns >>>

Pressing Fabric Before Sewing: Why?
Pressing your fabric before you begin to sew is very important. Your fabric needs to be as flat and as smooth as possible when you sew. Sewing wrinkled or creased fabrics will lead to a continually wrinkled or creased project. You are sewing these flaws into your project and creases in particular can be very hard to remove from a project, especially if the crease is stitched into the final product. Pressing fabric before sewing ensures that these issues do not arise. You can press your pattern pieces, as well, to ensure that you do not cut pieces that are too small due to an unwanted fold or crease.
Why You Shouldn’t Iron Before Sewing
We all know how to iron and it might seem intuitive to iron your projects as this is how you remove wrinkles from your already sewn and worn pieces. This is not the case! Ironing your project can make minor changes to your fabric that, while fine on clothing, really can affect the fit and construction of a piece. This is especially true when you are learning how to sew wearables. Since ironing involves sliding the iron over fabric, it can stretch and hold fabric in place in a weird way. Pressing avoids this by smoothing our wrinkles in a much less invasive way. This is especially true of delicate and thinner fabrics.
Pressing vs Ironing
The difference between pressing and ironing is entirely in the motion. When you press, you lift the iron up and down. When you iron, you swipe the iron across your fabric in a back and forth or forward motion. The infographic below explains this perfectly.

How to Press Your Fabric
Before Pressing Fabric:
Since your fabric is likely brand new and is not cheap, you want to make sure it is okay to press your fabric before doing so! Run the following test before putting the hot iron on your whole stash.
- Test Your Iron for Heat: Find a corner of your fabric that you will not be using. Once you heat up your iron, test it on this piece by pressing it down on the “wrong side” or back of the fabric for several seconds. If it works just fine, you are ready to continue. If it leaves a mark, try turning off your iron and letting it cool, before doing this again with a cooler setting. If this doesn’t work, try another setting. If your iron continues to leave marks, you may need to skip pressing for this particular fabric or purchase a new iron!
- Test Steam Settings on Your Iron: Make sure you test the steam setting on your iron, as well. Many fabrics will benefit from this extra feature but some thinner fabrics might be warped by the pressing.

On to the Pressing!
- Lay your fabric down on your ironing board or on another flat surface with the wrong side of the fabric facing up.
If you are using a smaller piece just lay the whole thing out. If you are using a large piece, drape it over the edge and slide it over the edge or across your board as you press. If you do not have an ironing board, you can lay a towel out on your table instead!
- Once you have found the proper setting it is time to press your fabric.
You do not need to press every inch of the fabric. All you are doing right now is tackling the creases and wrinkles. Find where on the fabric that you need to press.
- Now take your iron and press down for several seconds on the crease or wrinkle.
This should flatten it out and if this does not work, simple press down again. Make sure you DO NOT press your fabric too long as it may burn. Additionally, make sure you are pressing and not ironing.
- Do this for the entirety of your fabric’s wrinkles and creases.
Once you have finished, immediately lay out your fabric to pin and cut it. Folding or storing your fabric after this may result in new creases.

Your Recently Viewed Projects
Thanks for your comment. Don't forget to share!
Report Inappropriate Comment
Are you sure you would like to report this comment? It will be flagged for our moderators to take action.
Thank you for taking the time to improve the content on our site.


![Know Your Skirts Guide [Infographic]](http://irepo.primecp.com/2021/10/509029/Know-Your-Skirts-Infographic-square21-nw_Large400_ID-4536247.png?v=4536247)