Lace Edged Fingerless Gloves
Learn how to make lace fingerless gloves using materials you already have!

Designed to be both pretty and warm, these Lace Edged Fingerless Gloves/Mittens are a trendy accessory you're going to want to make yourself. These fingerless mittens are perfect for the cooler months.
Here in England, our winters are mild, and although it sometimes feels cold, temperatures don’t often drop below freezing.
Even so, I still like to have something covering my hands. Fingerless mittens mean that most of my hand is warm, but I still have my fingers free. This is especially useful for when I need to use my phone outside!
If you live somewhere where the winters are colder, you could wear fingerless mittens over a pair of gloves.
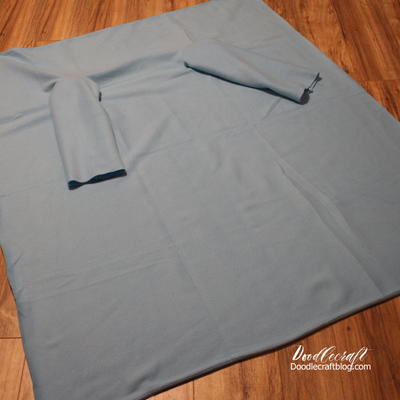
I used fleece to the fingerless mittens because it is both stretchy and warm. If you prefer to upcycle something and you don’t have fleece, you could use brushed cotton that has a stretch to it or an old thermal top.
A jumper/sweater you no longer use would work as well as long as it wouldn’t unravel when you cut it. This makes these DIY fingerless gloves an amazing upcycle and a thrifty project no matter what you use as the base fabric.
Fingerless Mittens Materials Needed:
Paper and pencil
Fleece fabric or something similar that has a stretch to it
Cotton lace trim
Embroidery thread and a needle
Usual sewing supplies

Making the Mitten Template
Making your own template means that your fingerless mittens will fit your hands perfectly!
If you are planning on wearing your fingerless mittens over a pair of gloves, then put the glove on your hand before drawing around it.
A quick warning: making things from your own pattern often involves some trial and error, so it’s a good idea to make a practice one first and adjust your pattern as necessary.
Put your hand down on a piece of paper. Printer paper will do if you don’t have pattern paper. Make sure that your wrist is straight.
The mittens will end at your knuckles, and extend to just beyond your wrist. So, draw from the knuckle of your first finger round up to the knuckle of your thumb, then from your thumb to just past your wrist.
On the other side of your hand, draw from the same point, ie the knuckle of your first finger to just past your wrist. Don’t worry if it isn’t perfect, you can sort it out in a minute.

Take your hand off the paper. Draw over the lines to even out the lumps and bumps.
Join the wrist points together, making sure that the line you draw is at right angles to the sides.
Now join the knuckle points together. Start at the first finger side of the hand and draw the line across, making sure that it is at right angles to the sides.

Draw round your template, adding an extra 0.5 cm or ⅛ inch, plus a 1 cm or ¼ inch seam allowance.
Cut out your template.

Cutting Out the Fingerless Mittens
You will need 8 mitten pieces, so fold your fabric in half and pin your template. Cut it out, then do the same again 3 more times.
You should have 4 pieces with the thumb on the right, and 4 pieces with the thumb on the left.
Sewing the Fingerless Mittens
Take a left hand piece and a right hand piece. With the right sides together, sew the side seams.

Do the same another 3 times. You should now have 4 fingerless mittens.
Take 2 mittens. With the right sides together, pin at the top where your fingers will be. Sew both pieces together.

Turn the mitten the correct way out. Fold the raw edges at the wrist inwards. Pin, then topstitch along the hem.

I left the raw edges of the thumbs as they were. Fleece doesn’t fray and it would have been fiddly!
Attaching the Cotton Lace Trim to the Fingerless Mittens
Cut enough of the trim to go around the finger and thumb holes of each mitten, plus 2 cm or 1/2-inch for the seam.
Take one of the pieces of trim for the fingers. Sew the side seam. Slip the trim over the end of the mitten and sew in place. I did this by hand.
Do the same with the thumb. This will definitely be easier to do by hand! Repeat with the other mitten.
Your fingerless mittens are ready to wear!

About the Author

Anna learnt to use a sewing machine at the age of 10 and hasn't looked back! She lives in rural Norfolk in the UK and can be found online at Tea and a Sewing Machine, where she shares her love of making things.
Want More?
Read NextCozy DIY Snuggie Tutorial