How to Make a Fabric Sewing Machine Cover
Make a simply classic DIY sewing machine cover with this full tutorial.

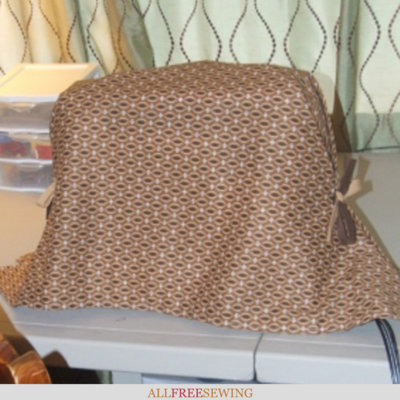
Protect your sewing machine in style with this simply classic sewing machine cover. This page, How to Make a Fabric Sewing Machine Cover, is a great tutorial that will teach you how to make your own sewing machine cover that will keep your machine clean and in good working order.
It is practical and functional, but also adds beauty to your sewing area.
If you're looking for easy sewing projects, this DIY machine cover is a great place to start. Make one for yourself or give it as a thoughtful gift to a fellow sewist. This handsewn protector is sure to keep the dust away and make sure your prized machine is safe.
If you need a cover for your sewing machine, this sewing tutorial is for you.
It is easy to take off and put back on, keeps the dust out, is pretty without being too cutesy, and can be coordinated with other decorative items in your sewing room.
In addition to making a sewing machine cover, you can also create a matching chair seat cover and roll pillow so that your sewing seat is comfortable and beautiful. You can see all three in the picture of the finished cover.
Sign Up For More Free Patterns
DIY Fabric Sewing Machine Cover
Project Type: Make a Project
Skill Level: Easy
Time to Complete: In an evening
Sewn By: Machine
Materials List:
- Fabric
- Sewing machine
- Pins
- Scissors
- Thread
- Bias Tape or Ribbon
- Tape Measure
How to Make a Fabric Sewing Machine Cover:
- Use your tape measure to measure the length and width of your machine, allowing enough for the fabric to drape. Measure from the tabletop on one side over the top of your machine to the tabletop on the opposite side.
Then measure the same way front to back. This does not need to be very accurate as you can adjust the size later, but remember, it's better to have too much than not enough. Also, be sure you allow additional room (at least 1 inch) for hemming.

- Lay out fabric and cut to the measurements you took.
- Turn raw edge of fabric under about 1/4" and then turn under again, 1/2" more or less, and stitch all the way around.

- Drape hemmed fabric over your machine and adjust to be sure it hangs evenly on all sides. This is where you will want to adjust if the fabric hangs too long. You can decide how long and how much drape you want your cover to have.
This example is made to hang to the tabletop from front to back and to drape a little onto the tabletop from side to side. To adjust to the size you want, you can either take up a wider hem or if it is quite a bit too large, cut down the fabric and re-stitch the hem.
- With the hemmed fabric draped over your machine, hanging evenly on all sides, using both hands, pinch fabric together, with each hand about 4"-5" apart, on one side of the machine where your ties will go to make two pleats. (Step 7 photo shows the pleats.) Put a straight pin to indicate where you want the ties sewn to each pleat.
Do the same on the other side of the machine. Make sure you place your ties so that they will be about the same height on both sides of your machine. (You don’t want the ties on one side noticeably higher than those on the other side.) Check again to be sure the cover will hang evenly all the way around the machine.
- Take coordinating color bias tape or ribbon and cut four pieces 6"-8" long. You decide how long you want your ties to be.
- Sew ties to outside of each pleat where you had them pinned.

- Place cover over your machine and make a bow with the ties on each side. This will fit the cover to your machine. Don't pull it too tight, a looser, draped look is what is intended.

Want More?
Sewing Room Organization: Your Complete Guide >>
What steps do you take to keep your sewing machine working well?
Read NextEasy-Sew DIY Ikea Curtains